Summary
This article provides a detailed guide on how to use Instagram grid generators to create eye-catching Instagram cover grid effects. We'll explore the steps for creating Instagram grids, compare popular tools, discuss creative applications, and share best practices. Whether you're an individual user or a brand manager, this guide will help you master Instagram grid layout techniques to enhance your social media presence.
Introduction
Instagram cover grid effects are becoming increasingly popular in social media marketing. Many Instagram influencers and brand accounts are cleverly utilizing these Instagram grid layouts to attract attention. For example, the official account of the renowned K-pop girl group aespa, @aespa_official, showcases an impressive Instagram grid effect. Through carefully designed grid layouts, they've successfully created a visually striking profile with high brand recognition.
This article will delve into how to use Instagram grid generator tools to create these attention-grabbing Instagram grid effects. We'll cover the basic concepts of Instagram grid creation, popular grid generator tools, detailed step-by-step instructions, and creative application methods. Whether you want to enhance the appeal of your personal Instagram account or create a unique social media image for your brand, this guide will provide practical Instagram grid layout tips and inspiration.
Let's explore how to use Instagram grid generators to create stunning Instagram cover grid effects!
What is an Instagram Cover Grid Effect?
Definition and Characteristics
The Instagram cover grid effect, also known as an Instagram puzzle or grid layout, is a unique visual presentation method that divides a single large image into nine equal square images, which are then posted in a specific order on an Instagram profile. When users visit your Instagram profile, these nine images combine to form a complete large image, creating an eye-catching cover effect.
Key features of this Instagram grid layout include:
-
Strong visual impact:
- The large image is divided into nine parts, creating a unique puzzle effect.
- Immediately attracts visitors' attention, making your profile stand out.
-
Large creative display space:
- Provides a huge "canvas" for showcasing large images or complex designs.
- Allows brands or individual creators to tell visual stories innovatively.
-
Enhances profile professionalism:
- A well-designed grid effect demonstrates the user's design skills and attention to detail.
- Gives an impression of thoughtful planning and curation.
-
Strengthens brand recognition:
- Can be used to showcase logos, product lines, or brand colors.
- Helps establish a consistent brand image and visual identity.
-
High flexibility:
- Can be updated regularly to keep the profile fresh.
- Suitable for various content types, such as product displays, artwork, photography, etc.
-
Encourages interaction:
- Unique visual effects can attract users to browse your entire Instagram feed.
- Can create interactive puzzles to encourage follower engagement.
-
Reflects planning and strategy:
- Requires advance planning and design, demonstrating professional account management.
- Can be used to preview upcoming content or events.
-
Mobile-friendly:
- Designed specifically for the Instagram mobile app, optimal for smartphone screens.
- Considers the fact that most users access Instagram via mobile devices.
The Instagram cover grid effect is not just a visual trick; it's a powerful marketing and brand-building tool. By cleverly using this Instagram grid layout, individual creators and brands can create memorable first impressions, effectively convey their messages, and stand out in the competitive social media landscape.
Successful Case Studies
Let's continue with the example of the aespa_official account mentioned in the introduction, analyzing their Instagram grid creation effect in depth. Here are some screenshots of their Instagram profile:
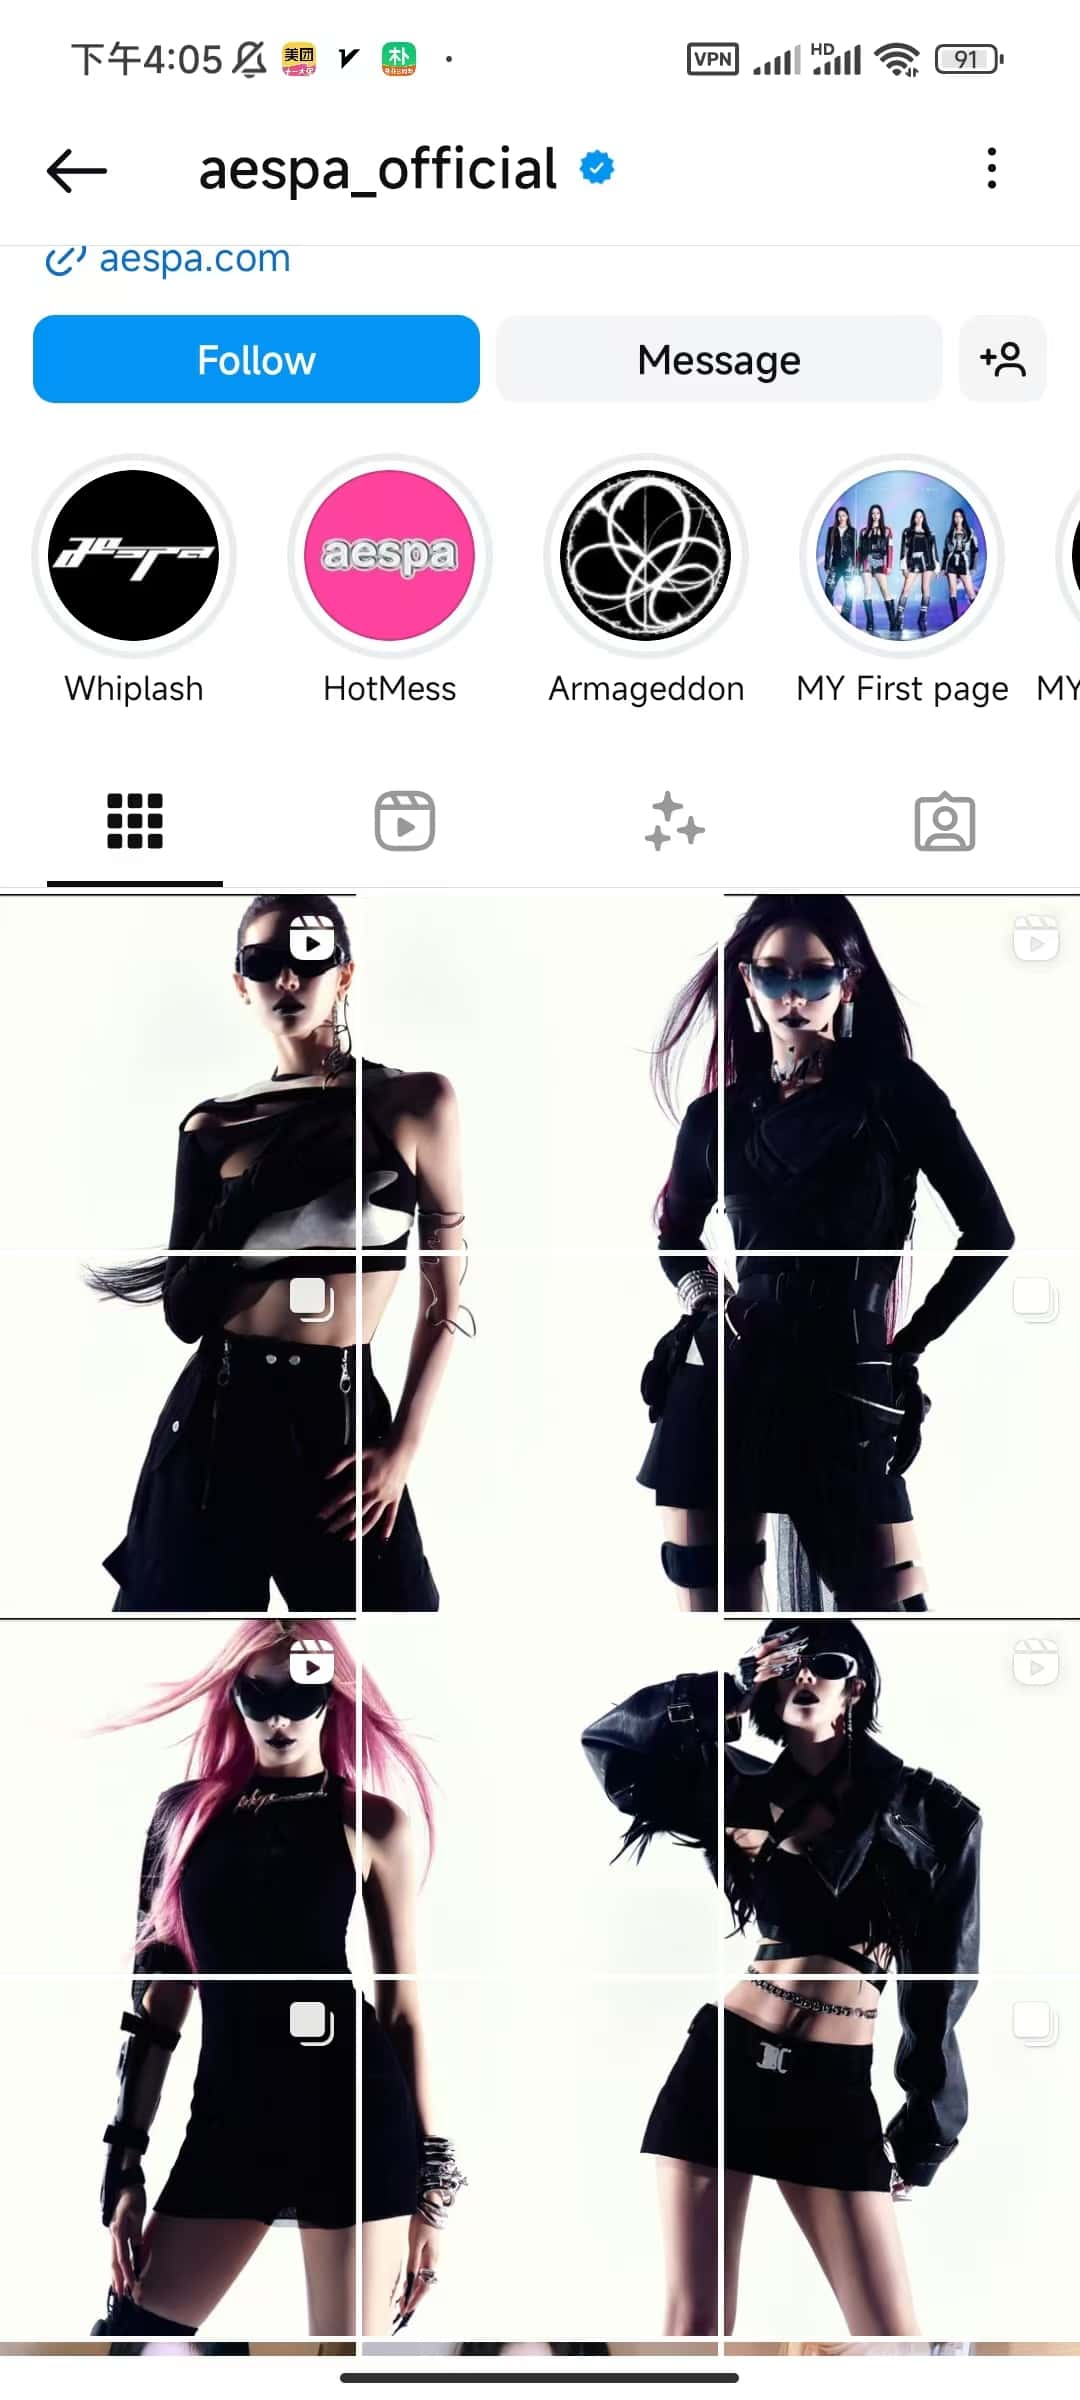
Analyzing the first image, we can see:
The aespa_official Instagram cover grid effect showcases an excellent case study. Their profile presents an impressive set of grid layouts:
- The overall layout contains four large images, each cleverly divided into a 3x3 grid.
- The image content shows four women wearing stylish black outfits and sunglasses, presenting a cool and avant-garde style.
- All images maintain a unified tone and aesthetic style, creating visual coherence and harmony.
The effects of this Instagram grid layout are significant:
- The strong visual impact immediately attracts viewers' attention.
- The unified style effectively reinforces the brand image.
- The creative division method showcases both the overall picture and individual details.
- The professional design leaves a deep impression, elevating the brand's tone.
This case perfectly demonstrates the potential of the Instagram cover grid effect, not only enhancing brand recognition but also increasing user engagement, making it an excellent example of using Instagram grid generators.
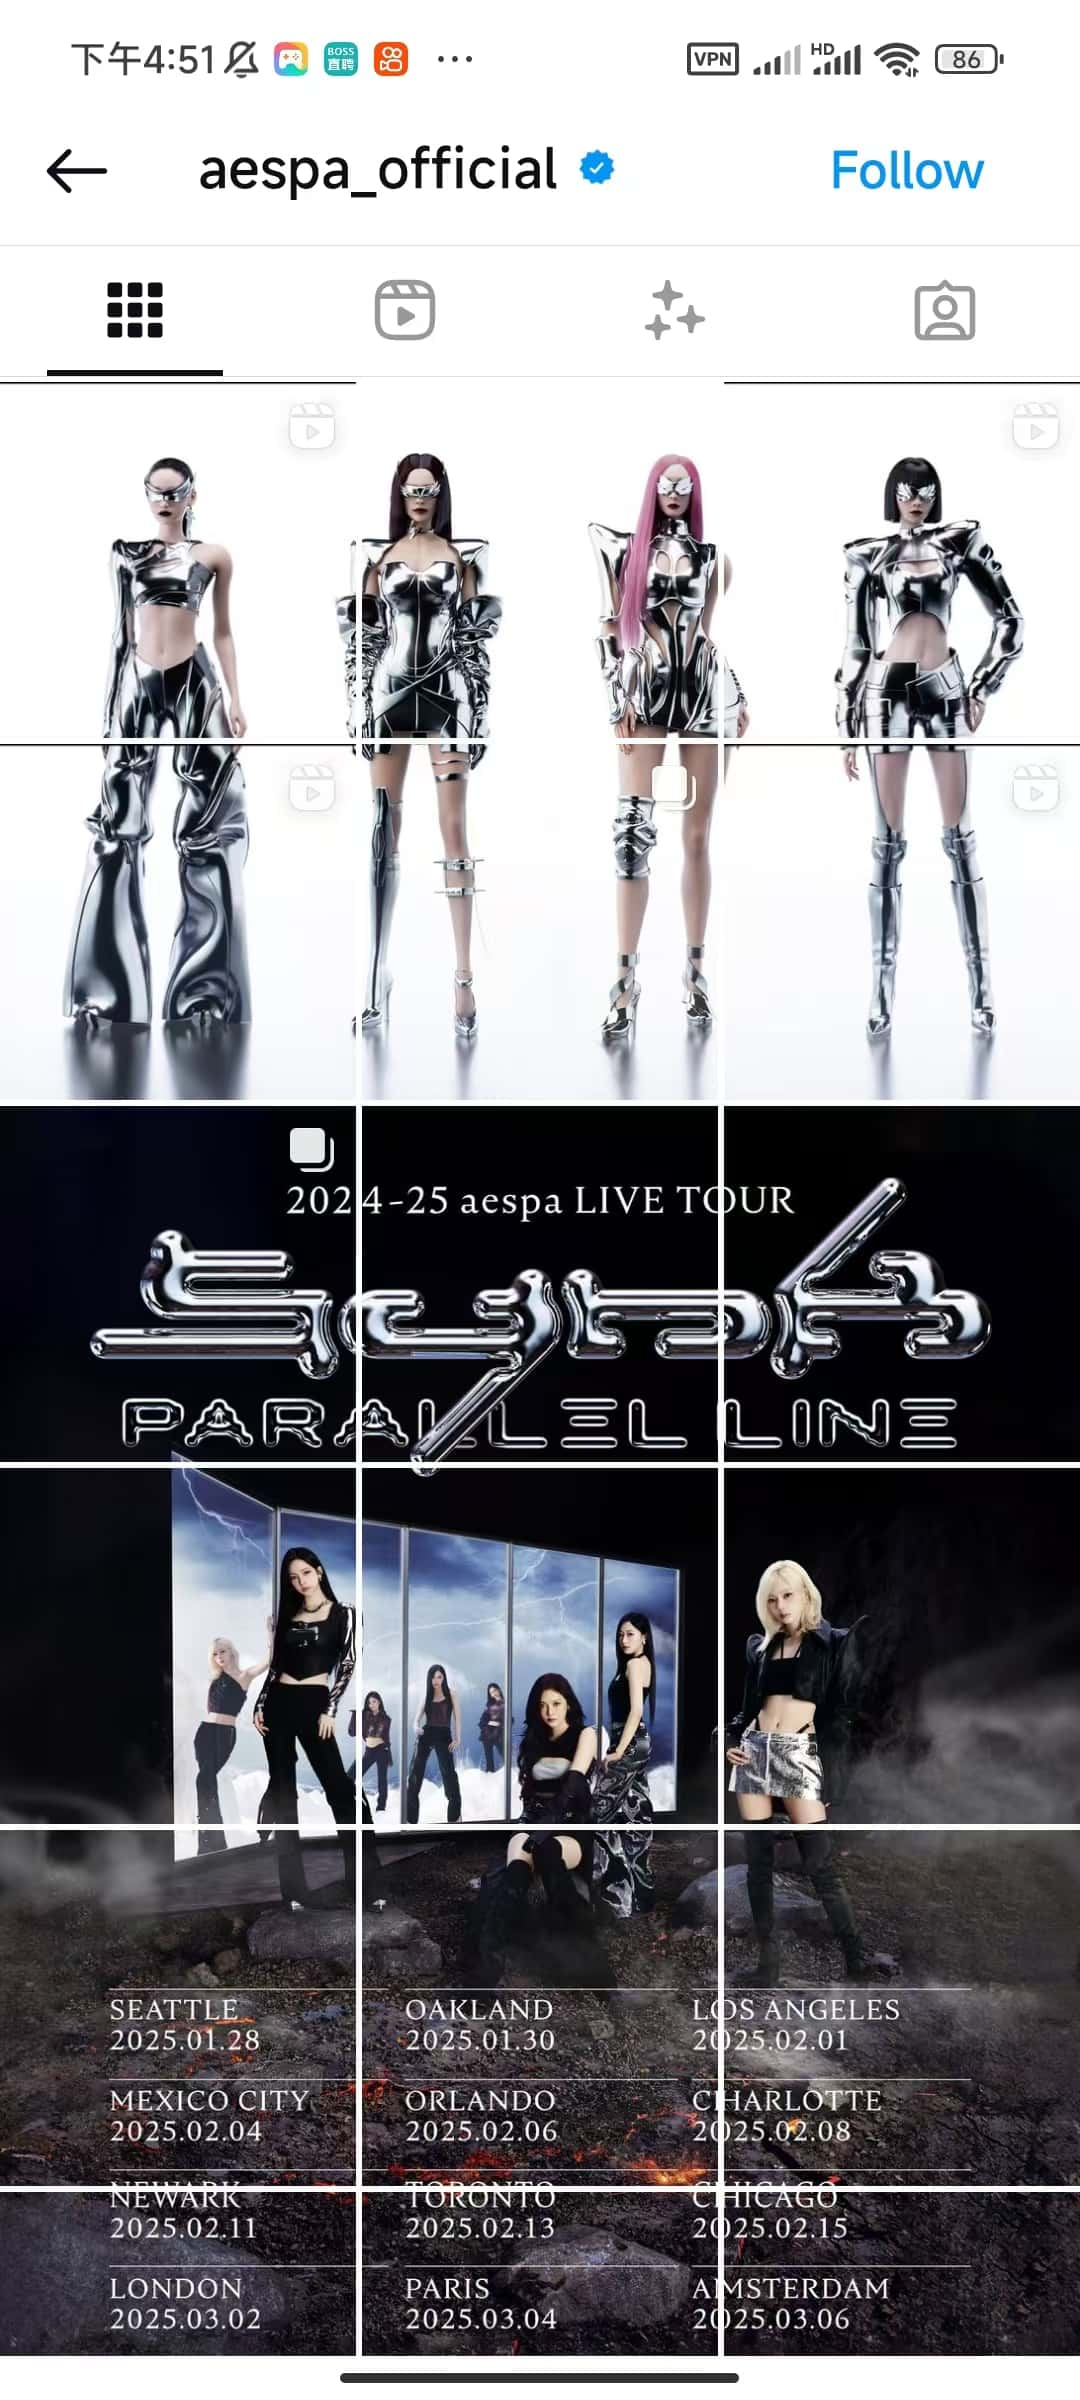
Looking at the second image:
Another impressive Instagram grid creation case from the aespa_official account demonstrates the versatility and creativity of grid layouts:
- The entire layout is cleverly divided into three main sections, each occupying three rows, forming a visually striking three-part layout.
- The top three rows showcase full-body shots of the four members wearing futuristic silver outfits, presenting a unified and unique visual effect.
- The middle three rows announce "2024-25 aespa LIVE TOUR PARALLEL LINE" with a black background and silver text design, highlighting the tour information.
- The bottom three rows display the tour poster and specific tour dates and locations, providing detailed performance information.
The effects of this Instagram grid layout are remarkable:
- Clear hierarchy, conveying information powerfully and clearly.
- Each of the top, middle, and bottom sections has its own focus, but the overall style is unified, demonstrating strong brand recognition.
- Cleverly utilizes Instagram's grid feature, perfectly combining promotional posters, tour information, and artist photos.
- Through carefully designed layouts, it maximizes the display of rich content in limited space.
This case fully demonstrates the creative application of Instagram grid layouts in music tour promotion, not only attracting fans' attention but also efficiently conveying key information, making it an excellent example of using Instagram grid generators for event promotion.
Introduction to Instagram Grid Generators
What are Instagram Grid Generators?
Instagram grid generators are online tools specifically designed to create Instagram grid layouts. These tools automatically divide a single large image into multiple small squares, allowing users to easily create eye-catching Instagram grid layouts. Here are the main features and functions of Instagram grid generators:
-
Image splitting:
- Automatically cuts a large image into 9 (or more) equal square images.
- Supports various splitting modes, such as 3x3, 3x1, 1x3, etc., to meet different creative needs.
-
Preview function:
- Real-time preview of the split effect, allowing users to see the final presentation on Instagram intuitively.
- Allows users to adjust and optimize the layout before uploading.
-
Ease of use:
- User-friendly interface, usually requiring only simple drag-and-drop operations to upload images.
- Provides intuitive setting options, such as grid size and spacing adjustments.
-
Export function:
- Exports split images in the correct order, making it easy for users to upload to Instagram in sequence.
- Usually supports various image formats, such as JPEG and PNG.
-
Additional features:
- Some advanced tools also provide filters, text addition, and simple image editing functions.
- May include a template library, offering ready-made creative layout solutions.
-
Cross-platform compatibility:
- Most are web-based tools that can be used on various devices, including computers, tablets, and smartphones.
-
Social media integration:
- Some tools offer direct posting to Instagram, simplifying the workflow.
Instagram grid generators greatly simplify the process of creating complex Instagram layouts, allowing individual users, brands, and businesses to easily create professional-looking Instagram grid effects. These tools not only save time and effort but also provide users with more creative possibilities, helping them visually attract more followers and enhance their social media presence.
Comparison of Common Instagram Grid Generator Tools
-
Postcron Image Splitter Website:
- Postcron Image Splitter Pros:
- User-friendly interface, easy to operate
- Supports multiple splitting modes
- Provides preview function Cons:
- May require registration to use all features
-
PineTools Split Image Website:
- PineTools Split Image Pros:
- Completely free, no registration required
- Supports various splitting methods and output formats Cons:
- Relatively simple interface, lacks advanced editing features
- Not specifically optimized for Instagram
-
ImageOnline Split Image Website:
- ImageOnline Split Image Pros:
- Simple and intuitive operation
- Supports multiple splitting methods Cons:
- Relatively basic functionality
- Lacks Instagram-specific optimization
-
My Social Boutique Instagram Grid Maker Website:
- Instagram Grid Maker Pros:
- Designed specifically for Instagram
- Offers various creative templates
- Includes basic editing functions Cons:
- Some advanced features may require payment
-
ImagesTool Split Images Website:
- ImagesTool Split Images Pros:
- Offers multiple splitting options
- Clear interface, easy to use Cons:
- May contain advertisements
- Lacks advanced editing features
-
ImageSplitter.vip Instagram Splitter Website:
- ImageSplitter.vip Instagram Splitter Pros:
- Specifically optimized for Instagram
- Provides real-time preview
- Supports multiple splitting modes
- Completely free, no registration required Cons:
- May lack some advanced editing features
Each Instagram grid generator tool has its unique advantages and limitations. Users can choose the most suitable tool based on their specific needs and preferences. For most Instagram users, tools specifically optimized for Instagram (such as My Social Boutique and ImageSplitter.vip) may be more convenient and practical.
Steps to Use Instagram Grid Generators
Next, we'll demonstrate how to create an Instagram grid effect using the Instagram Splitter tool from ImageSplitter.vip.
-
Choose a suitable image We'll use a new image for this operation, selecting an attractive portrait photo.
-
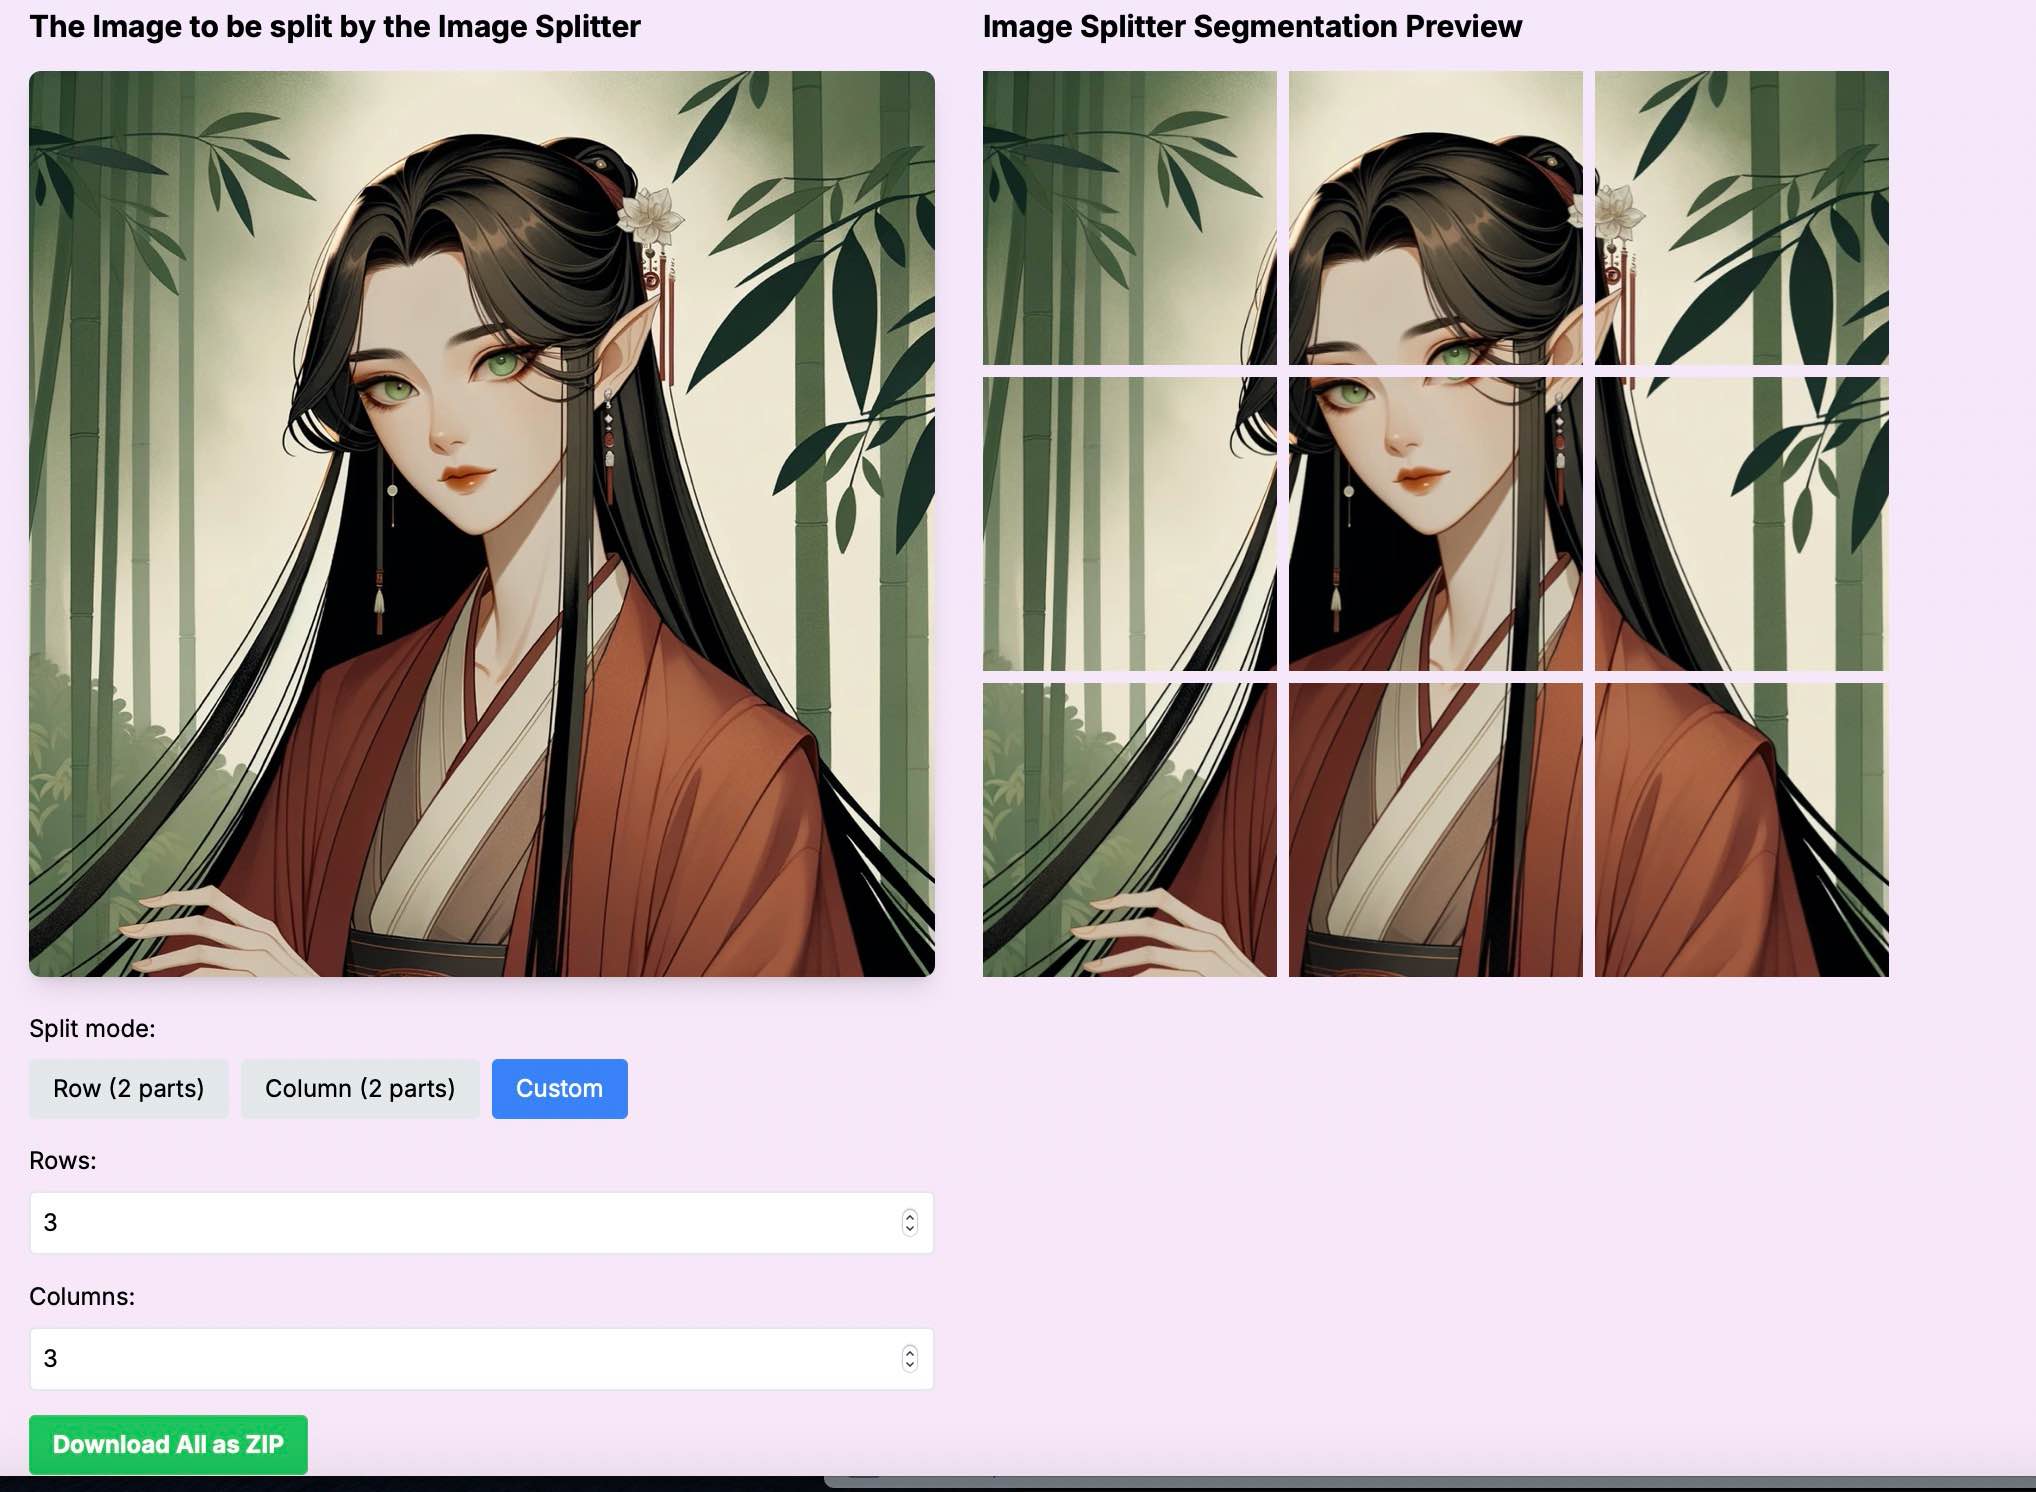
Upload the image to the grid generator As shown in the image below, click upload or drag the image to the upload area on the left. The original image is displayed on the left, and the preview area on the right shows the final visual effect after grid splitting.
-
Set splitting parameters While uploading the image, we've already adjusted the splitting parameters. Set the splitting mode to custom mode and set both rows and columns to 3, creating a 3x3 grid effect. Note that Instagram cover grid effects are typically displayed in three rows, so you can choose ratios like 3x1, 3x2, 3x3, 3x4, 3x5, etc., as needed. This ensures you create a true Instagram cover grid effect.
-
Preview and adjust As shown in the image above, the advantage of ImageSplitter.vip's Instagram Splitter tool is its real-time preview function. Once you upload an image and adjust the splitting ratio, the preview effect updates automatically. You can adjust the row and column values based on the content of your uploaded image to find the most suitable effect.
-
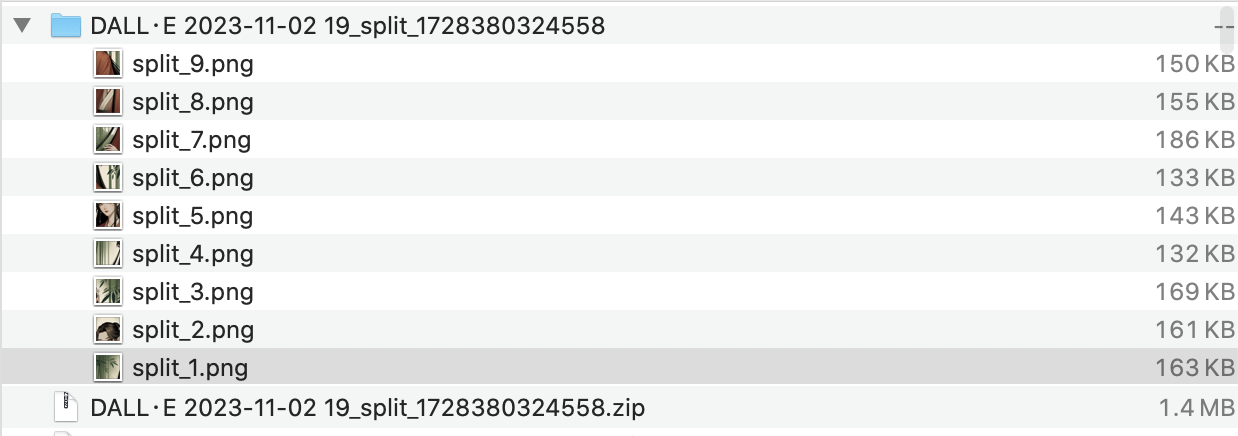
Download the split images After confirming that you're satisfied with the preview effect, click the "Download All as ZIP" button to download all grid images in one click. As shown in the image:
Posting Grid Effects on Instagram
-
Prepare posting materials We'll use the Instagram web version to post the grid effect. In the previous steps, we've obtained 9 split images, with file names clearly indicating the order, such as split_1.png to split_9.png.
-
Upload images in the correct order In the Instagram web version, click "Create New Post". As shown in the image below, we first select split_9.png. Note that the upload order must be in reverse, starting from the image with the highest number.
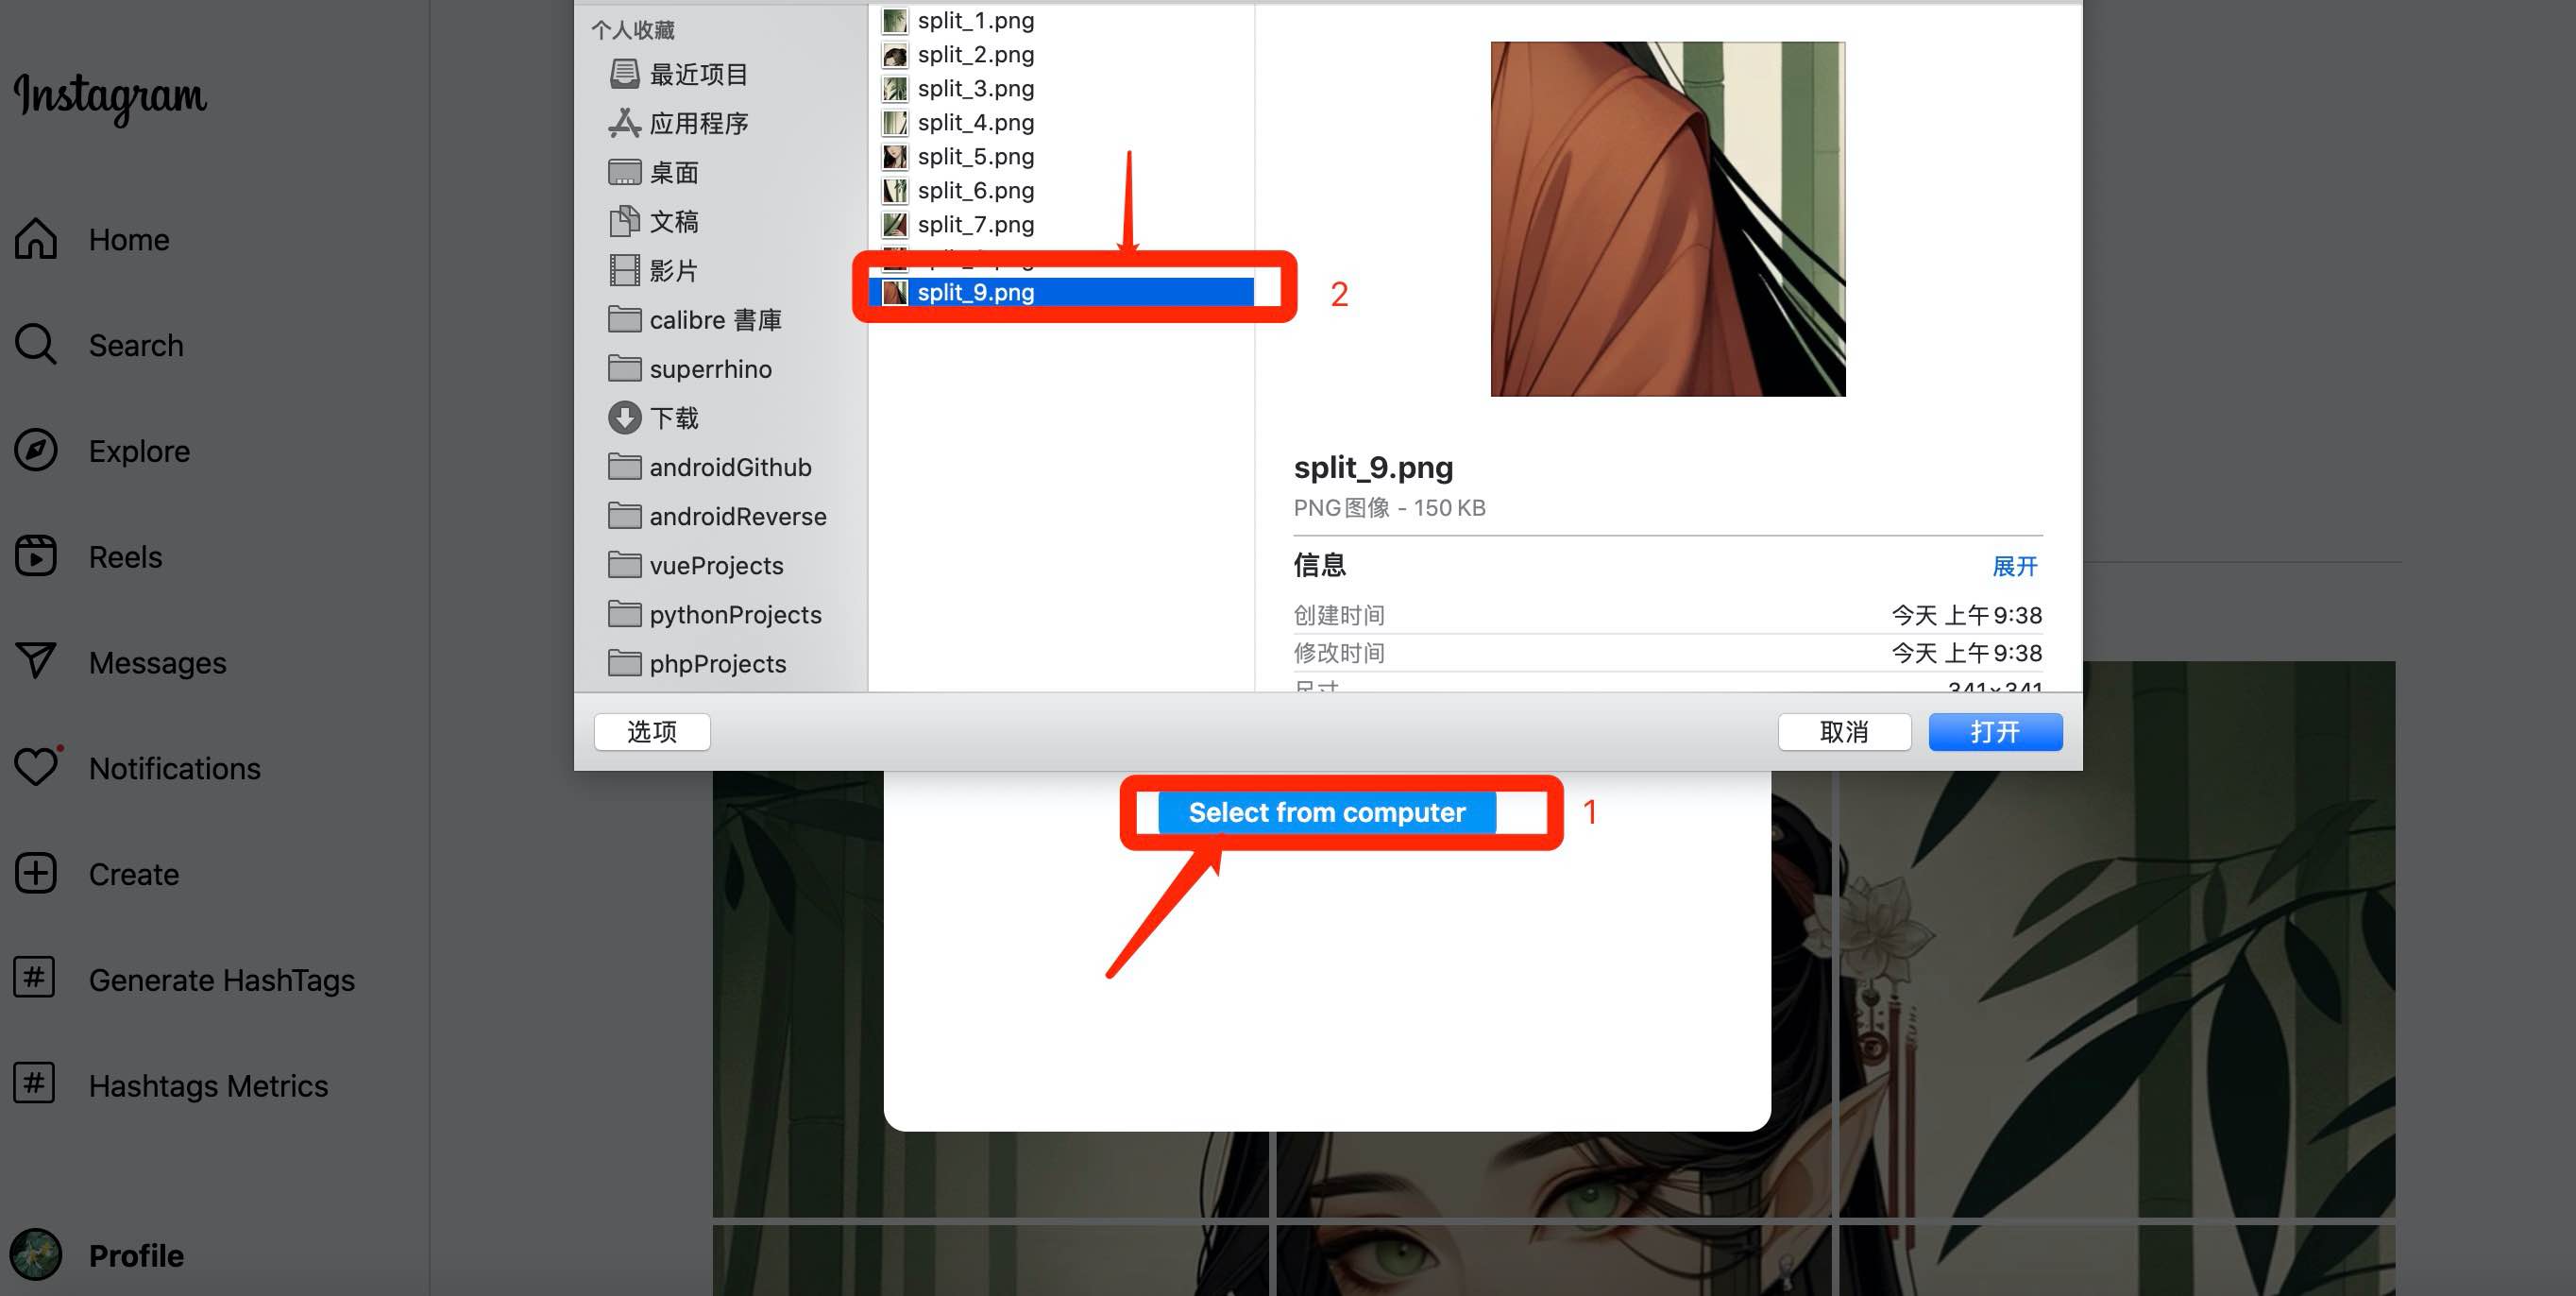 Then upload split_8.png, split_7.png, split_6.png, split_5.png, ... until split_1.png in sequence.
 -
Add captions and tags To demonstrate the cover effect, we won't add text or tags this time. Here's the final Instagram cover grid effect:
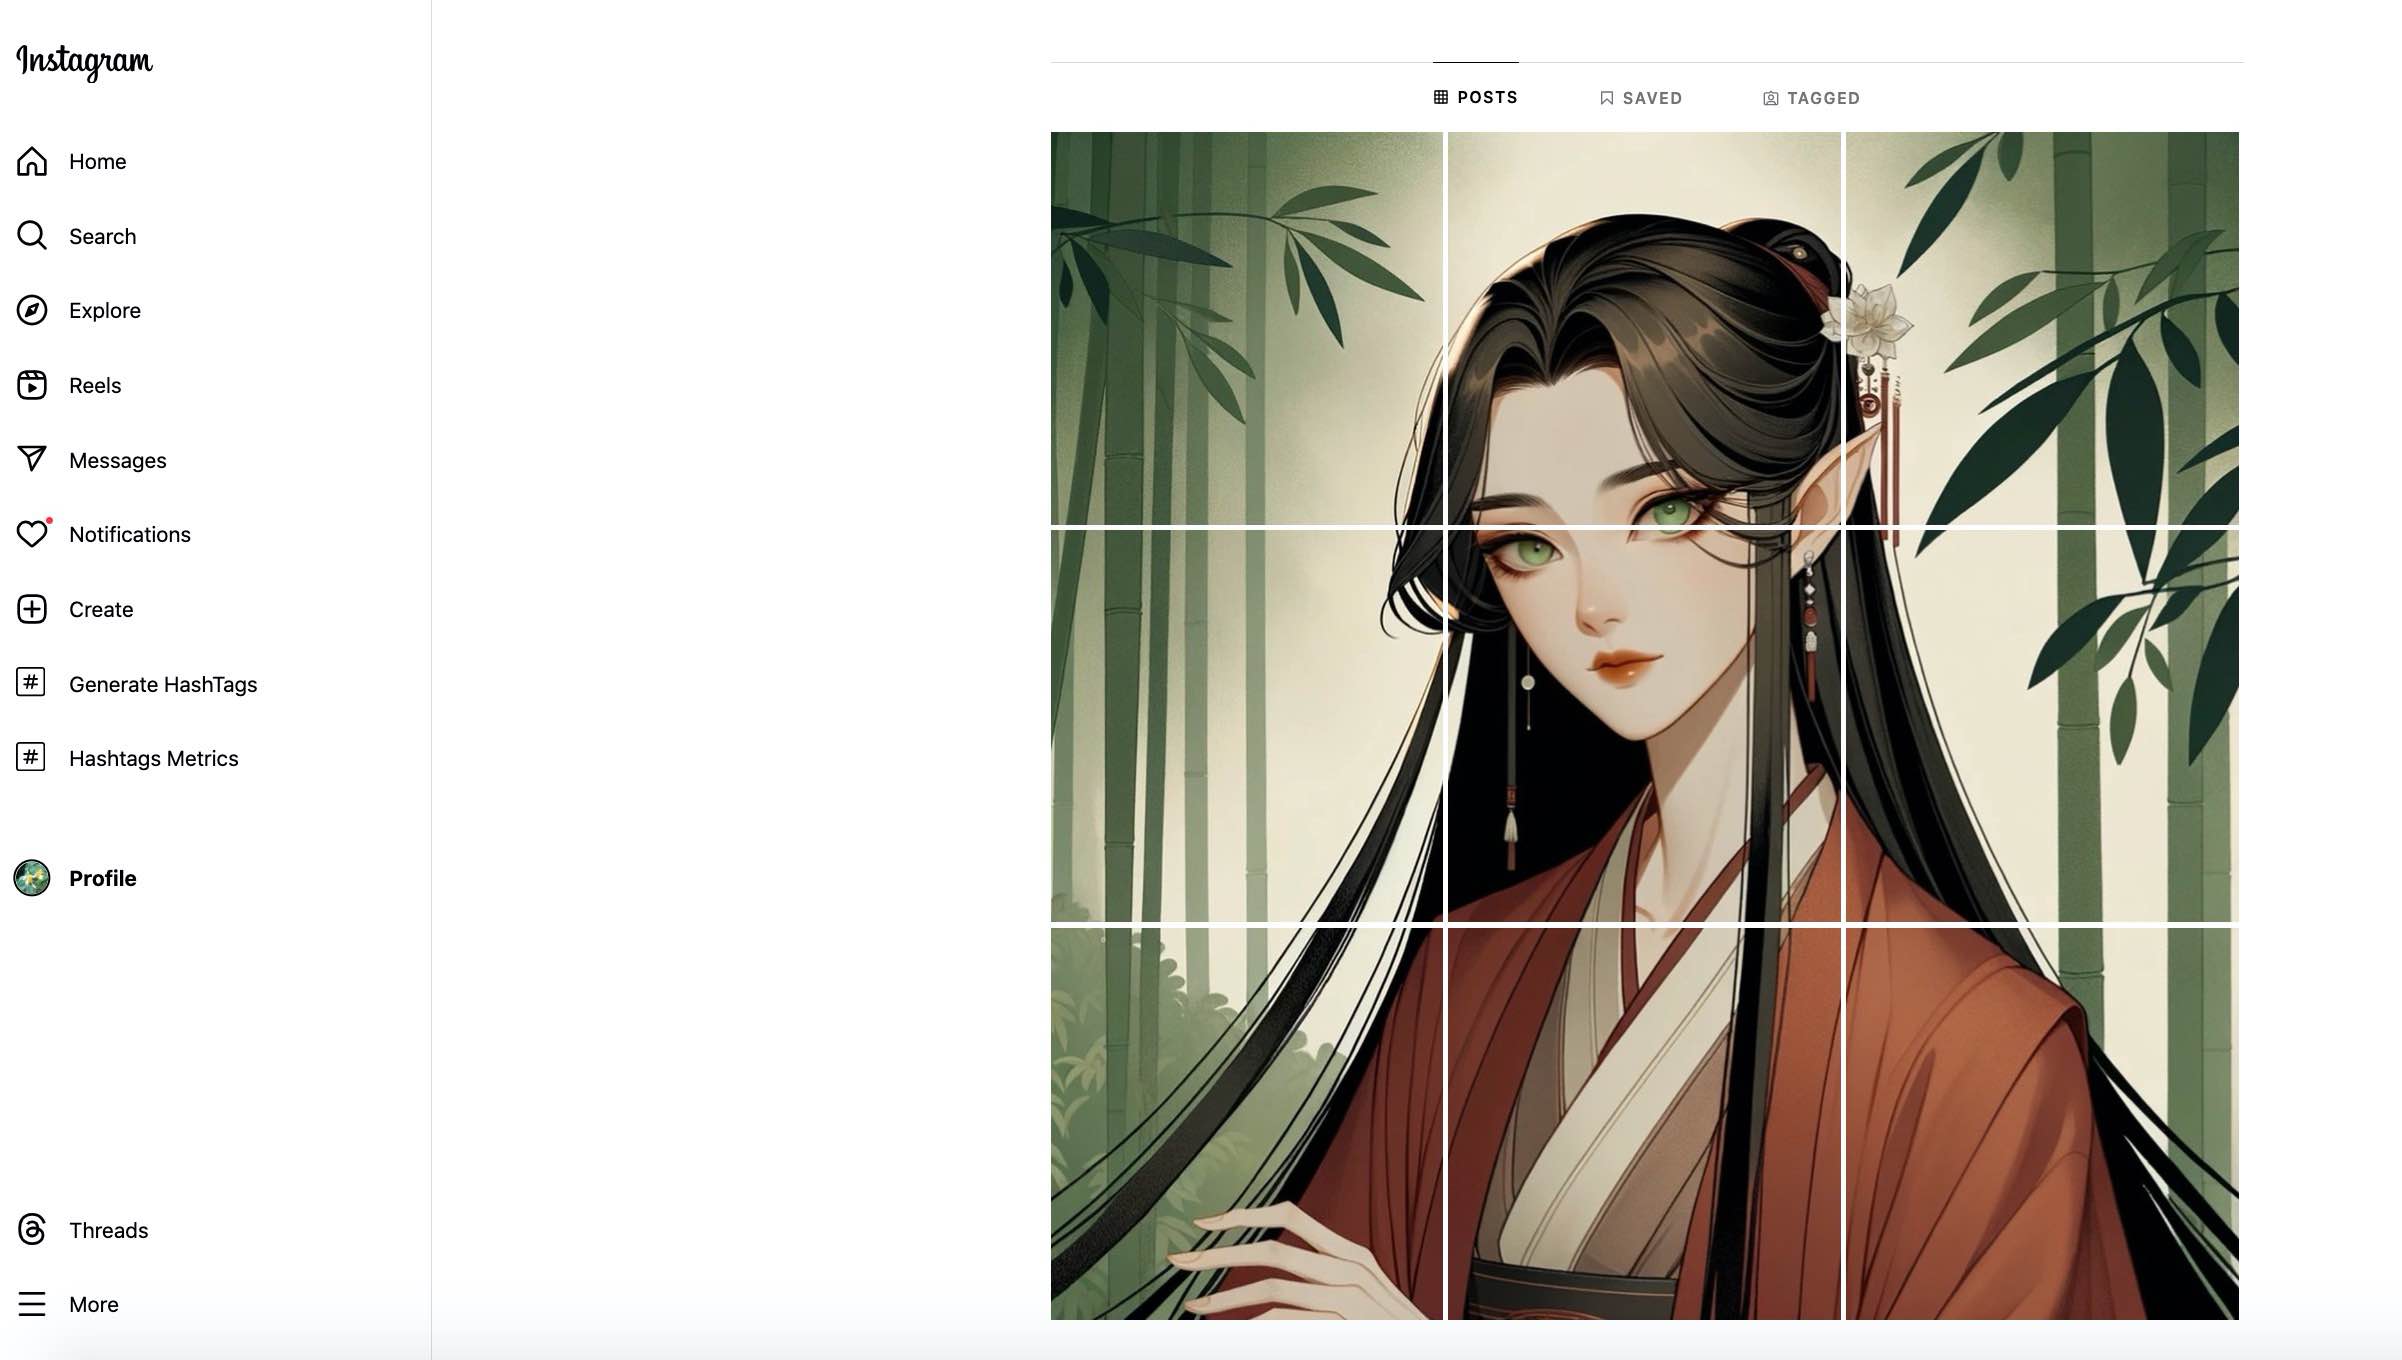 As you can see, this Instagram grid layout creates a clear, attractive image of a woman, greatly enhancing the visual effect.
Creative Ways to Use Grid Effects
Instagram's grid effect is not just a visual trick; it's a powerful marketing and brand-building tool. By cleverly using Instagram grid generators, we can create various eye-catching effects. Here are some creative ways to use them:
Showcasing Product Lines
-
Product matrix display:
- Use a 3x3 grid to showcase 9 different products, with each cell representing a product.
- For example, a cosmetics brand could display different lipstick shades in each cell.
-
Product detail display:
- Divide different angles or details of a single product into 9 cells.
- For instance, a watch brand could showcase the dial, strap, movement, and other details.
-
New product launch teasers:
- Use 9 cells to gradually reveal a new product, creating suspense and anticipation.
- You can follow aespa_official's approach, using a unified visual style to showcase a new clothing line.
Telling Brand Stories
-
Timeline narratives:
- Use 9 cells to showcase important milestones in brand development.
- Each cell represents a significant time point, arranged chronologically from left to right, top to bottom.
-
Value proposition display:
- Display the brand's core values separately in 9 cells.
- Use icons, short text, or relevant images to express each value.
-
Team introductions:
- Similar to aespa_official's approach, use 9 cells to showcase team members.
- Each cell can be a photo of a member or an image representing their work.
Creating Interactive Puzzles
-
Puzzle games:
- Design a large image, then use an Instagram grid generator to split it into 9 parts.
- Encourage fans to screenshot and rearrange, creating new image combinations.
-
Gradual event reveals:
- Similar to aespa_official's tour poster, gradually release 9 cells to reveal details of an upcoming event.
- Post one cell per day for 9 days, maintaining fan interest.
-
User-generated content:
- Create a themed hashtag, encouraging fans to upload brand-related photos.
- Select the 9 best user photos and use a grid generator to create a collective work.
By using tools like ImageSplitter.vip, brands and individual creators can easily implement these creative ideas. Remember, the key is to maintain visual consistency and appeal, just like in the aespa_official example. Whether showcasing products, telling brand stories, or creating interactive content, grid effects can help you stand out on Instagram and attract more attention.
Tips and Best Practices
When creating Instagram grid effects using grid generators, the following tips and best practices will help you achieve the best results:
Maintaining Image Quality
-
Use high-resolution images:
- Choose images with a resolution of at least 1080x1080 pixels to ensure each cell remains clear after splitting.
- Remember, Instagram compresses uploaded images, so starting with high quality is important.
-
Pay attention to file formats:
- Prioritize PNG format, especially for images containing text or logos.
- JPEG format is also acceptable, but choose high-quality settings.
-
Avoid over-editing:
- When using tools like ImageSplitter.vip, avoid over-editing the image before splitting.
- Excessive filters or adjustments may result in unnatural effects after splitting.
Considering Mobile Display Effects
-
Optimize thumbnail display:
- Remember, most users will browse Instagram on their phones.
- Ensure key elements are not cropped out in thumbnails.
-
Test on different devices:
- Preview the effect on different sized phones before posting.
- Pay special attention to text readability and visibility of small details.
-
Consider scrolling effects:
- Design with the user's scrolling experience in mind.
- Create a visual flow that guides users from one cell to the next.
Maintaining Style Consistency
-
Use a unified color scheme:
- Like in the aespa_official example, maintain consistency in overall color tones.
- You can use color themes to connect different grid series.
-
Maintain coherence of visual elements:
- Use similar visual elements across different cells.
- This could be consistent filters, similar compositions, or repeated graphic elements.
-
Plan long-term strategy:
- Consider how to keep multiple grid series harmonious overall.
- Design different visual styles for different themes or periods, but maintain overall consistency.
-
Pay attention to transitions:
- When switching to a new grid series, consider how to transition smoothly.
- You can use gradient colors or thematic elements to connect new and old content.
By following these tips and best practices, and making good use of Instagram grid generators like ImageSplitter.vip, you can create professional and attractive Instagram grid effects. Remember, the ultimate goal is to create an Instagram profile that is visually striking while effectively conveying your message or brand story.
Frequently Asked Questions
When creating and posting grid effects using Instagram grid generators, users often encounter some issues. Here are answers to some common questions:
How to ensure correct image order
-
Use correct naming conventions:
- Most Instagram grid generators (like ImageSplitter.vip) will automatically name split images in order, such as split_1.png to split_9.png.
- When uploading to Instagram, upload in reverse numerical order of file names (from 9 to 1).
-
Create a preview image:
- Before uploading, first assemble the split images locally to create a preview image.
- Check the upload order against the preview image to ensure it's correct.
-
Utilize Instagram's multiple image posting feature:
- Instagram allows uploading multiple images at once.
- When selecting images, make sure to choose them in the correct order (from the last to the first).
How to handle images of different sizes
-
Use square cropping:
- Before using the grid generator, first crop the image into a square.
- Most image editing tools have this function, including native photo apps on phones.
-
Utilize background filling:
- If the original image isn't square, you can extend it into a square using a white or other colored background.
- Some advanced Instagram grid generators (like ImageSplitter.vip) may provide this feature.
-
Creatively use non-square images:
- Split rectangular images into multiple squares to create unique visual effects.
- For example, a horizontal panoramic image can be split into a 3x1 layout.
How to update already published grids
-
Partial update strategy:
- Instagram doesn't allow replacing already published images, but you can delete old posts and re-upload.
- Consider updating only part of the grid, maintaining overall design continuity.
-
Creative transitions:
- When designing new grids, consider how to naturally transition from existing designs.
- You can use gradient colors or thematic elements to connect new and old content.
-
Archive old posts:
- If you don't want to delete old grids, you can use Instagram's archive function.
- This allows you to preserve content history while refreshing your profile's appearance.
-
Plan long-term strategy:
- When designing new grids, consider possible future updates.
- Create a design system that can flexibly change, facilitating future updates.
Remember, using Instagram grid generators like ImageSplitter.vip can greatly simplify these processes. These tools usually provide intuitive interfaces and real-time preview functions, helping you easily handle images of various sizes and ensure correct posting order. Whether creating new grids or updating existing designs, maintaining creativity and consistency is key.
Case Analysis
Examples of Instagram Accounts Successfully Using Grid Effects
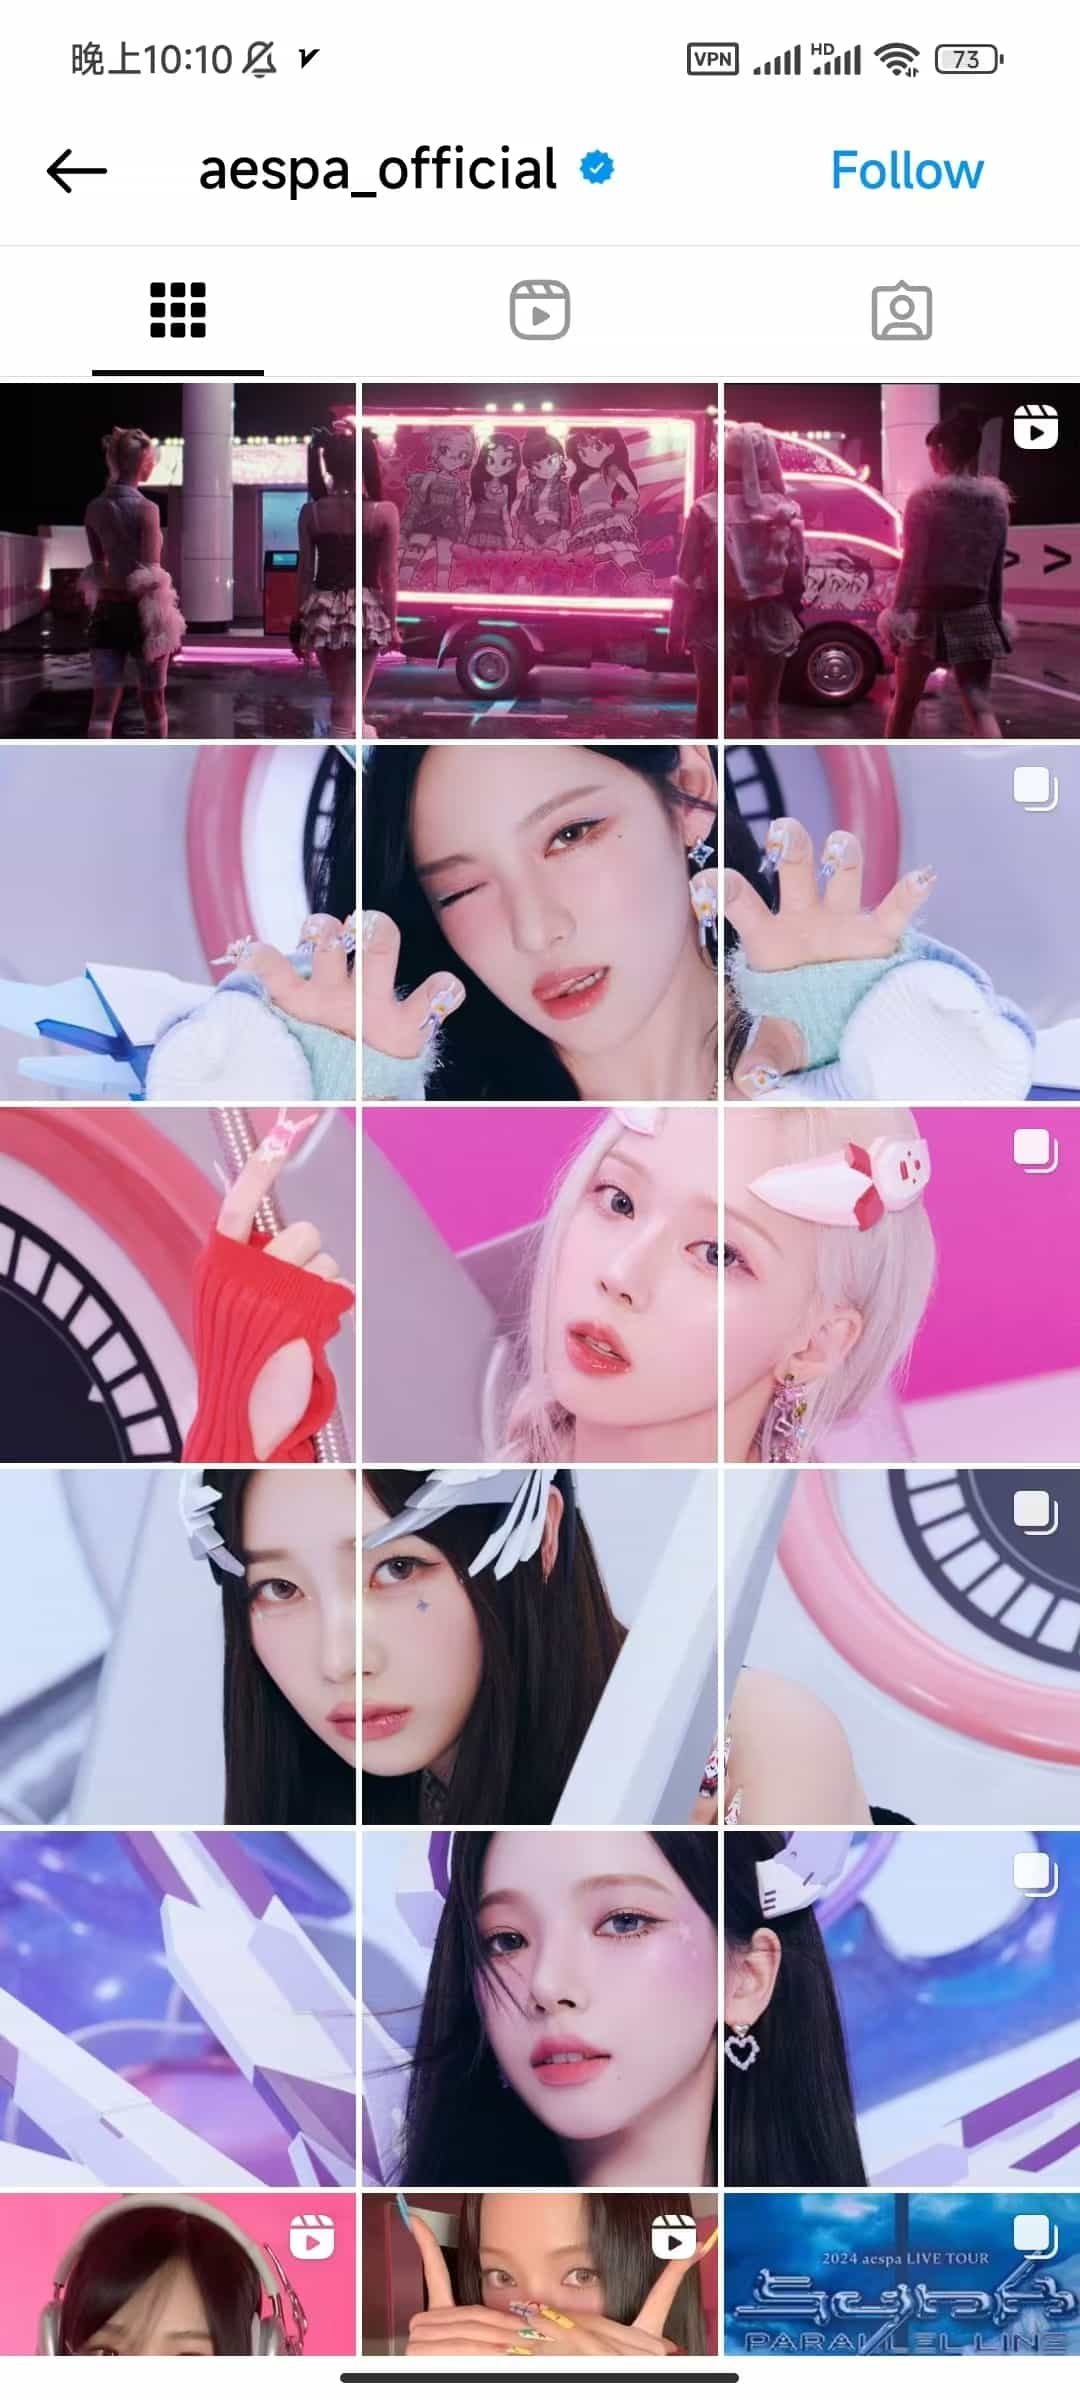
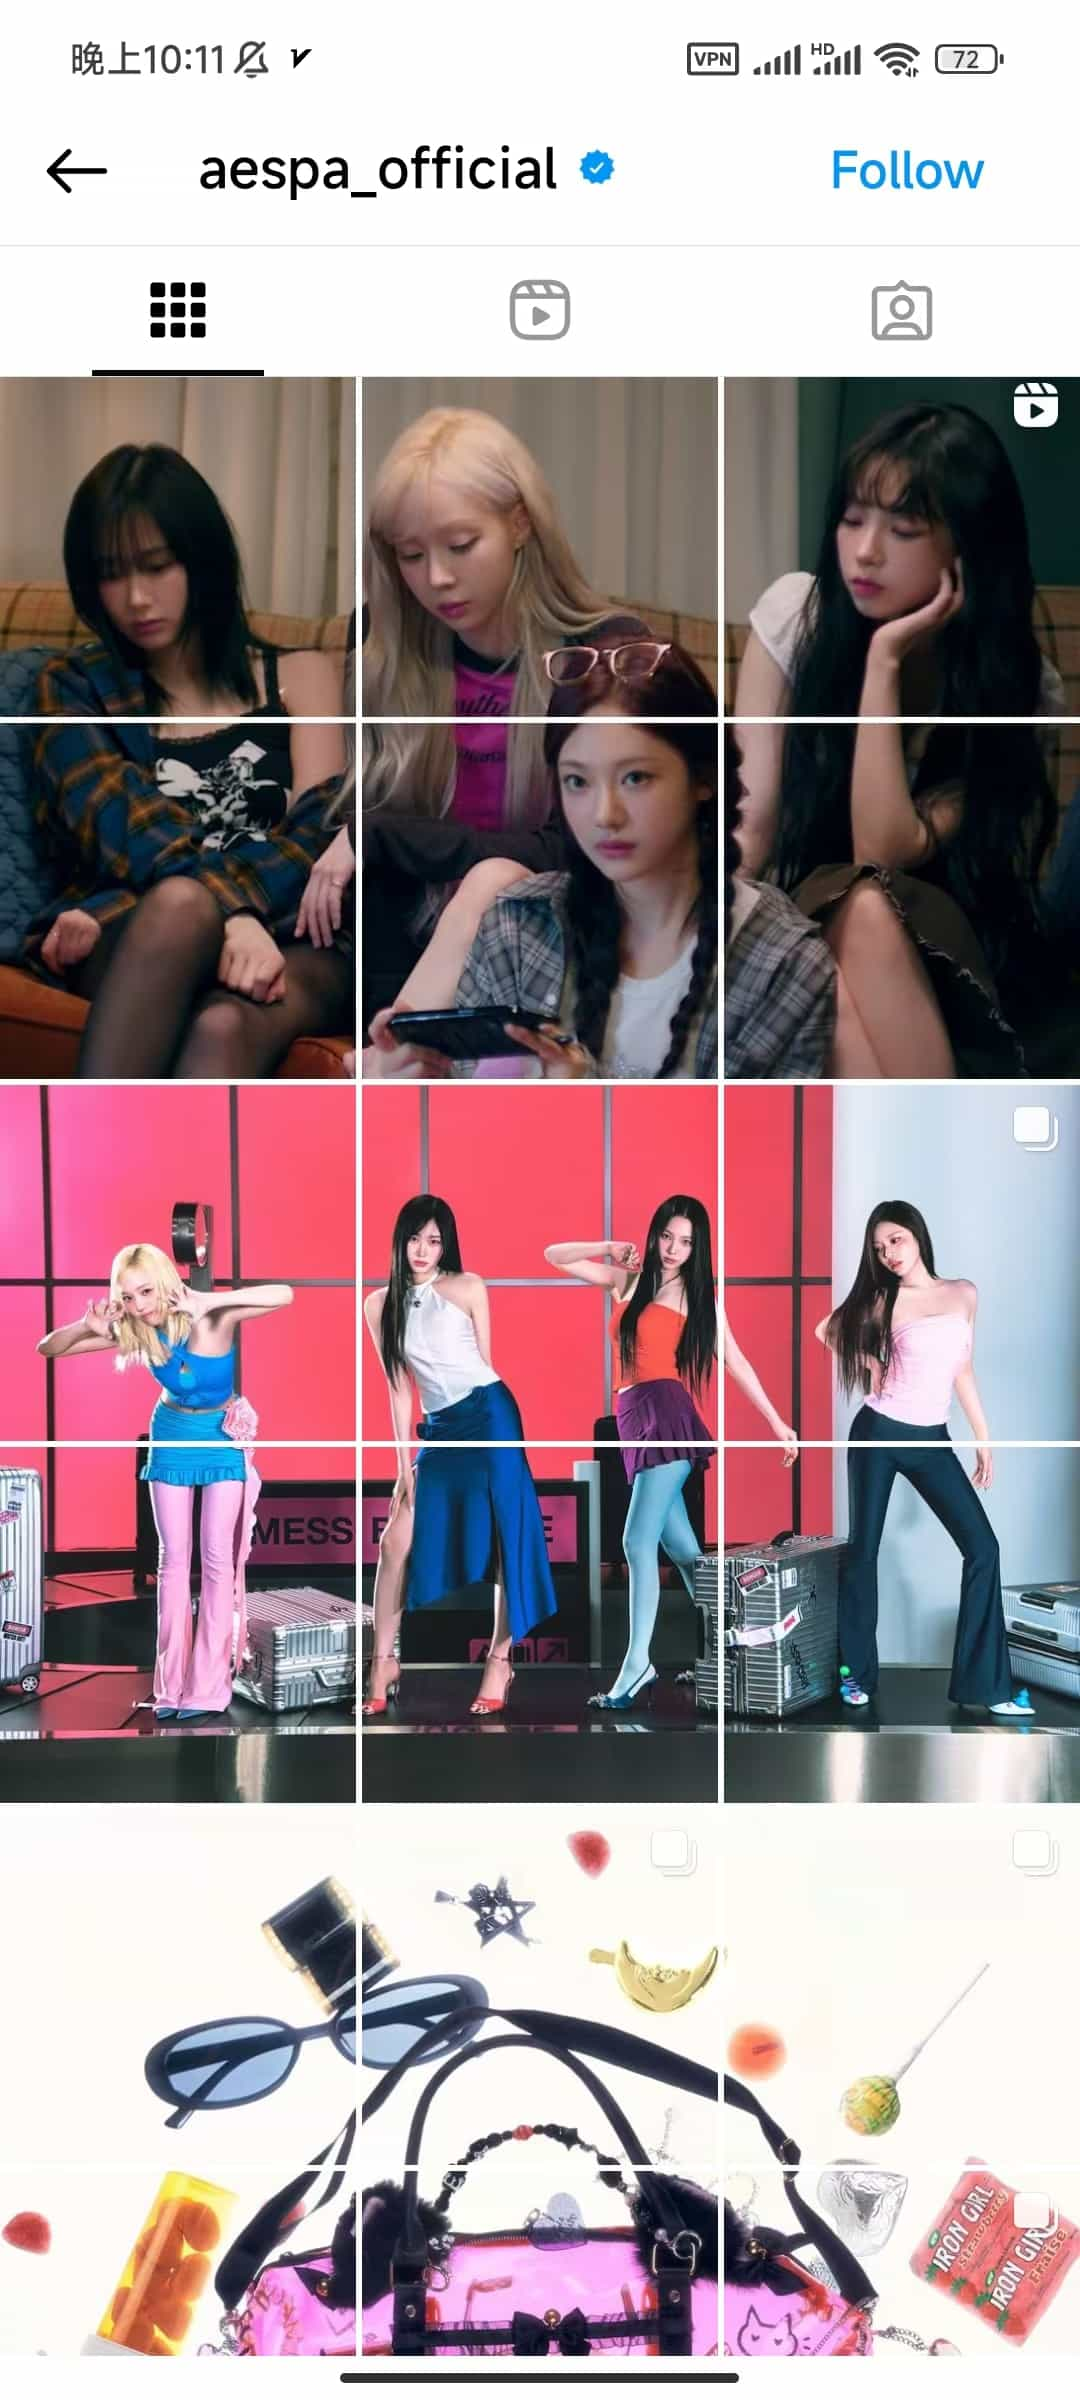
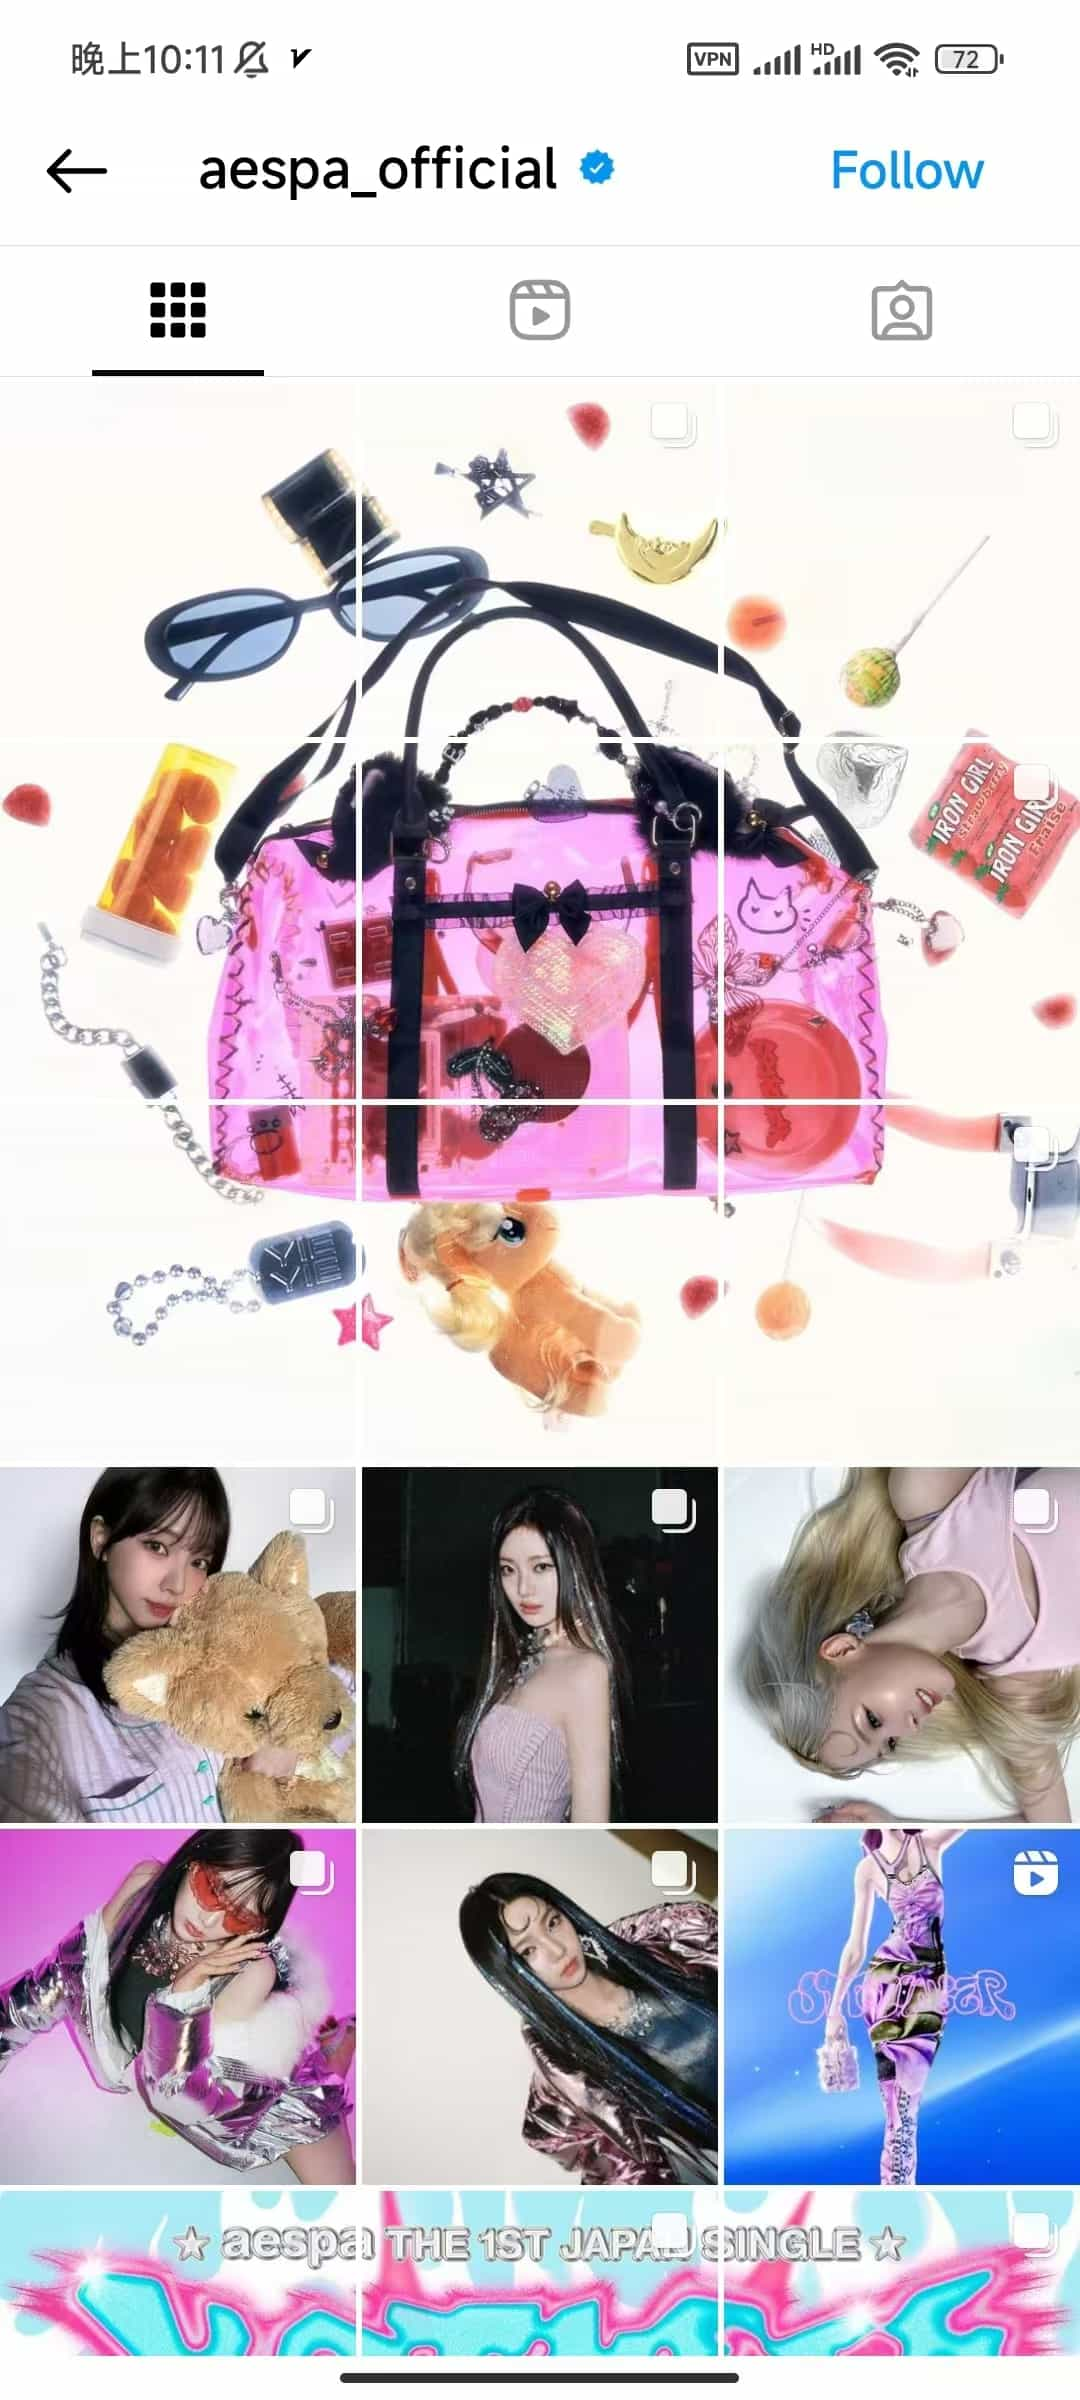
The aespa_official Instagram account demonstrates how to cleverly use grid effects to create visual impact and brand consistency:
-
Thematic coherence:
- Each set of grids revolves around a specific theme or concept, such as music video scenes, member close-ups, etc.
- The color scheme is unified, mainly using pink, purple, and blue, creating a dreamy yet modern atmosphere.
-
Diverse layouts:
- Flexibly uses 3x3, 3x1 layouts to showcase different types of content.
- Combines large images with detail close-ups, achieving both overall visual effect and highlighting individual charm.
-
Integration of brand elements:
- Cleverly incorporates promotional elements such as albums and tours, like the tour poster in the last row.
- Maintains a consistent visual style, reinforcing brand recognition.
-
Interactive design:
- Some images feature video icons, encouraging fans to click and watch, increasing interactivity.
- By splitting character images, it creates an effect that attracts users to browse the entire page.
The aespa_official case demonstrates how through carefully designed grid layouts, they can showcase the group's overall image, highlight each member's personality, and effectively conduct brand marketing.
Conclusion
Summarizing the Advantages of Instagram Cover Grid Effects
The Instagram cover grid effect provides users with a unique visual presentation method, with main advantages including:
- Strong visual impact, attracting user attention
- Providing larger creative space to showcase brand stories or product lines
- Enhancing brand recognition and professional image
- Encouraging user interaction and increasing engagement
- Flexibility to adapt to different marketing strategies and content themes
Encouraging Readers to Try Grid Generators
Creating impressive Instagram grid effects is now easier than ever. We encourage you to try Instagram grid generator tools like ImageSplitter.vip and start your creative journey. Whether you're an individual creator or a brand manager, grid effects can help you stand out in the competitive social media environment. Start experimenting now and bring a fresh visual experience to your Instagram profile!
Additional Resources
Recommended Instagram Grid Generator Tools
- Postcron Image Splitter - User-friendly, supports various splitting modes
- PineTools Split Image - Free tool, supports multiple output formats
- ImageOnline Split Image - Simple and intuitive interface
- My Social Boutique Instagram Grid Maker - Designed specifically for Instagram, provides creative templates
- ImagesTool Split Images - Offers various splitting options
- ImageSplitter.vip Instagram Splitter - Optimized specifically for Instagram, provides real-time preview
Related Tutorials and Article Links
- Complete Guide to Instagram Marketing - Hootsuite Blog
- How to Create Eye-Catching Instagram Layouts - Later Blog
- Instagram Algorithm 2023: How It Works and How to Use It - Influencer Marketing Hub
- 15 Creative Instagram Post Ideas - Sprout Social
- Instagram Best Practices: 2023 Guide - Buffer
- How to Use Instagram Reels to Promote Your Business - Social Media Examiner
These resources will help you gain a deeper understanding of Instagram marketing strategies and provide inspiration and tips for your grid creations. By combining these tools and knowledge, you'll be able to create impressive Instagram profiles.
摘要
本文详细介绍了如何使用Instagram宫格生成器创建引人注目的Instagram封面九宫格效果。我们将探讨Instagram宫格制作的步骤、常用工具比较、创意应用方法以及注意事项。无论您是个人用户还是品牌管理者,本指南都将帮助您掌握Instagram宫格布局的制作技巧,提升您的社交媒体形象。
引言
Instagram封面九宫格效果在社交媒体营销中日益流行。许多Instagram红人和品牌账号都在巧妙运用这种Instagram宫格布局来吸引关注。例如,知名K-pop女团aespa的官方账号@aespa_official就展示了令人印象深刻的Instagram宫格制作效果。通过精心设计的九宫格布局,他们成功创造了视觉冲击力强、品牌识别度高的个人主页。
本文将深入探讨如何使用Instagram网格生成器工具来制作这种吸睛的Instagram宫格效果。我们将介绍Instagram宫格制作的基本概念、常用的宫格生成器工具、详细的操作步骤,以及创意应用方法。无论您是想提升个人Instagram账号的吸引力,还是为品牌打造独特的社交媒体形象,这篇指南都将为您提供实用的Instagram宫格布局技巧和灵感。
让我们开始探索如何利用Instagram网格生成器,创造出令人惊叹的Instagram封面九宫格效果吧!
什么是Instagram封面九宫格效果
定义和特点
Instagram封面九宫格效果,也被称为Instagram拼图或网格布局,是一种独特的视觉呈现方式,将单个大图分割成九个等大的正方形图片,并按特定顺序发布在Instagram个人主页上。当用户访问您的Instagram个人资料时,这九张图片会拼接成一个完整的大图,形成引人注目的封面效果。
这种Instagram宫格布局的主要特点包括:
-
视觉冲击力强:
- 大图被分割成九个部分,创造出独特的拼图效果。
- 能够立即吸引访问者的注意力,使您的个人资料脱颖而出。
-
创意展示空间大:
- 提供了一个巨大的"画布",可以展示大型图像或复杂的设计。
- 允许品牌或个人创作者以创新的方式讲述视觉故事。
-
提高个人资料的专业度:
- 精心设计的九宫格效果展示了用户的设计能力和对细节的关注。
- 给人一种经过深思熟虑和精心策划的印象。
-
增强品牌识别度:
- 可以用来展示logo、产品系列或品牌色彩。
- 帮助建立一致的品牌形象和视觉身份。
-
灵活性高:
- 可以定期更新,保持个人资料的新鲜感。
- 适用于各种内容类型,如产品展示、艺术作品、摄影等。
-
鼓励互动:
- 独特的视觉效果可以吸引用户浏览您的整个Instagram feed。
- 可以创建互动式拼图,鼓励关注者参与。
-
规划和策略的体现:
- 需要提前规划和设计,体现出账户运营的专业性。
- 可以用来预告即将发布的内容或活动。
-
移动端友好:
- 专为Instagram移动应用设计,在手机屏幕上效果最佳。
- 考虑到大多数用户通过移动设备访问Instagram的事实。
Instagram封面九宫格效果不仅仅是一种视觉技巧,它还是一种强大的营销和品牌塑造工具。通过巧妙运用这种Instagram宫格布局,个人创作者和品牌可以创造出令人难忘的第一印象,有效传达其信息,并在竞争激烈的社交媒体环境中脱颖而出。
成功案例展示
让我们继续以引言中提到的aespa_official账号为例,深入分析他们的Instagram宫格制作效果。以下是他们Instagram主页的几张截图:


分析第一张图,我们可以看到:
aespa_official的Instagram封面九宫格效果展示了一个出色的案例。他们的主页呈现了一组令人印象深刻的九宫格布局:
- 整体布局包含四张大图,每张大图又被巧妙地分割成3x3的九宫格。
- 图片内容展示了四位身着黑色时尚服装、戴着墨镜的女性,呈现出酷炫前卫的风格。
- 所有图片保持统一的色调和美学风格,创造出视觉上的连贯性和和谐感。
这种Instagram宫格布局的效果非常显著:
- 强烈的视觉冲击力立即吸引观者注意。
- 统一的风格有效强化了品牌形象。
- 创意的分割方式既展示了整体画面,又突出了个人细节。
- 专业的设计给人留下深刻印象,提升了品牌调性。
这个案例完美展示了Instagram封面九宫格效果的潜力,不仅增强了品牌识别度,还提高了用户参与度,是运用Instagram网格生成器的绝佳范例。
再看第二张图:
另一个令人印象深刻的Instagram宫格制作案例同样来自aespa_official的账号,展示了九宫格布局的多样性和创意性:
- 整个布局被巧妙地分为三个主要部分,每部分占据三行,形成了一个视觉上引人注目的三段式布局。
- 顶部三行展示了四位成员穿着未来感十足的银色服装的全身照,呈现出统一而独特的视觉效果。
- 中间三行以黑底银字的设计宣布了"2024-25 aespa LIVE TOUR PARALLEL LINE",突出了巡演信息。
- 底部三行展示了巡演海报和具体的巡演日期地点,提供了详细的演出信息。
这种Instagram宫格布局的效果非常显著:
- 层次分明,信息传达清晰有力。
- 上中下三个部分各有侧重,但整体风格统一,展现了强烈的品牌识别度。
- 巧妙利用了Instagram的九宫格特性,将宣传海报、巡演信息和艺人照片完美结合。
- 通过精心设计的布局,在有限的空间内最大化地展示了丰富的内容。
这个案例充分展示了Instagram九宫格布局在音乐巡演宣传中的创意应用,不仅吸引了粉丝的注意力,还高效地传递了关键信息,是运用Instagram网格生成器进行活动推广的绝佳范例。
Instagram网格生成器介绍
什么是Instagram网格生成器
Instagram网格生成器是一种专门设计用来创建Instagram九宫格布局的在线工具。这类工具能够将单张大图自动分割成多个小方格,使用户能够轻松创建吸引眼球的Instagram宫格布局。以下是Instagram网格生成器的主要特点和功能:
-
图片分割:
- 自动将一张大图切割成9个(或更多)等大的正方形图片。
- 支持多种分割模式,如3x3、3x1、1x3等,满足不同创意需求。
-
预览功能:
- 实时预览分割后的效果,让用户直观地看到最终在Instagram上的呈现效果。
- 允许用户在上传前调整和优化布局。
-
易用性:
- 用户友好的界面,通常只需简单的拖放操作即可完成图片上传。
- 提供直观的设置选项,如网格大小、间距调整等。
-
导出功能:
- 将分割后的图片以正确的顺序导出,便于用户按顺序上传到Instagram。
- 通常支持多种图片格式,如JPEG、PNG等。
-
附加功能:
- 一些高级工具还提供滤镜、文字添加、简单的图片编辑功能等。
- 可能包括模板库,为用户提供现成的创意布局方案。
-
跨平台兼容:
- 大多数是基于网页的工具,可以在各种设备上使用,包括电脑、平板和智能手机。
-
社交媒体整合:
- 部分工具提供直接发布到Instagram的功能,简化工作流程。
Instagram网格生成器极大地简化了创建复杂Instagram布局的过程,使得个人用户、品牌和企业能够轻松制作专业看起来的Instagram宫格效果。这些工具不仅节省了时间和精力,还为用户提供了更多创意可能性,帮助他们在视觉上吸引更多关注者,提升社交媒体存在感。
常见的Instagram网格生成器工具比较
-
Postcron Image Splitter 地址:
- Postcron Image Splitter 优点:
- 用户界面友好,操作简单
- 支持多种分割模式
- 提供预览功能 缺点:
- 可能需要注册才能使用全部功能
-
PineTools Split Image 地址:
- PineTools Split Image 优点:
- 完全免费,无需注册
- 支持多种分割方式和输出格式 缺点:
- 界面相对简单,缺乏高级编辑功能
- 不专门针对Instagram优化
-
ImageOnline Split Image 地址:
- ImageOnline Split Image 优点:
- 操作简单直观
- 支持多种分割方式 缺点:
- 功能相对基础
- 缺乏Instagram特定的优化
-
My Social Boutique Instagram Grid Maker 地址:
- Instagram Grid Maker 优点:
- 专为Instagram设计
- 提供多种创意模板
- 包含基本编辑功能 缺点:
- 部分高级功能可能需要付费
-
ImagesTool Split Images 地址:
- ImagesTool Split Images 优点:
- 提供多种分割选项
- 界面清晰,易于使用 缺点:
- 可能包含广告
- 缺乏高级编辑功能
-
ImageSplitter.vip Instagram Splitter 地址:
- ImageSplitter.vip Instagram Splitter 优点:
- 专门为Instagram优化
- 提供实时预览
- 支持多种分割模式
- 完全免费,无需注册 缺点:
- 可能缺乏一些高级编辑功能
每个Instagram网格生成器工具都有其独特的优势和局限性。用户可以根据自己的具体需求和偏好选择最适合的工具。对于大多数Instagram用户来说,专门为Instagram优化的工具(如My Social Boutique和ImageSplitter.vip)可能更为便捷和实用。
使用Instagram网格生成器的步骤
接下来,我们将使用ImageSplitter.vip的Instagram Splitter工具来演示如何创建Instagram宫格效果。
-
选择合适的图片 我们将使用一张新的图片进行操作,这次选择一个吸引人的人物照片。
-
上传图片到网格生成器 如下图所示,点击上传或者将图片拖拽到左侧的上传区域。左侧显示原始图片,右侧是预览区域,展示网格分割后的最终视觉效果。

-
设置分割参数 在上传图片的同时,我们已经调整了分割参数。将分割模式设置为自定义模式,并将行列都设置为3,创建一个3x3的宫格效果。请注意,Instagram封面宫格效果通常是三行展示,因此您可以根据需要选择3x1, 3x2, 3x3, 3x4, 3x5等比例来分割。这样才能确保创建出真正的Instagram封面宫格效果。
-
预览和调整 如上图所示,ImageSplitter.vip的Instagram Splitter工具的优势在于实时预览功能。一旦上传图片并调整分割比例,预览效果会自动更新。您可以根据上传的图片内容来调整行和列的值,找到最适合的效果。
-
下载分割后的图片 确认预览效果满意后,点击"Download All as ZIP"按钮,即可一键下载所有宫格图片。 如图所示:

在Instagram上发布九宫格效果
-
准备发布材料 我们将使用Instagram网页版来发布九宫格效果。在前面的步骤中,我们已经得到了9张分割好的图片,文件名清晰地标注了顺序,如split_1.png到split_9.png。
-
按正确顺序上传图片 在Instagram网页版中,点击"Create New Post"。如下图所示,我们首先选择split_9.png这张图。请注意,上传顺序必须是倒序,即从序号最大的图片开始上传。
 然后依次上传split_8.png, split_7.png, split_6.png, split_5.png, ... 直到split_1.png。
 -
添加说明文字和标签 为了演示封面效果,我们这次不添加文字和标签。以下是最终形成的Instagram封面九宫格效果:
 可以看到,这种Instagram宫格布局创造出了一个清晰、吸引人的美女图像,极大地提升了视觉效果。
九宫格效果的创意使用方法
Instagram的九宫格效果不仅是一种视觉技巧,更是一种强大的营销和品牌塑造工具。通过巧妙运用Instagram网格生成器,我们可以创造出各种引人注目的效果。以下是一些创意使用方法:
展示产品系列
-
产品矩阵展示:
- 使用3x3网格展示9个不同的产品,每个格子代表一个产品。
- 例如,化妆品品牌可以在每个格子中展示不同色号的口红。
-
产品细节展示:
- 将一个产品的不同角度或细节分割到9个格子中。
- 比如,手表品牌可以展示表盘、表带、机芯等细节。
-
新品发布预告:
- 利用9个格子逐步揭示新产品,制造悬念和期待感。
- 可以参考aespa_official的做法,用统一的视觉风格展示新系列服装。
讲述品牌故事
-
时间线叙事:
- 使用9个格子展示品牌发展的重要里程碑。
- 每个格子代表一个重要时间点,从左到右、从上到下按时间顺序排列。
-
价值观展示:
- 将品牌的核心价值观分别展示在9个格子中。
- 可以使用图标、简短文字或相关图片来表达每个价值观。
-
团队介绍:
- 类似aespa_official的做法,用9个格子展示团队成员。
- 每个格子可以是一个成员的照片或代表其工作的图像。
创建互动拼图
-
拼图游戏:
- 设计一个大图,然后用Instagram网格生成器分割成9个部分。
- 鼓励粉丝截图并重新排列,创造新的图像组合。
-
逐步揭示活动:
- 类似aespa_official的巡演海报,逐步发布9个格子来揭示即将到来的活动详情。
- 每天发布一个格子,持续9天,保持粉丝的关注度。
-
用户生成内容:
- 创建一个主题标签,鼓励粉丝上传与品牌相关的照片。
- 选择9张最佳用户照片,使用网格生成器创建一个集体作品。
通过使用像ImageSplitter.vip这样的Instagram网格生成器,品牌和个人创作者可以轻松实现这些创意。记住,关键是保持视觉上的一致性和吸引力,就像aespa_official的例子那样。无论是展示产品、讲述品牌故事还是创建互动内容,九宫格效果都能帮助你在Instagram上脱颖而出,吸引更多关注。
注意事项和技巧
在使用Instagram网格生成器创建九宫格效果时,以下几点注意事项和技巧将帮助你获得最佳效果:
保持图片质量
-
使用高分辨率图片:
- 选择分辨率至少为1080x1080像素的图片,以确保分割后的每个格子仍然清晰。
- 记住,Instagram会压缩上传的图片,所以从高质量开始很重要。
-
注意文件格式:
- 优先选择PNG格式,特别是对于包含文字或logo的图片。
- JPEG格式也可以,但要选择高质量设置。
-
避免过度编辑:
- 使用如ImageSplitter.vip这样的工具时,避免在分割前过度编辑图片。
- 过度的滤镜或调整可能在分割后产生不自然的效果。
考虑移动端显示效果
-
优化缩略图显示:
- 记住,大多数用户会在手机上浏览Instagram。
- 确保关键元素不会在缩略图中被裁剪掉。
-
测试不同设备:
- 在发布前,在不同尺寸的手机上预览效果。
- 特别注意文字的可读性和小细节的可见度。
-
考虑滚动效果:
- 设计时考虑用户滚动浏览的体验。
- 可以创造一种视觉流,引导用户从一个格子滚动到下一个。
保持风格一致性
-
使用统一的色彩方案:
- 就像aespa_official的例子,保持整体色调的一致性。
- 可以使用色彩主题来连接不同的九宫格系列。
-
保持视觉元素的连贯性:
- 在不同的格子之间使用相似的视觉元素。
- 可以是一致的滤镜、相似的构图或重复的图形元素。
-
规划长期策略:
- 考虑如何让多个九宫格系列在整体上保持和谐。
- 可以为不同主题或时期设计不同的视觉风格,但要保持整体的一致性。
-
注意过渡:
- 当更换新的九宫格系列时,考虑如何平滑过渡。
- 可以使用渐变色或主题元素来连接新旧内容。
通过遵循这些注意事项和技巧,并善用如ImageSplitter.vip这样的Instagram网格生成器,你可以创建出既专业又吸引人的Instagram九宫格效果。记住,最终目标是创造一个视觉上引人注目,同时又能有效传达你的信息或品牌故事的Instagram个人主页。
常见问题解答
在使用Instagram网格生成器创建和发布九宫格效果时,用户经常会遇到一些问题。以下是一些常见问题的解答:
如何确保图片顺序正确
-
使用正确的命名方式:
- 大多数Instagram网格生成器(如ImageSplitter.vip)会自动为分割后的图片按顺序命名,如split_1.png到split_9.png。
- 上传到Instagram时,按照文件名的数字顺序倒序上传(从9到1)。
-
创建预览图:
- 在上传前,先在本地将分割后的图片拼接起来,创建一个预览图。
- 对照预览图检查上传顺序是否正确。
-
利用Instagram的多图发布功能:
- Instagram允许一次性上传多张图片。
- 选择图片时,确保按照正确的顺序选择(从最后一张开始,到第一张)。
如何处理不同尺寸的图片
-
使用正方形裁剪:
- 在使用网格生成器之前,先将图片裁剪成正方形。
- 大多数图片编辑工具都有这个功能,包括手机的原生相册应用。
-
利用背景填充:
- 如果原图不是正方形,可以使用白色或其他颜色的背景将其扩展成正方形。
- 一些高级的Instagram网格生成器(如ImageSplitter.vip)可能提供这个功能。
-
创意性使用非正方形图片:
- 将长方形图片分割成多个正方形,创造独特的视觉效果。
- 例如,一张横向全景图可以分割成3x1的布局。
如何更新已发布的九宫格
-
部分更新策略:
- Instagram不允许替换已发布的图片,但你可以删除旧的帖子并重新上传。
- 考虑只更新九宫格中的部分图片,保持整体设计的连续性。
-
创造性过渡:
- 设计新的九宫格时,考虑如何与现有的设计自然过渡。
- 可以使用渐变色或主题元素来连接新旧内容。
-
归档旧帖子:
- 如果不想删除旧的九宫格,可以使用Instagram的归档功能。
- 这样可以保留内容历史,同时刷新个人主页的外观。
-
规划长期策略:
- 在设计新的九宫格时,考虑未来可能的更新。
- 创建一个可以灵活变化的设计系统,便于日后更新。
记住,使用像ImageSplitter.vip这样的Instagram网格生成器可以大大简化这些过程。这些工具通常提供直观的界面和实时预览功能,帮助你轻松处理各种尺寸的图片,并确保正确的发布顺序。无论是创建新的九宫格还是更新现有的设计,保持创意和一致性都是关键。
案例分析
成功使用九宫格效果的Instagram账户示例


aespa_official的Instagram账号展示了如何巧妙运用九宫格效果来创造视觉冲击力和品牌一致性:
-
主题连贯性:
- 每组九宫格都围绕一个特定主题或概念,如音乐视频场景、成员特写等。
- 色彩方案统一,以粉色、紫色和蓝色为主,营造出梦幻而现代的氛围。
-
多样化布局:
- 灵活运用3x3、3x1的布局,展示不同类型的内容。
- 大图与细节特写相结合,既有整体视觉效果,又能突出个人魅力。
-
品牌元素融入:
- 巧妙融入专辑、巡演等宣传元素,如最后一行的巡演海报。
- 保持一致的视觉风格,强化了品牌识别度。
-
互动性设计:
- 部分图片带有视频图标,鼓励粉丝点击观看,增加互动性。
- 通过分割人物图像,创造出吸引用户浏览整个页面的效果。
aespa_official的案例展示了如何通过精心设计的九宫格布局,既能展示团体的整体形象,又能突出每位成员的个性,同时有效地进行品牌营销。
结语
总结Instagram封面九宫格效果的优势
Instagram封面九宫格效果为用户提供了独特的视觉呈现方式,其主要优势包括:
- 强烈的视觉冲击力,吸引用户注意
- 提供更大的创意空间,展示品牌故事或产品系列
- 增强品牌识别度和专业形象
- 鼓励用户互动,提高参与度
- 灵活多变,适应不同营销策略和内容主题
鼓励读者尝试使用网格生成器
现在,创建令人印象深刻的Instagram九宫格效果比以往任何时候都更加简单。我们鼓励您尝试使用像ImageSplitter.vip这样的Instagram网格生成器工具,开始您的创意之旅。无论您是个人创作者还是品牌管理者,九宫格效果都能帮助您在竞争激烈的社交媒体环境中脱颖而出。立即开始尝试,为您的Instagram个人主页带来全新的视觉体验!
额外资源
推荐的Instagram网格生成器工具
- Postcron Image Splitter - 用户友好,支持多种分割模式
- PineTools Split Image - 免费工具,支持多种输出格式
- ImageOnline Split Image - 简单直观的操作界面
- My Social Boutique Instagram Grid Maker - 专为Instagram设计,提供创意模板
- ImagesTool Split Images - 提供多种分割选项
- ImageSplitter.vip Instagram Splitter - 专门为Instagram优化,提供实时预览
相关教程和文章链接
- Instagram营销完全指南 - Hootsuite博客
- 如何创建引人注目的Instagram布局 - Later博客
- Instagram算法2023:工作原理及如何利用它 - Influencer Marketing Hub
- 15个创意Instagram帖子创意 - Sprout Social
- Instagram最佳实践:2023年指南 - Buffer
- 如何使用Instagram Reels提升您的品牌 - Social Media Examiner
这些资源将帮助您深入了解Instagram营销策略,并为您的九宫格创作提供灵感和技巧。结合使用这些工具和知识,您将能够创建出令人印象深刻的Instagram个人主页。
Introduction
Have you ever been captivated by those eye-catching nine-grid images in WeChat Moments? Want to post such images yourself but don't know where to start? Don't worry! This article will guide you through the process of easily creating and posting nine-grid images on WeChat Moments.
Nine-grid images are popular on WeChat Moments for several reasons:
- Strong visual impact, easily attracting attention
- Unique display effect, adding interest to content
- Clever way to showcase panoramas or large images
- Increasing interactivity of Moments content
Next, we'll introduce a simple online tool to help you effortlessly create nine-grid images.
Using Image Splitter to Create Nine-Grid Images for WeChat Moments
Tool Introduction
We recommend using the Image Splitter online tool. It not only serves as a WeChat nine-grid generator but also meets other image splitting needs.
Desktop Operation Steps
- Upload image
- Set splitting parameters
- Download split images
- Post on WeChat
Let's go through this process with a detailed example:
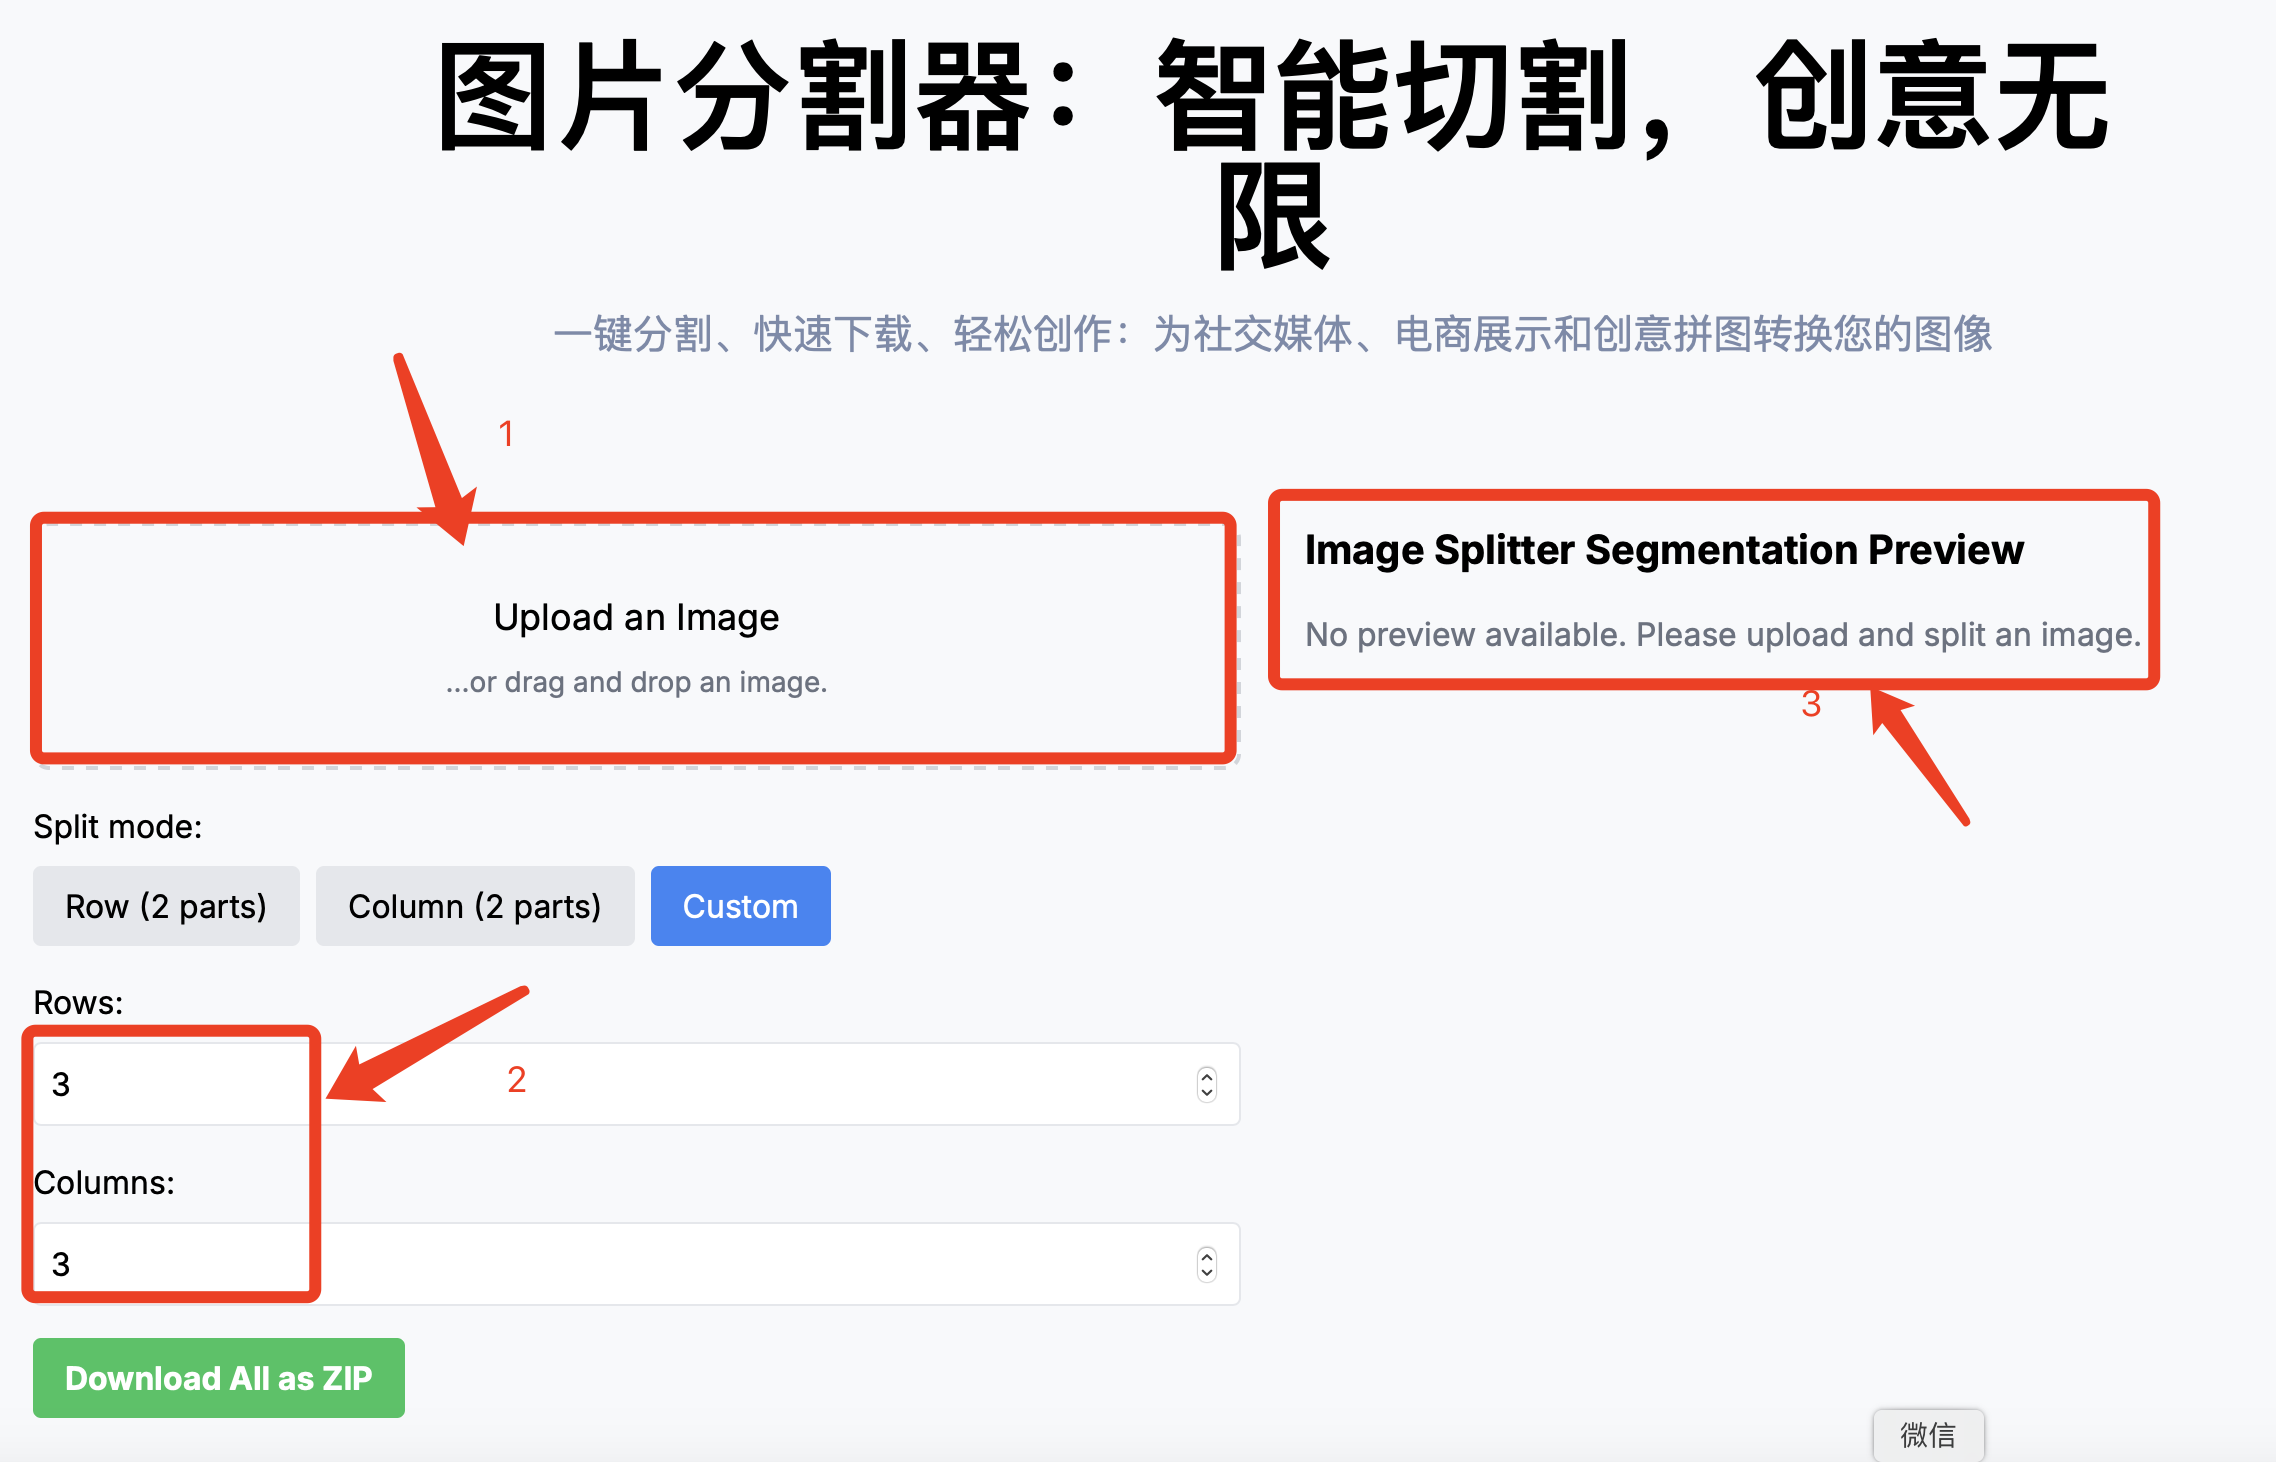
- Upload image: Click "Choose File" or drag and drop your image into the designated area.
- Set splitting parameters: In "Split Mode", select "Custom" and set both rows and columns to 3.
- Download split images:
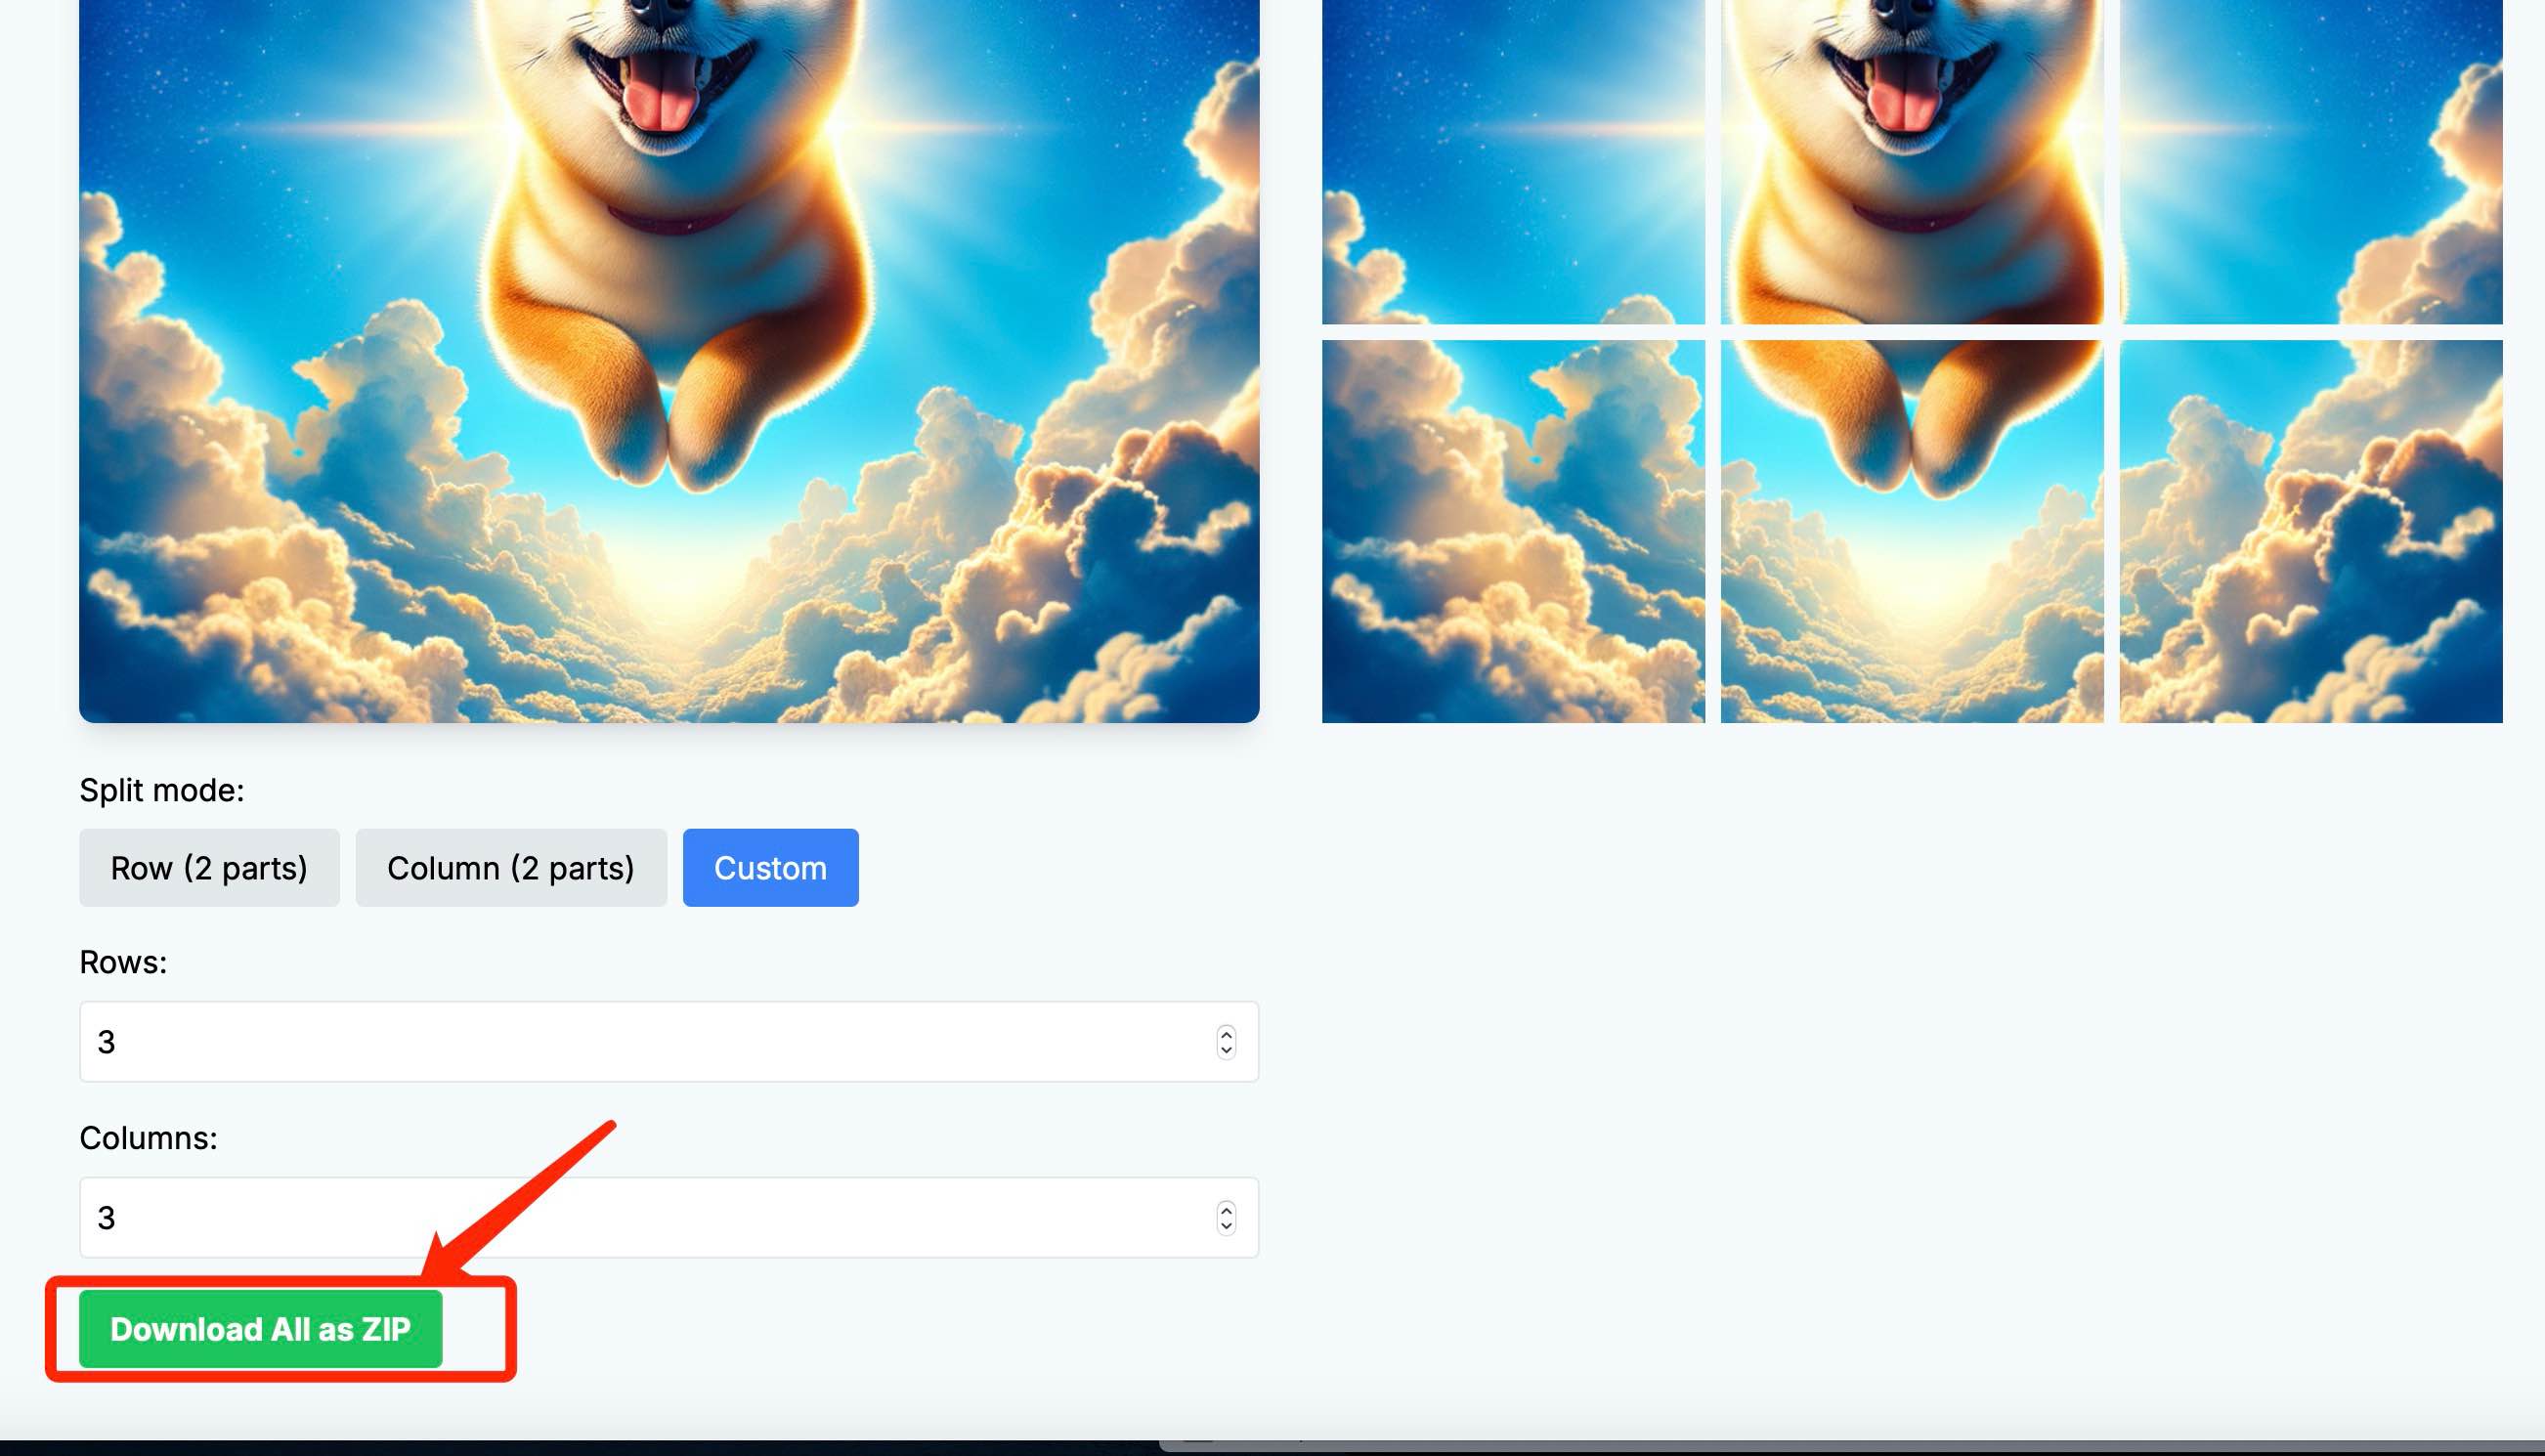 Click "Download All As Zip" to download all split images.
 - Unzip and upload to WeChat:
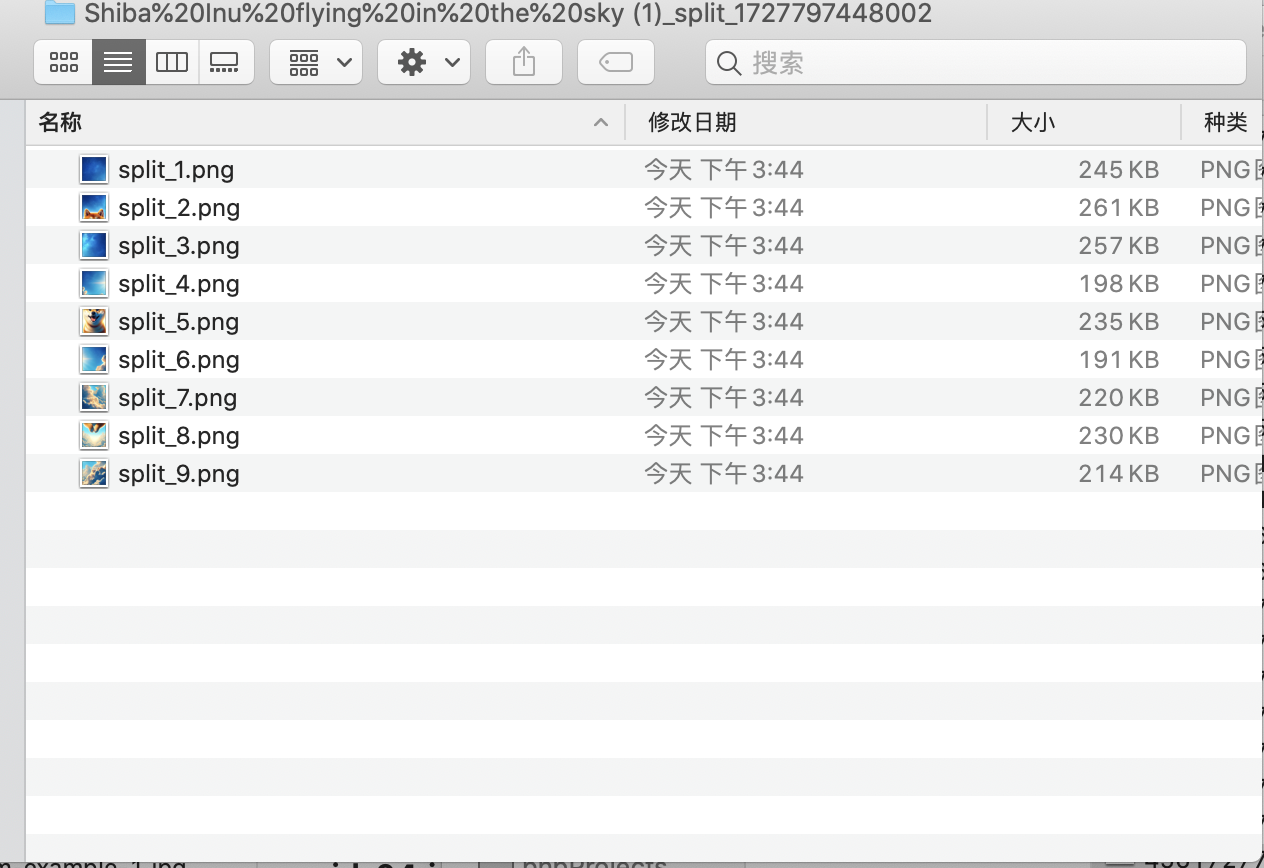 Unzip the downloaded file, then upload these 9 images in the desktop version of WeChat.
Result Showcase
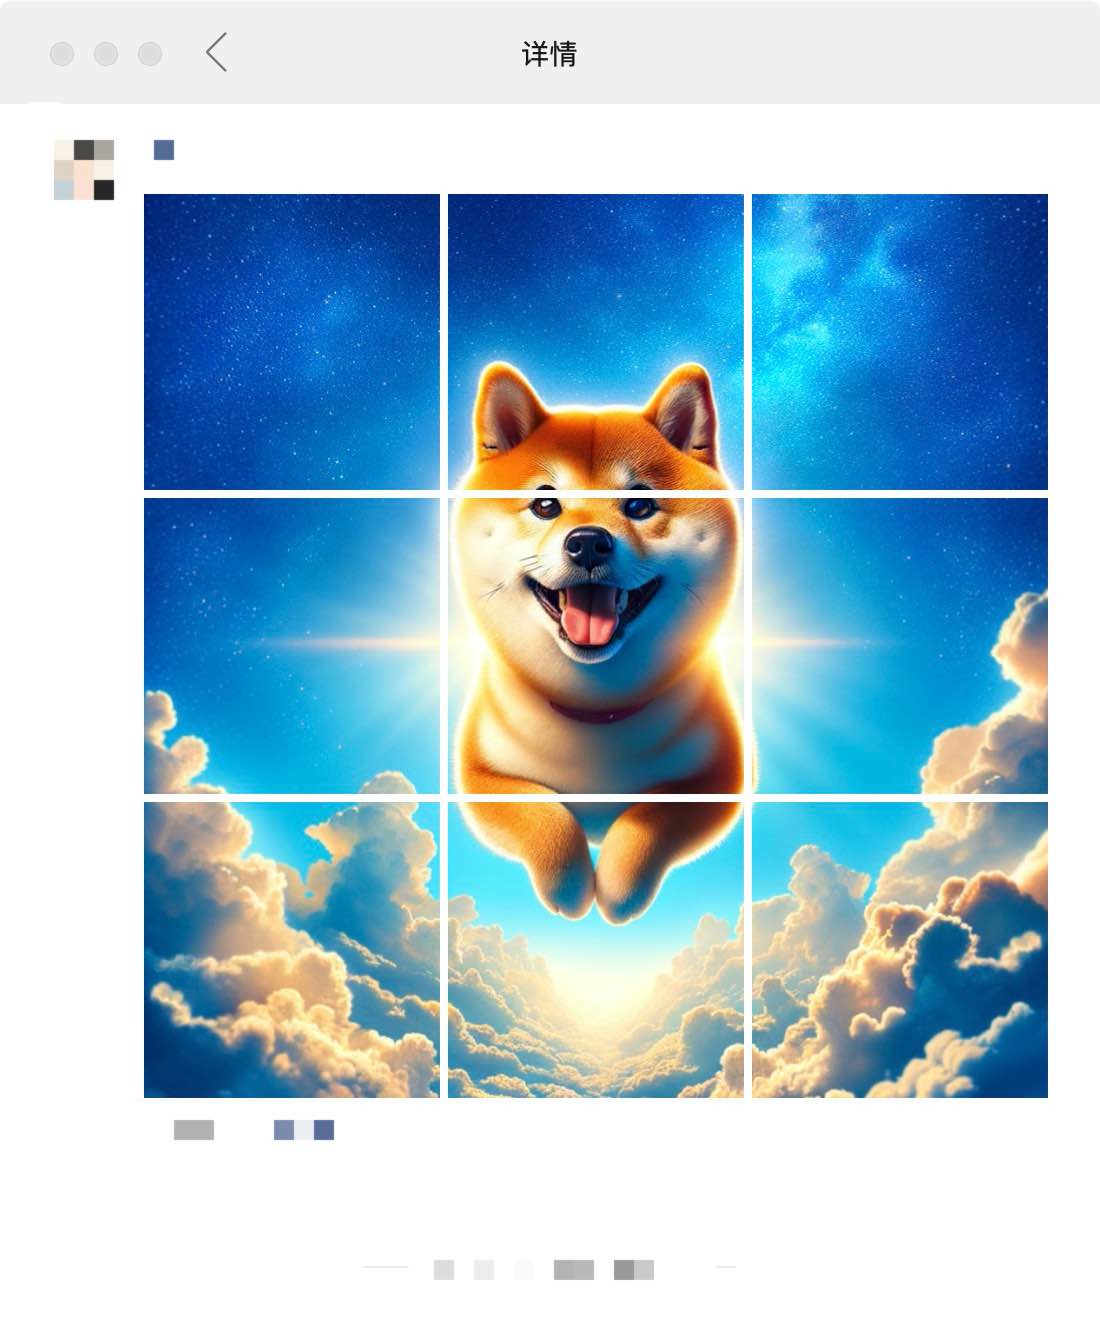
Here's how it looks after successful posting:
Mobile Operation: Using Browser to Create and Post Nine-Grid Images
While desktop operation is more convenient, we often only have our phones at hand. Don't worry, you can still complete this task using your mobile browser.
Mobile Operation Steps
- Open the tool website in your mobile browser
- Upload image and set parameters
- Download and unzip images
- Post on WeChat
Detailed steps are as follows:
-
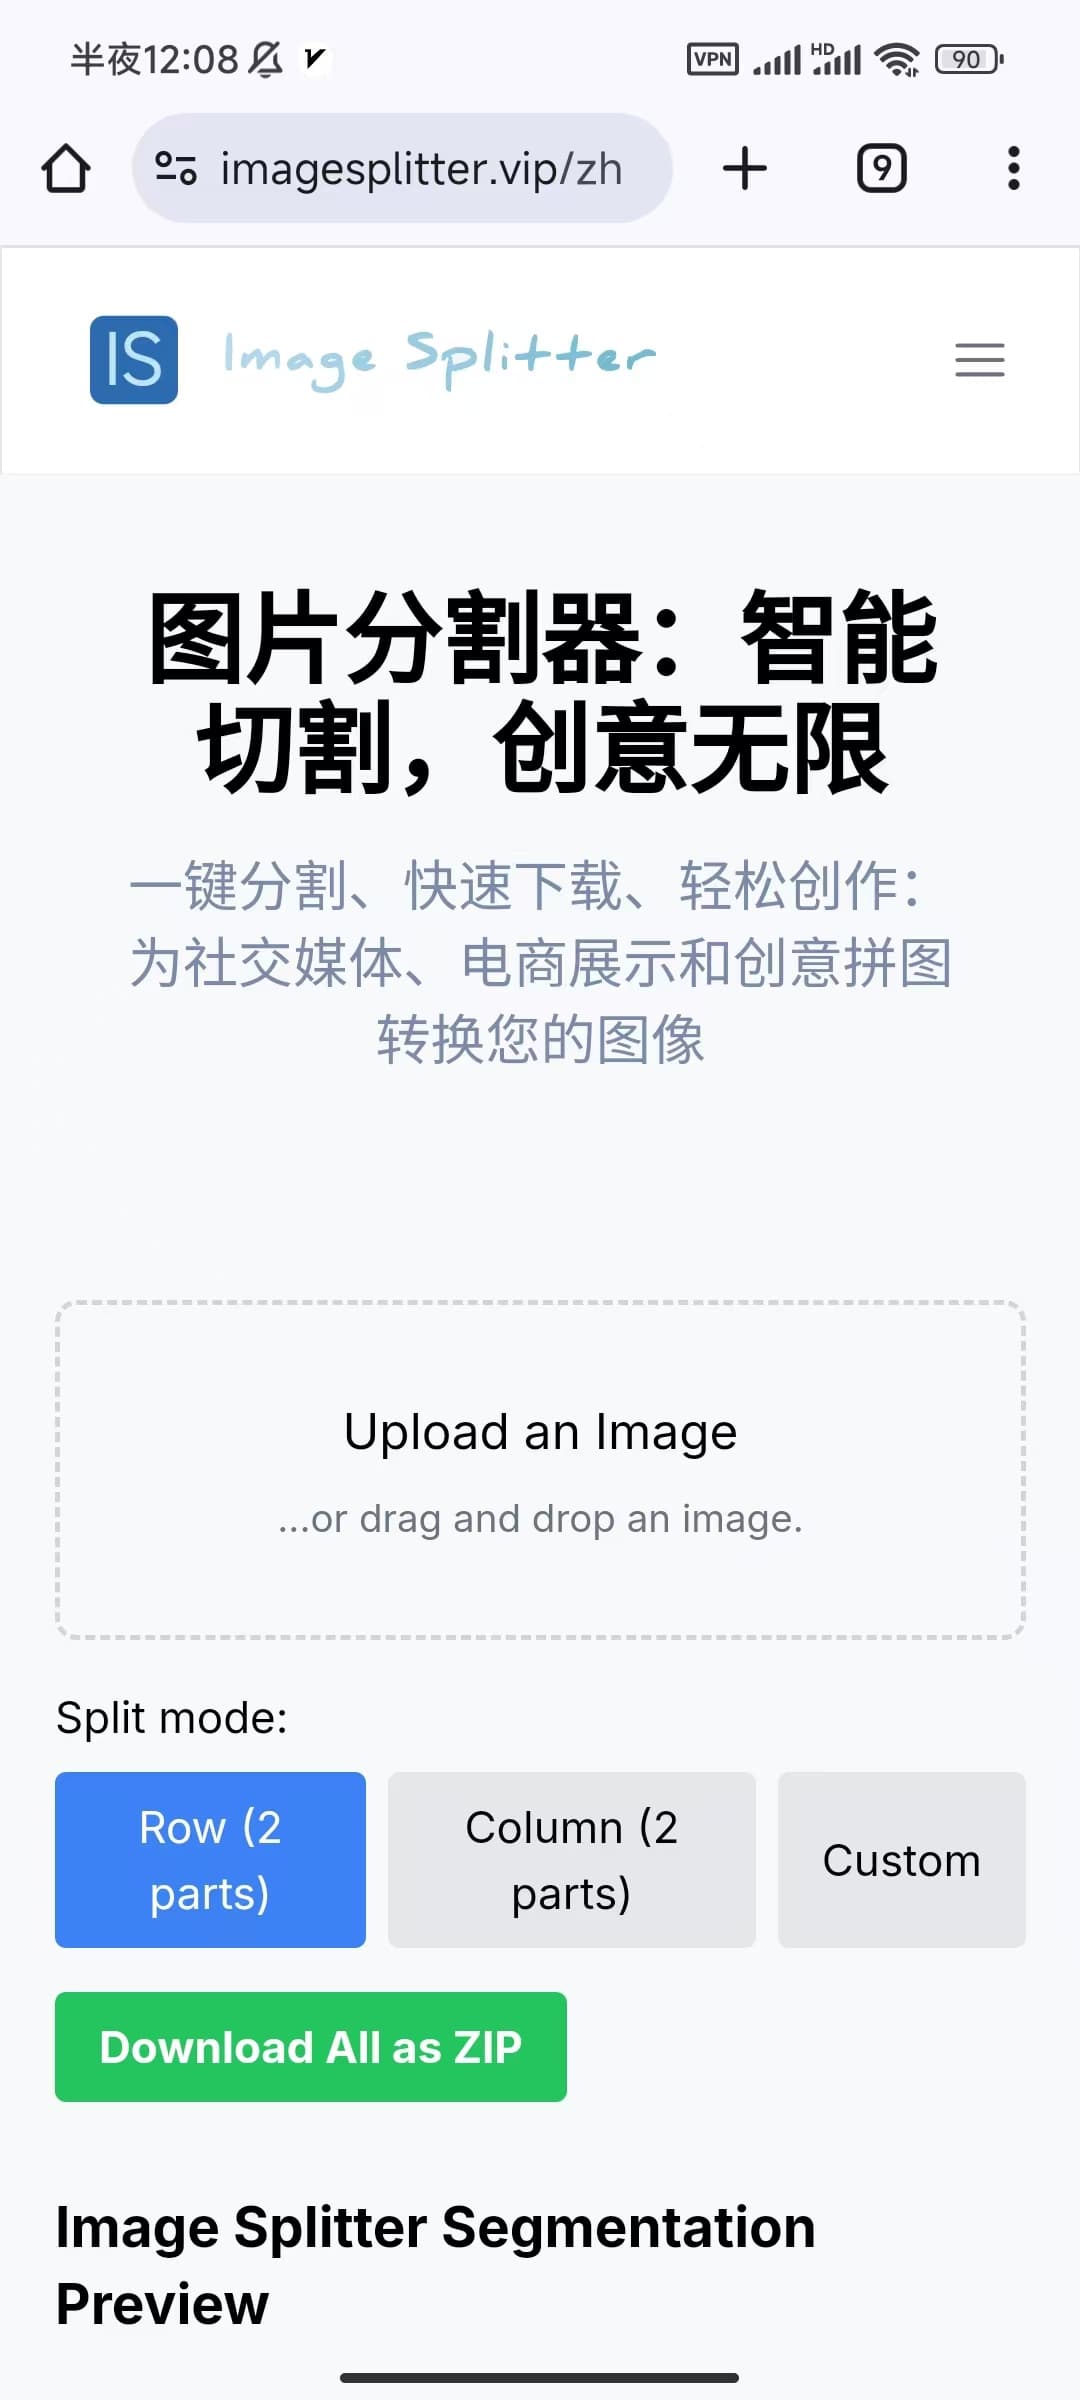
Visit the tool website:
-
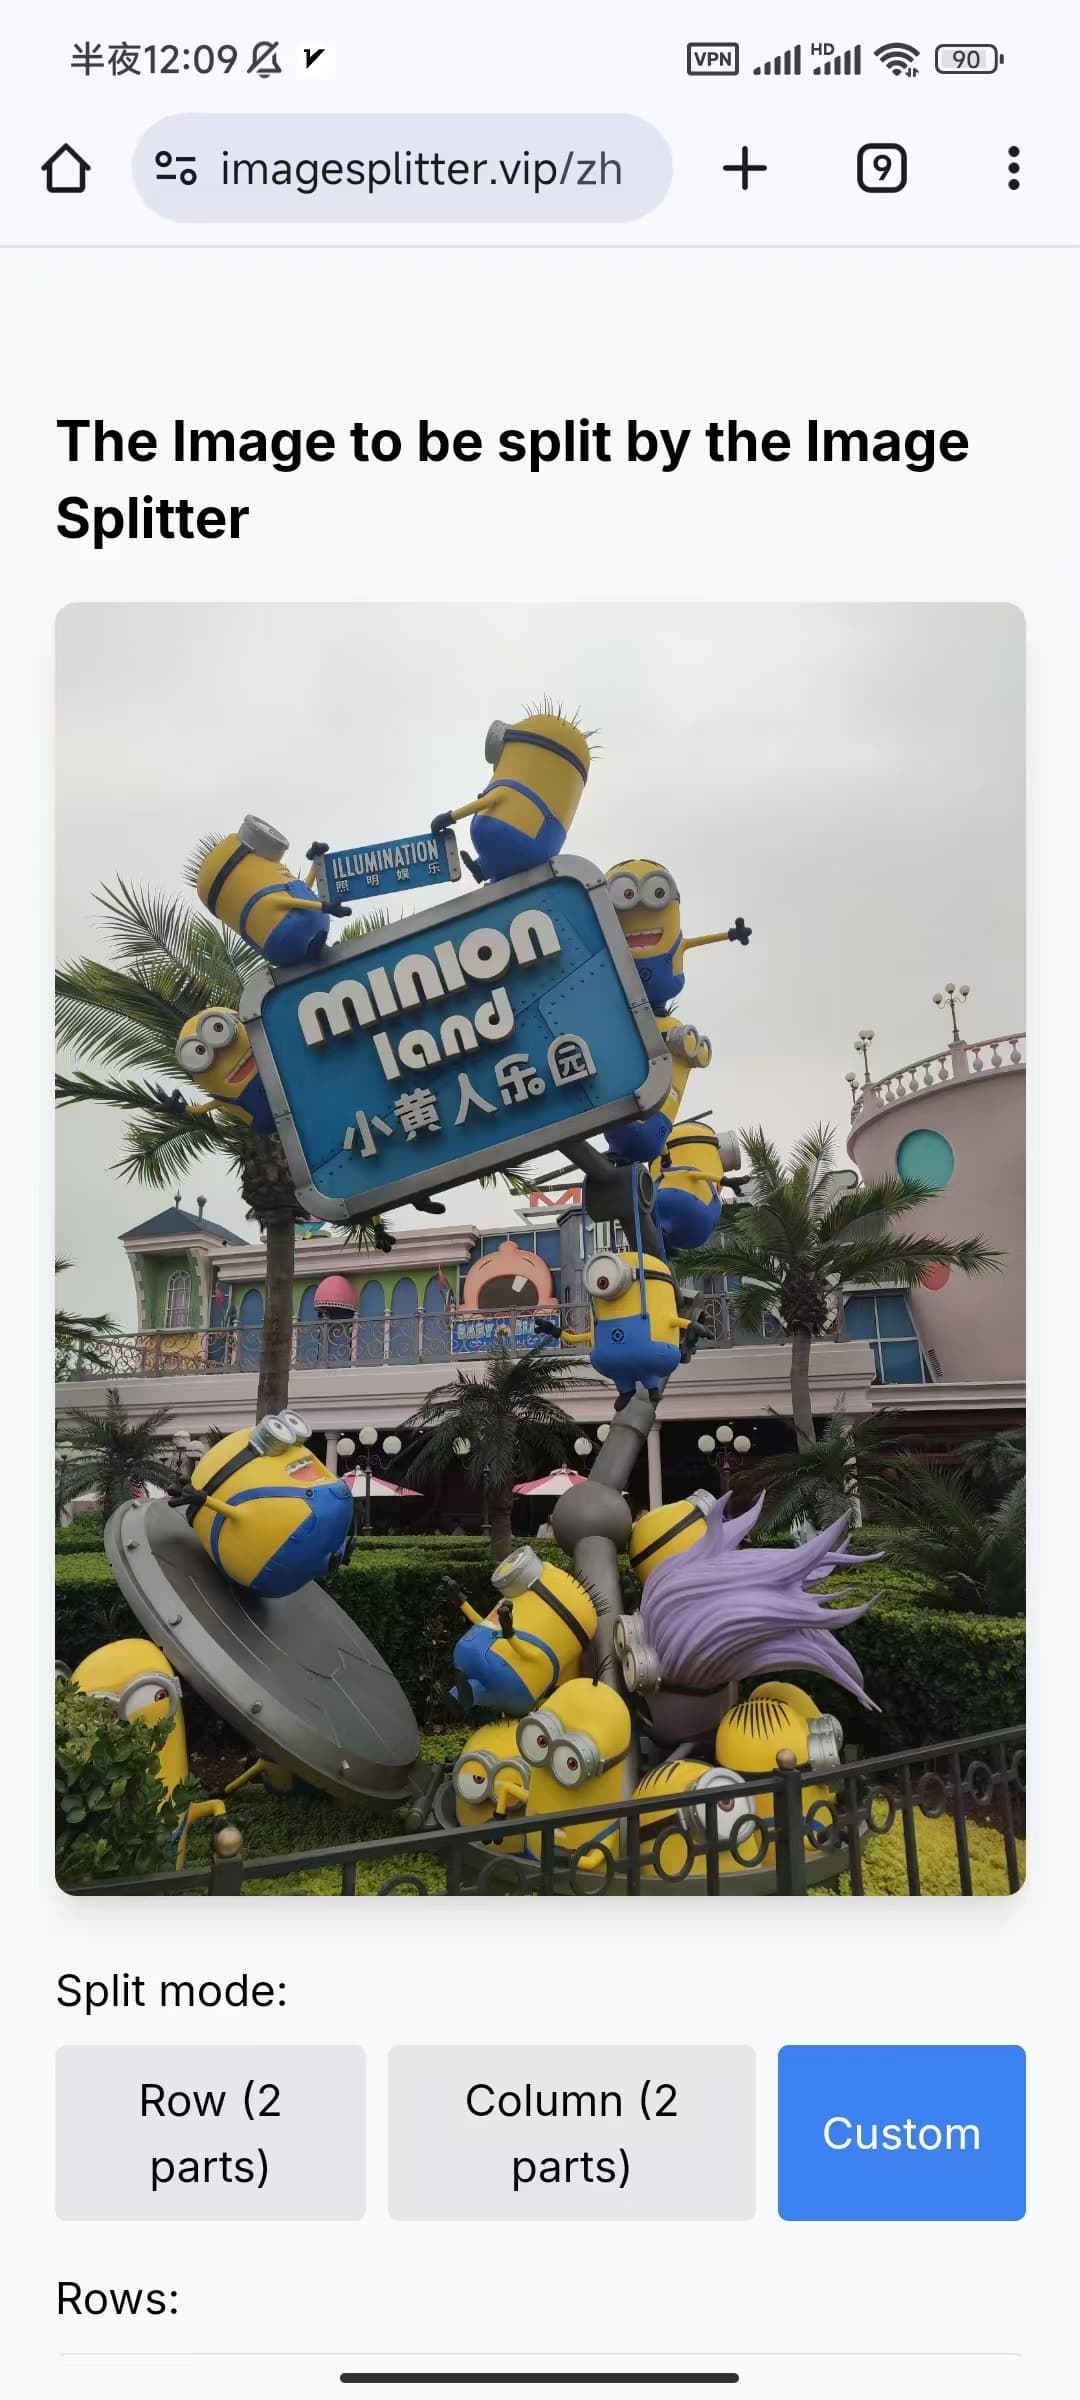
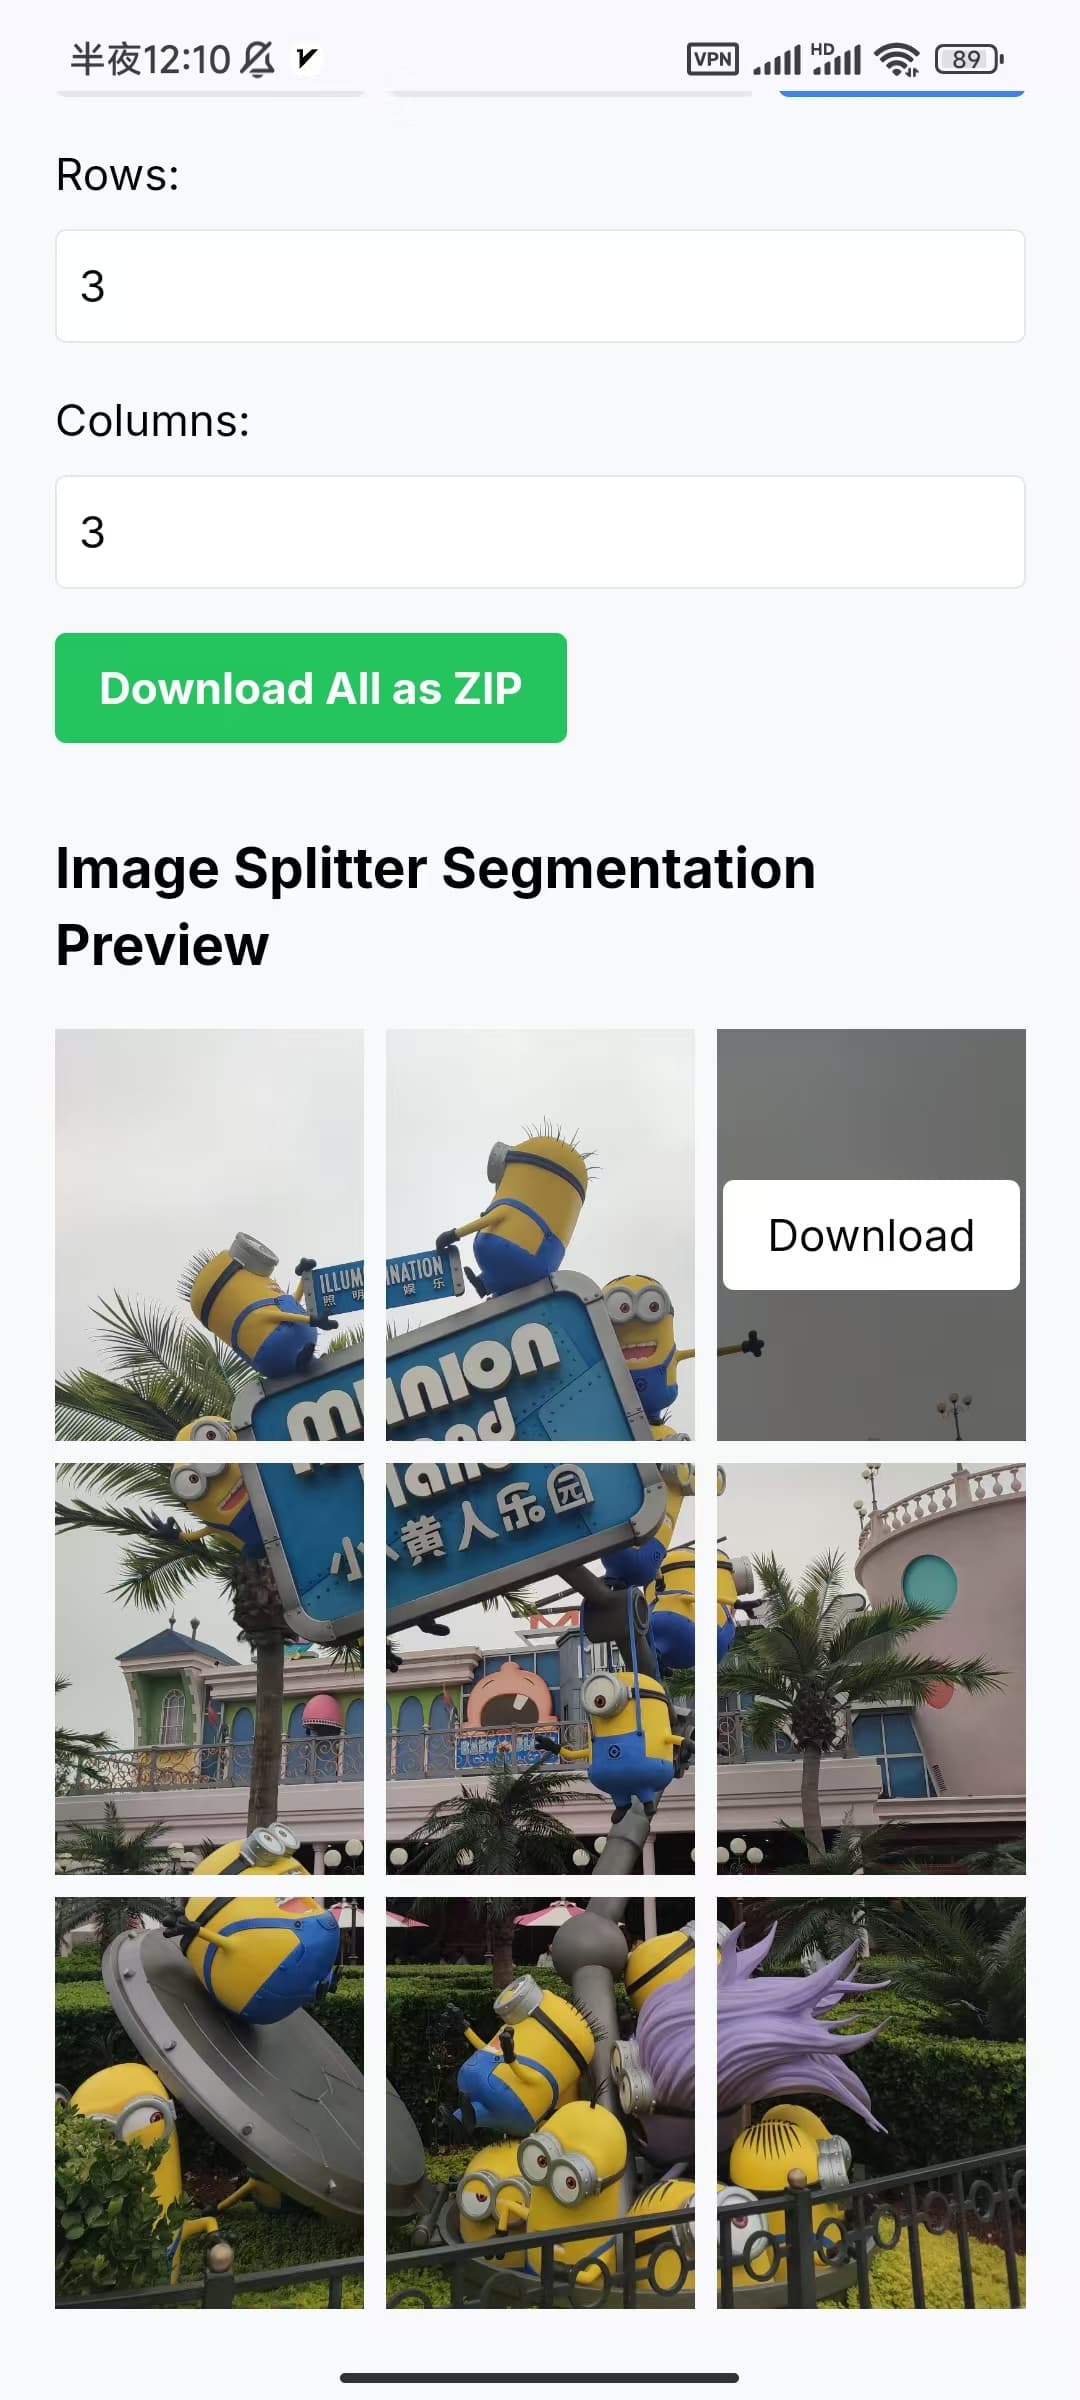
Upload image and set parameters:
-
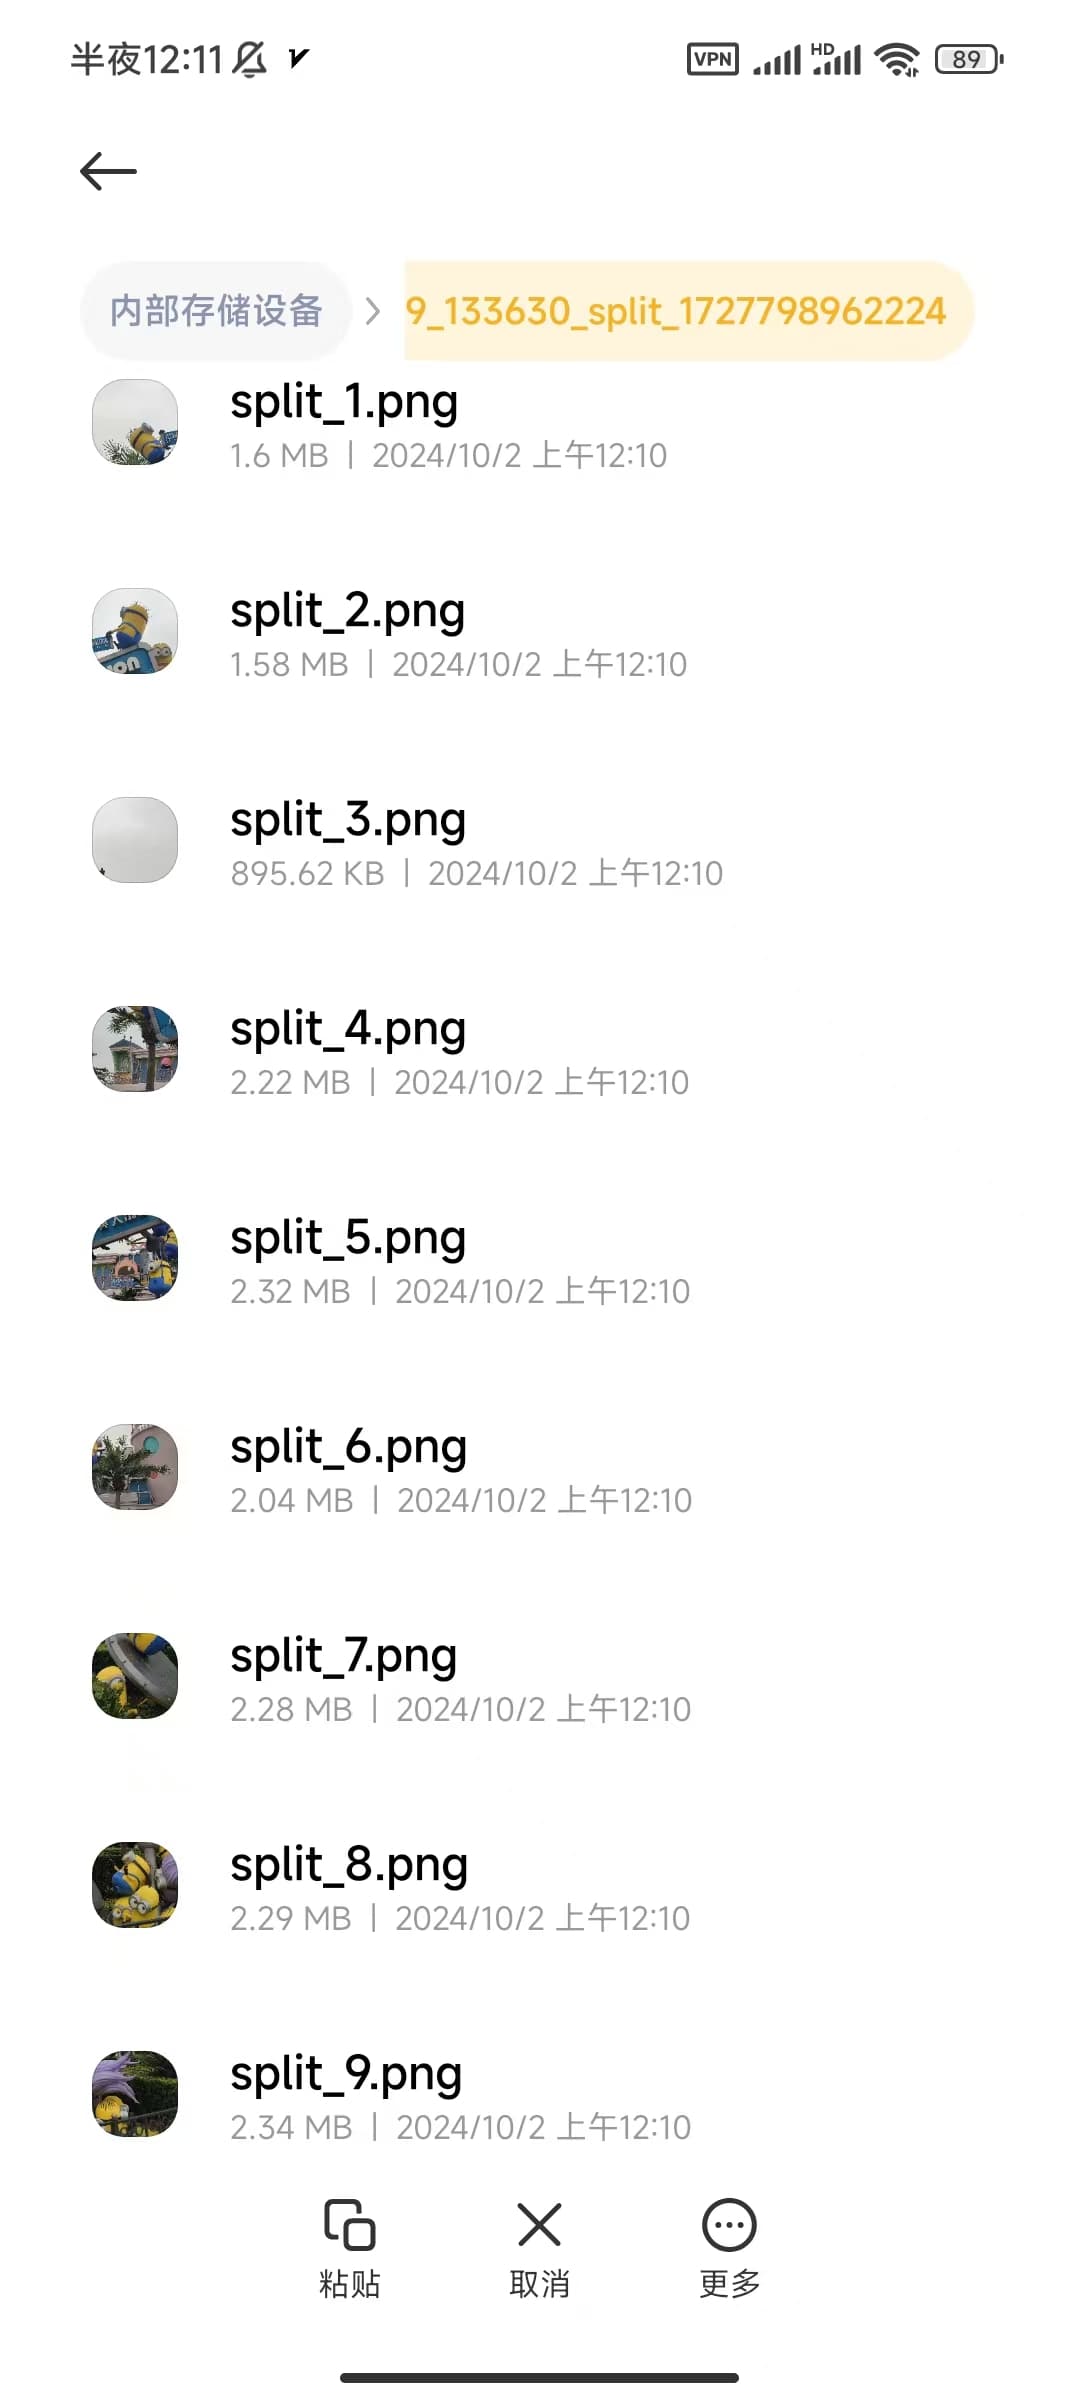
Download and unzip images:
-
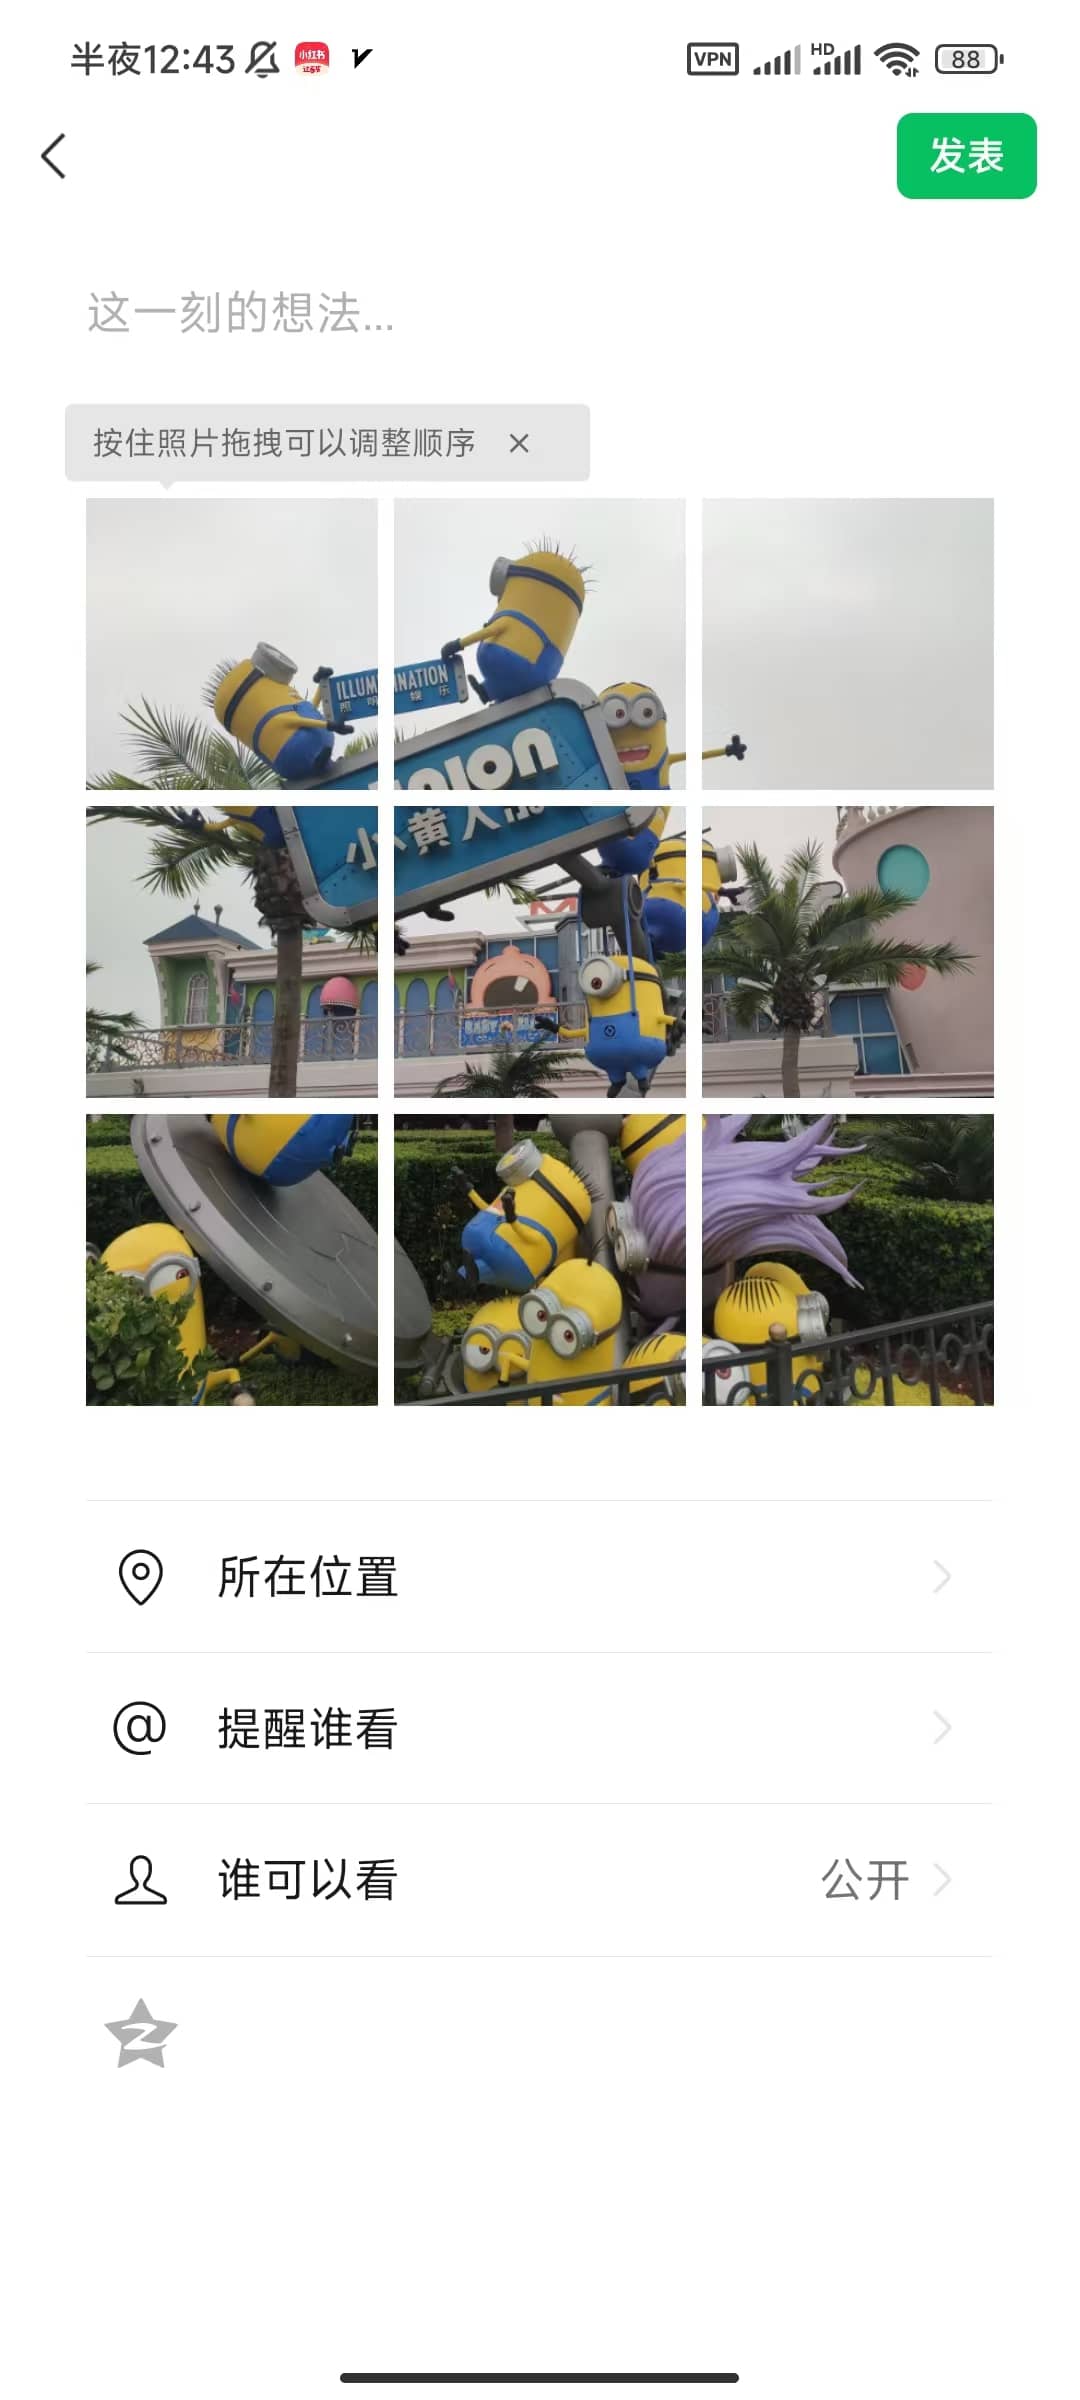
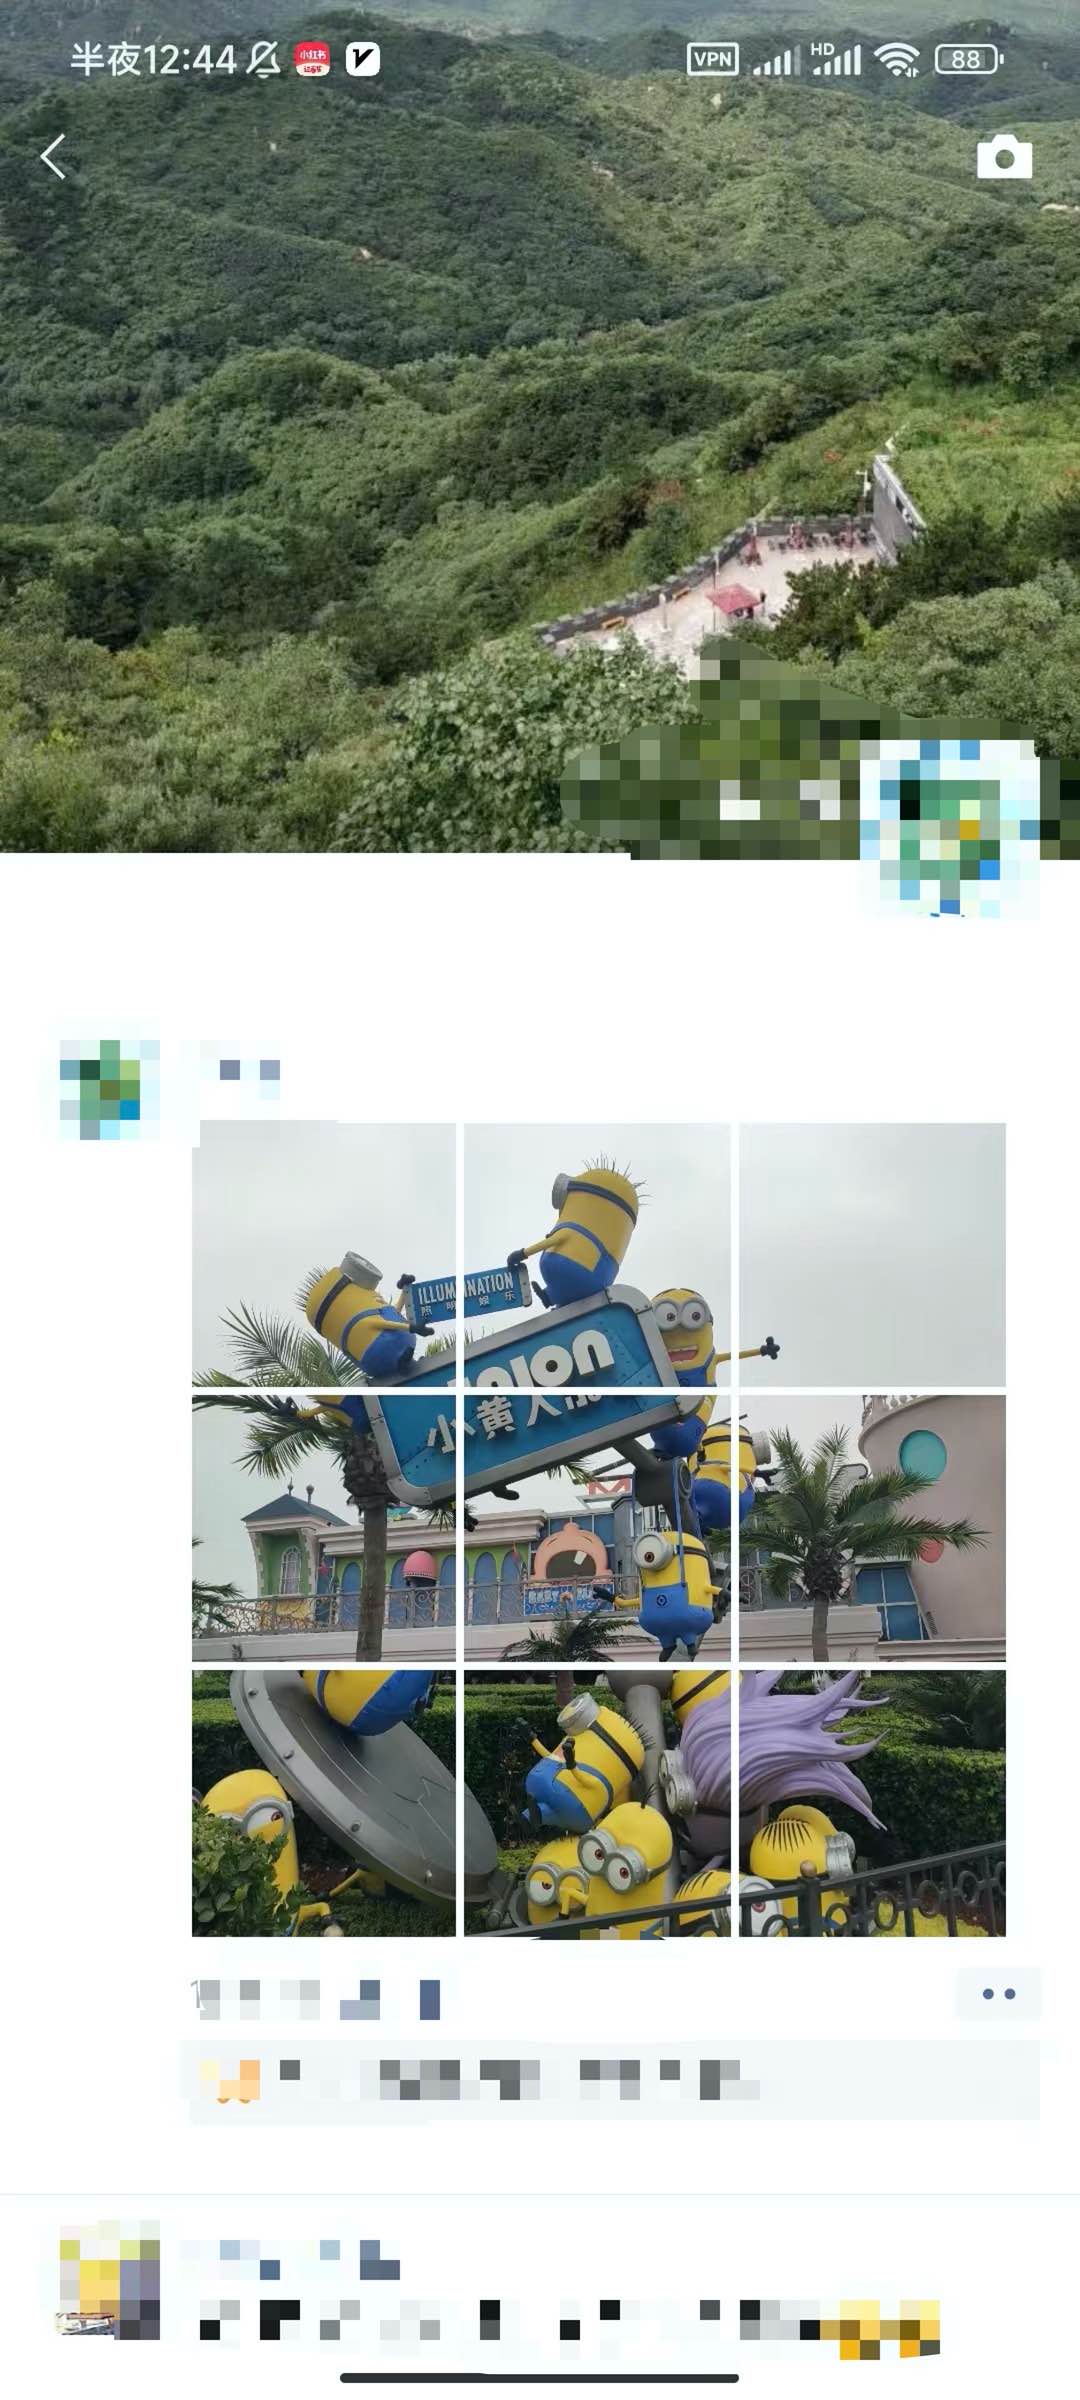
Post on WeChat:
More Nine-Grid Generator Recommendations
Web-based Tools
Mobile Apps
- iOS: Nine-Grid Image Cutter - Simple Operation
- Android: Nine-Grid Image Maker
- iOS: Split Image - One-Click Nine-Grid Puzzle Maker 4+
WeChat Mini Programs
Search in WeChat for:
- Nine-Grid Image Maker
- Nine-Grid Image Cutter
Conclusion
Now you've mastered the techniques for creating and posting nine-grid images on WeChat Moments. Whether using a computer or phone, you can easily create eye-catching nine-grid images. We hope this tutorial has been helpful!
If you have any other needs or suggestions, feel free to contact us at [email protected]. We'll continue to work hard to provide more useful tools and resources.
Don't forget to try making your first nine-grid image - your WeChat Moments will surely become more exciting!
Introduction
In today's visual-driven social media landscape, Instagram has become a crucial platform for showcasing personal brands and creativity. A well-designed Instagram feed layout is key to attracting attention and boosting account professionalism.
Why is an Instagram grid layout important? Let's break it down:
-
First Impression: Your grid is the first thing visitors see on your profile. It immediately shapes their opinion of your account.
-
Brand Consistency: A cohesive grid helps maintain visual style consistency. This reinforces your brand image across posts.
-
Storytelling: Through clever image arrangement, you can weave a compelling brand narrative. This increases follower engagement and interaction.
-
Professional Image: A neat, orderly grid layout demonstrates your attention to detail. It showcases your professionalism to potential followers or clients.
-
Increased Engagement: An eye-catching grid encourages users to spend more time on your profile. This leads to higher engagement rates and potentially more followers.
However, creating the ideal Instagram post layout isn't always straightforward. This is where Instagram grid maker tools and image splitters come into play. These Instagram feed planners can help you:
- Split large images into multiple smaller ones, creating stunning puzzle feed effects
- Maintain image quality, ensuring each split part remains clear and visible
- Save time and effort, eliminating the need for complex photo editing software
- Easily experiment with different Instagram post layout options
- Create unique visual effects, making your account stand out in the Instagram feed
In this article, we'll compare two popular Instagram grid planner tools: My Social Boutique's Instagram Grid Maker and imagesplitter.vip's Instagram Photo Splitter. We'll examine their features, usability, pricing, and more to help you choose the best Instagram feed planner for your needs.
Whether you're an individual creator, brand manager, or social media marketing expert, this comparison will provide valuable insights to help you create an impressive Instagram aesthetic and stand out on the platform.
Features of My Social Boutique's Instagram Grid Maker
My Social Boutique offers a free Instagram grid maker tool that goes beyond simple grid creation. Let's explore its key features:
- Grid Effects: Create classic Instagram grid layouts
- Carousel Effects: Design engaging multi-image posts
- Puzzle Effects: Craft eye-catching split-image puzzles
You can access this versatile Instagram post layout tool at instagram-grid-maker.
Features of imagesplitter.vip's Instagram Photo Splitter
In contrast, imagesplitter.vip provides a focused image splitting tool. Here's what it offers:
- Flexible Splitting: Supports various splitting formats, not just grids
- Custom Layouts: Create row and column splits beyond standard Instagram layouts
- Versatile Use: Suitable for Instagram, WeChat, and other social platforms
You can try this powerful Instagram feed planner at Instagram Photo Splitter.
Feature Comparison
Let's break down the key differences between these Instagram grid maker tools:
| Feature | Instagram Grid Maker | Instagram Photo Splitter |
|---|---|---|
| Layout Options | Grid mode only (1x1 to 5x5) | Flexible (1x2, 2x1, custom modes) |
| Upload Process | Drag-and-drop or click | Drag-and-drop or click |
| Splitting Process | Manual "Split Image" click | Automatic, real-time preview |
| Download Options | Single image only | Single and batch (ZIP) |
| Mobile Compatibility | PC only | PC and mobile |
| Image Quality | Compressed | Preserves original quality |
| Extra Features | Canva templates | None |
| Pricing | Basic free, some paid templates | Completely free |
| Target Users | Marketing pros, brand managers | Individual users, beginners |
| Use Cases | Complex layouts, design needs | Quick splits, focus on division |
| Registration | Not required | Not required |
| Ease of Use | Moderate | Simple |
Upload and Splitting Process
Let's dive deeper into how these Instagram feed planners handle uploads and image splitting.
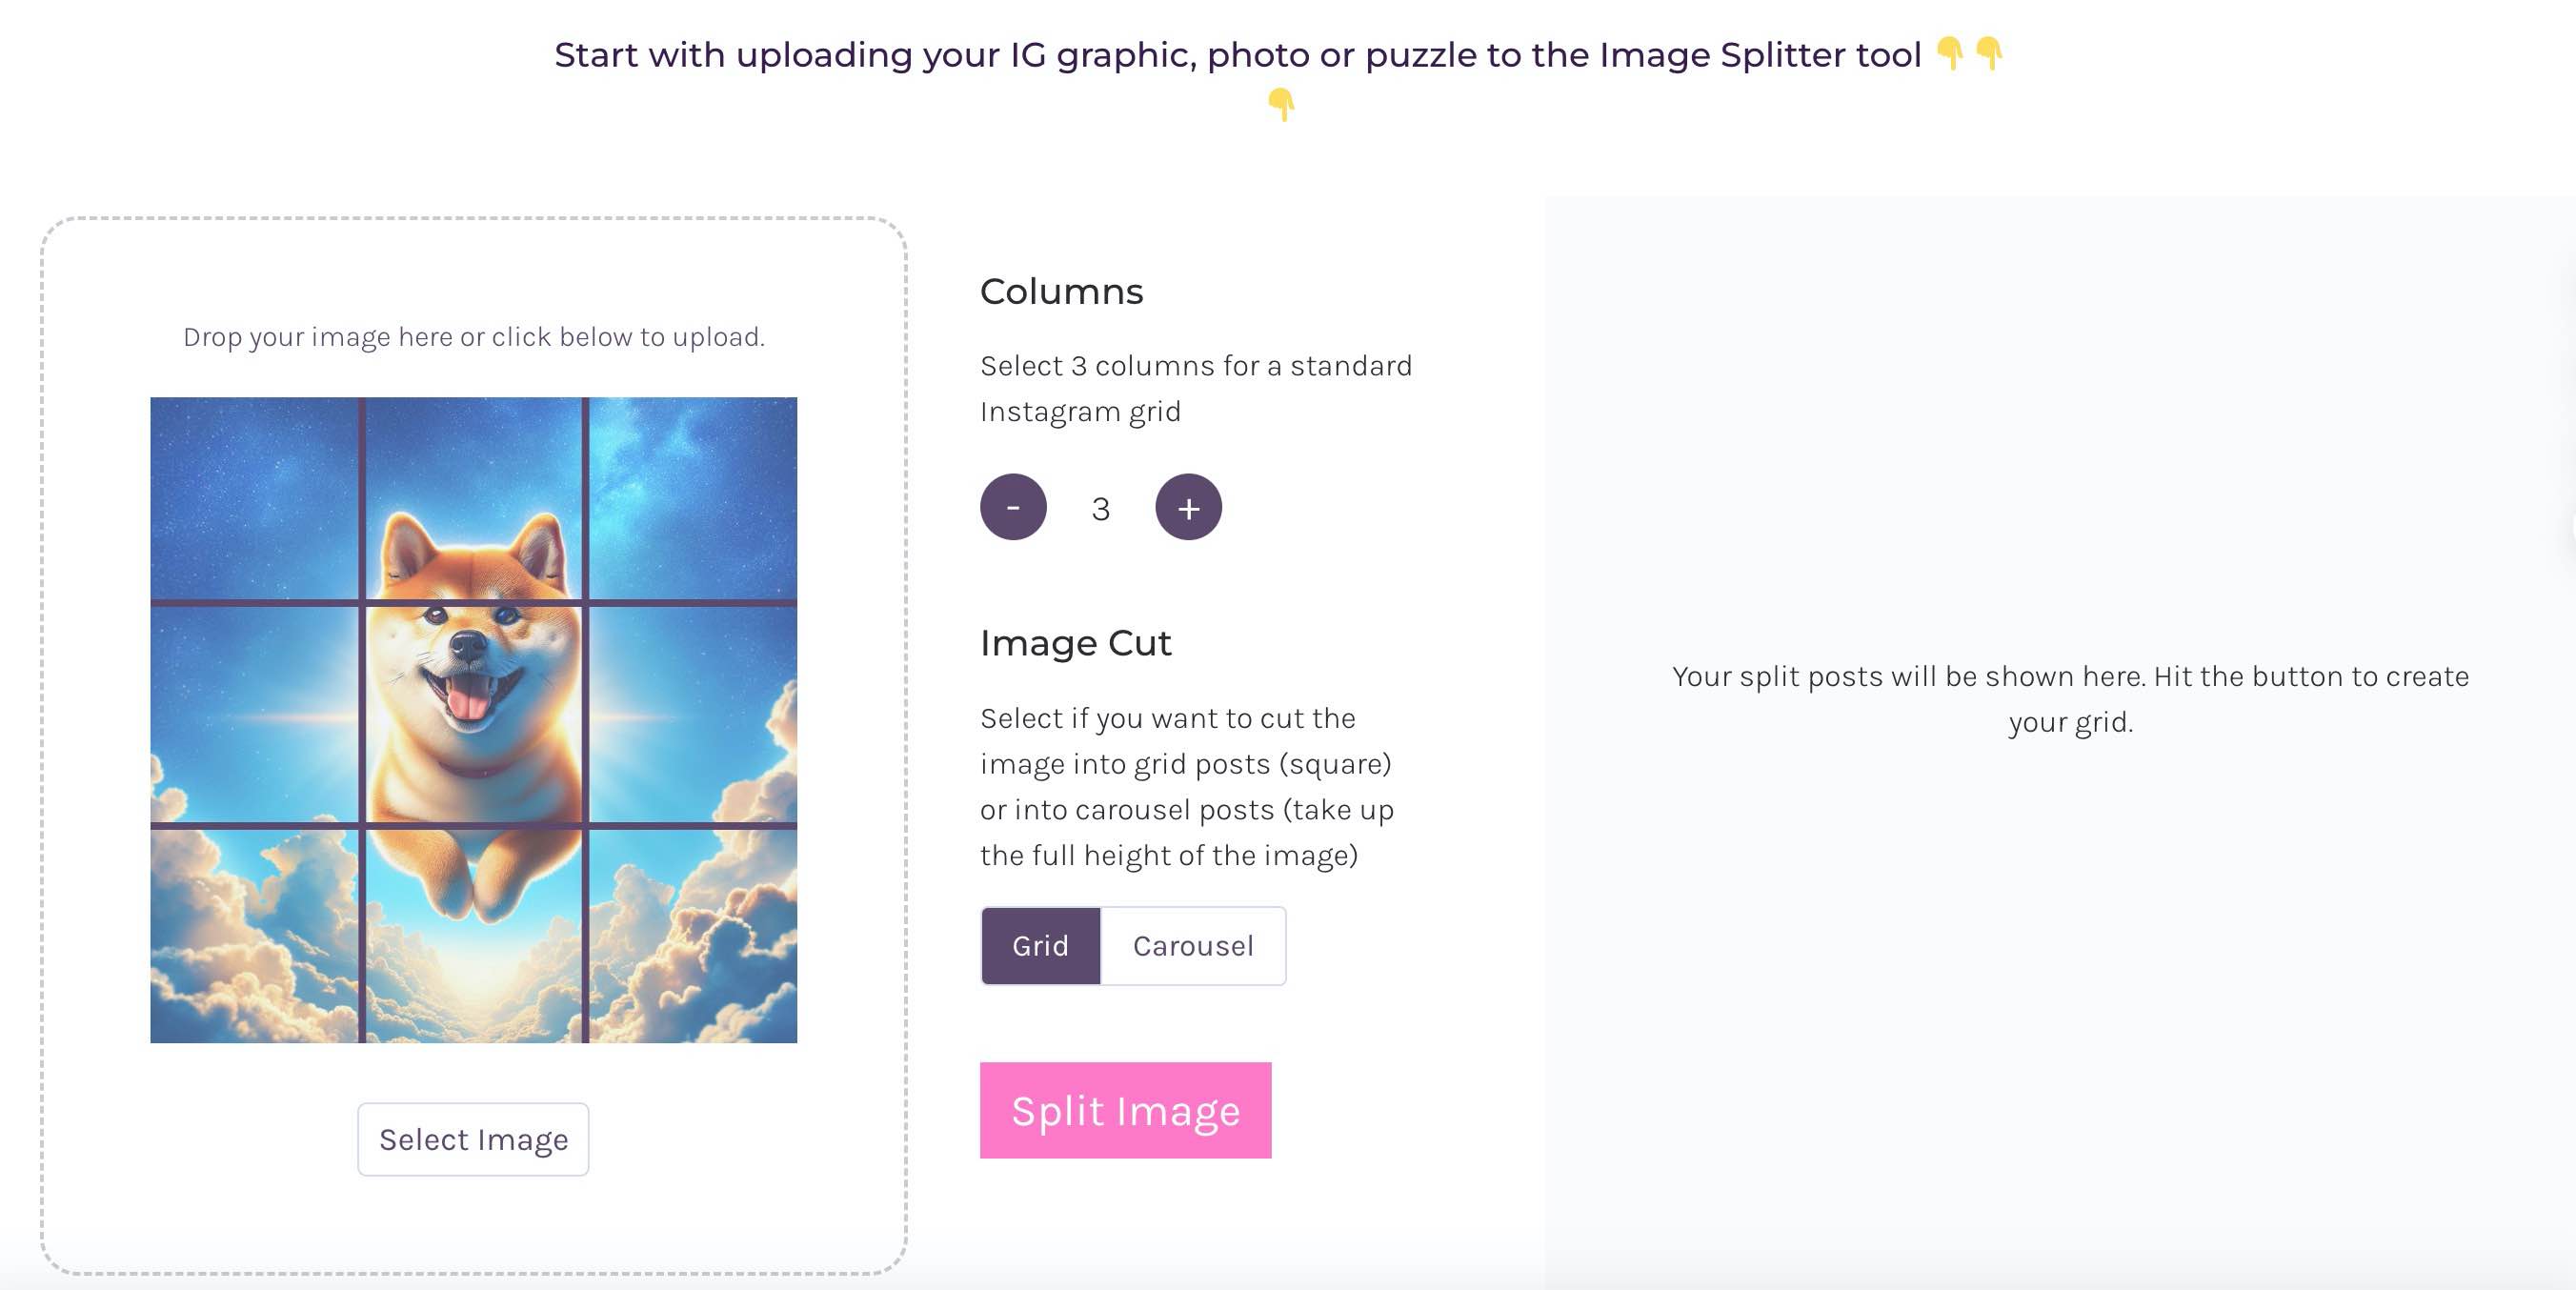
My Social Boutique's Instagram Grid Maker:
- Supports drag-and-drop or click-to-upload
- Defaults to a 3x3 grid after upload
- Offers grid and carousel modes
- Adds grid lines to the original image for preview
Here's what it looks like:
imagesplitter.vip's Instagram Photo Splitter:
- Also supports drag-and-drop or click-to-upload
- Shows original image on the left, preview on the right
- Requires manual adjustment for 3x3 grid in custom mode
- Provides immediate splitting preview
Take a look:
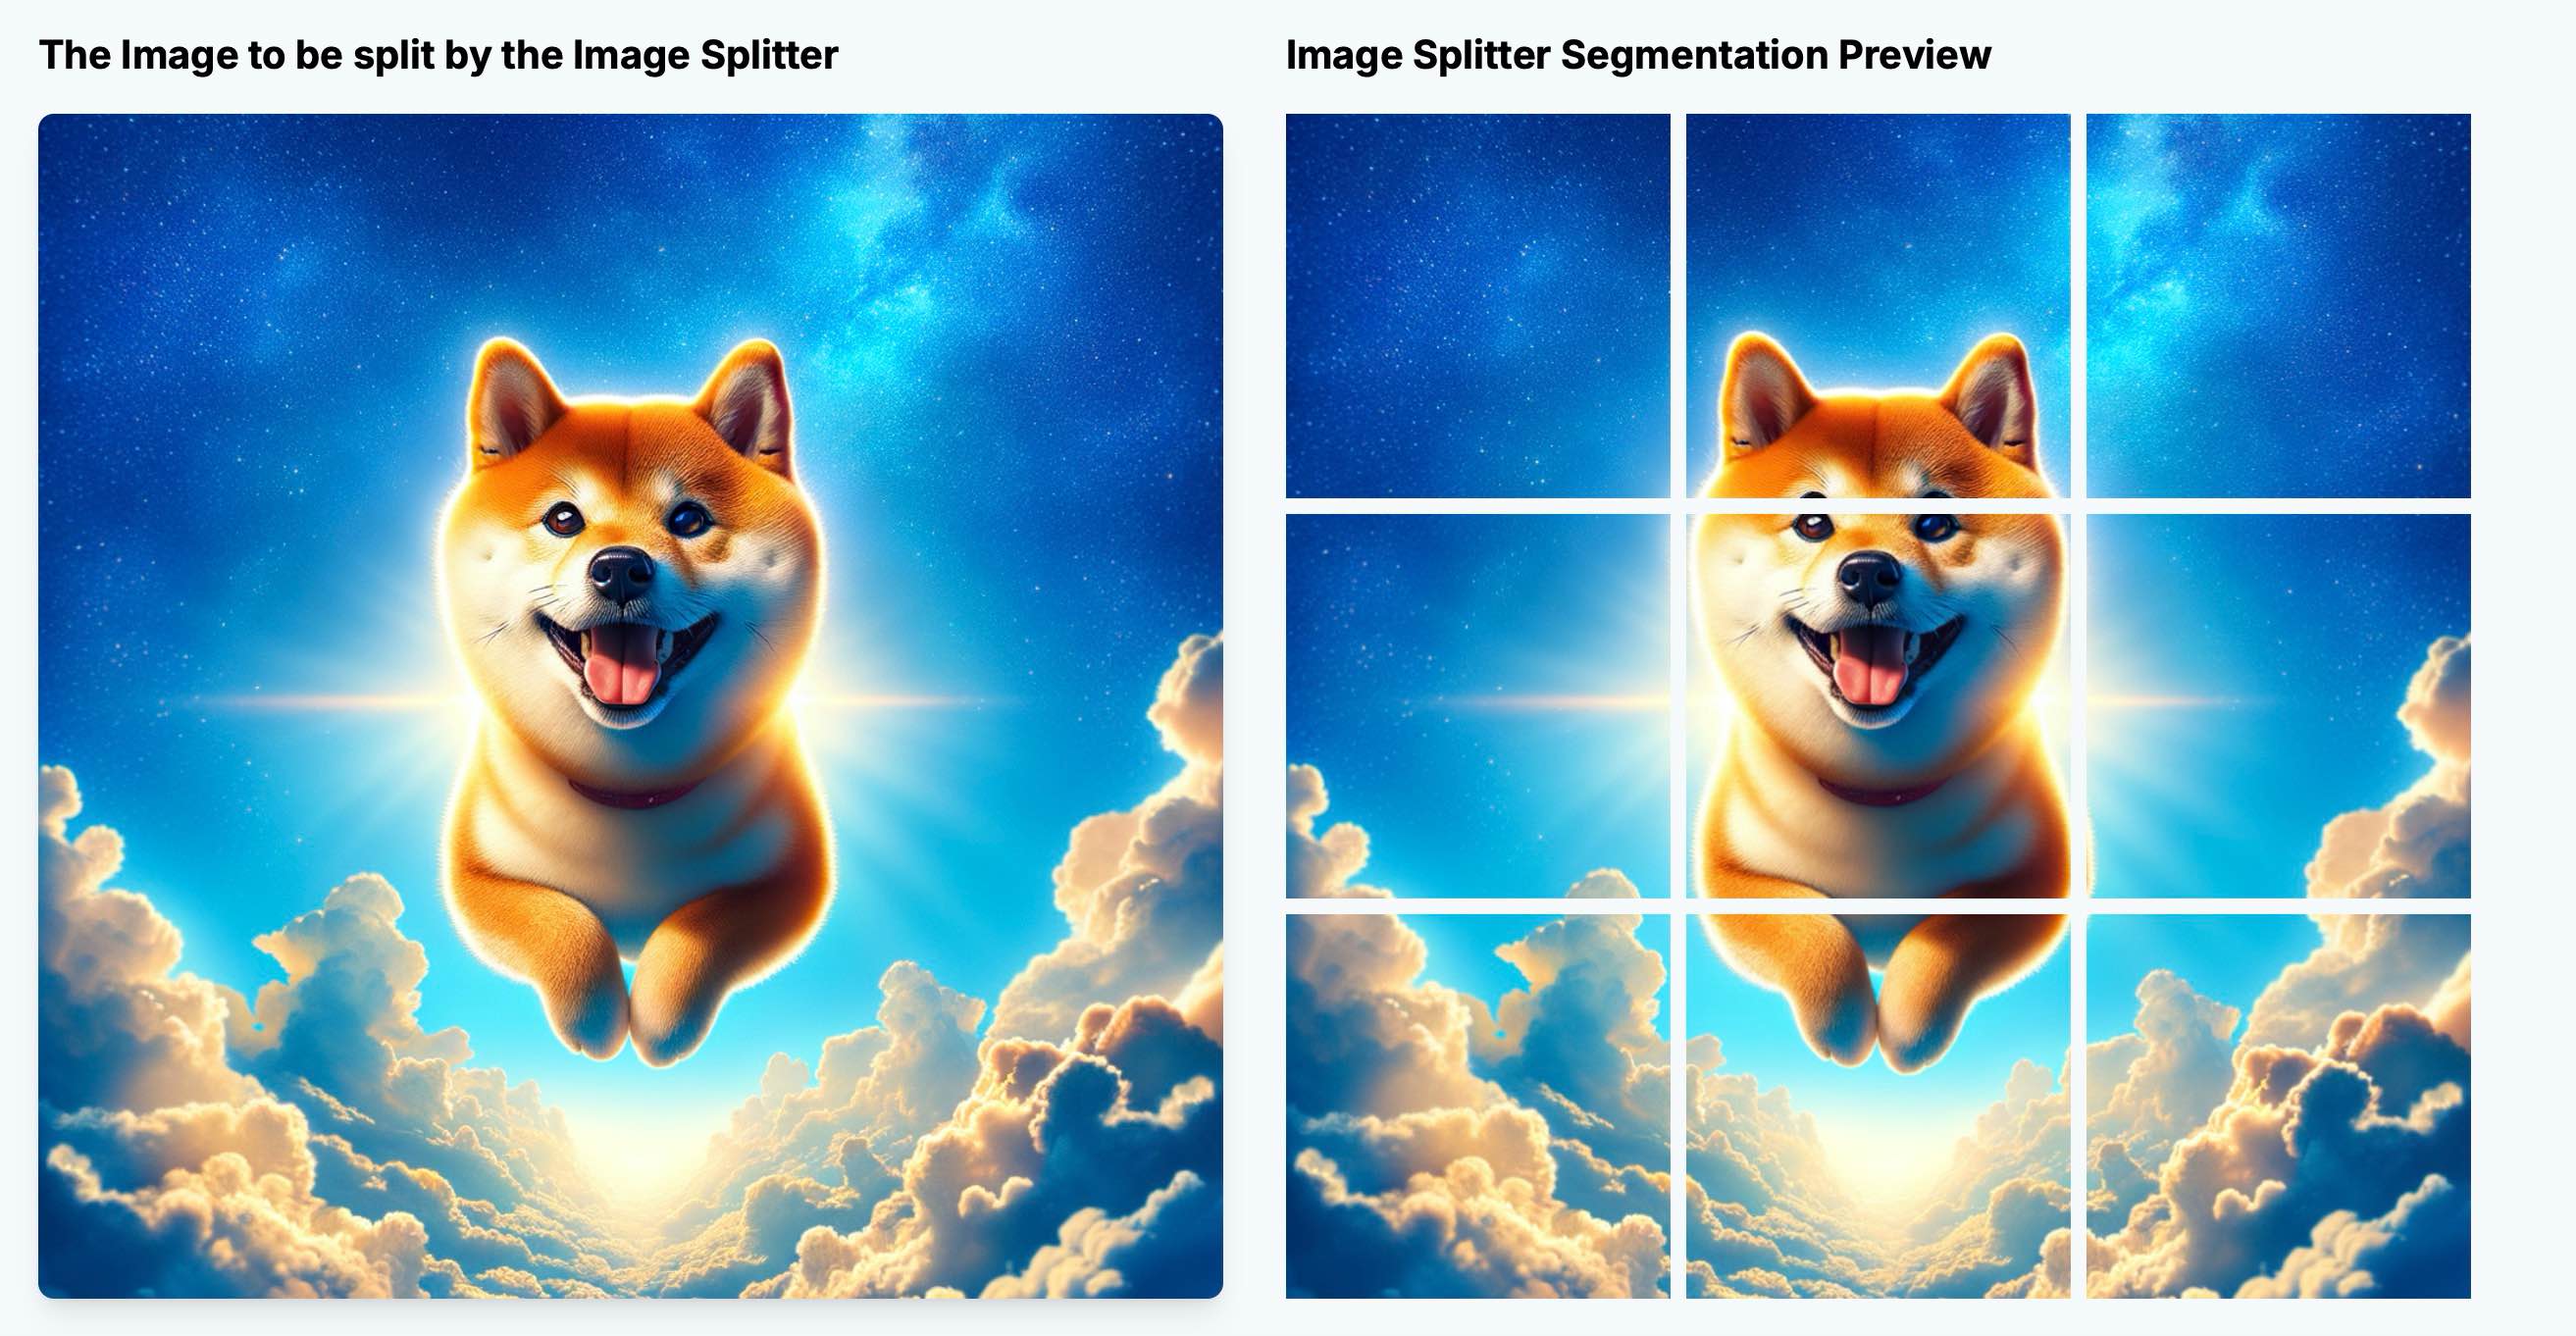

In terms of user experience, Instagram Photo Splitter seems to have an edge. It allows easy comparison between the original and split images.
For the actual splitting process:
Instagram Grid Maker:
- Requires manual click of "Split Image" button
- Takes a few seconds to process
- Displays list of split images for individual download
Here's the result:
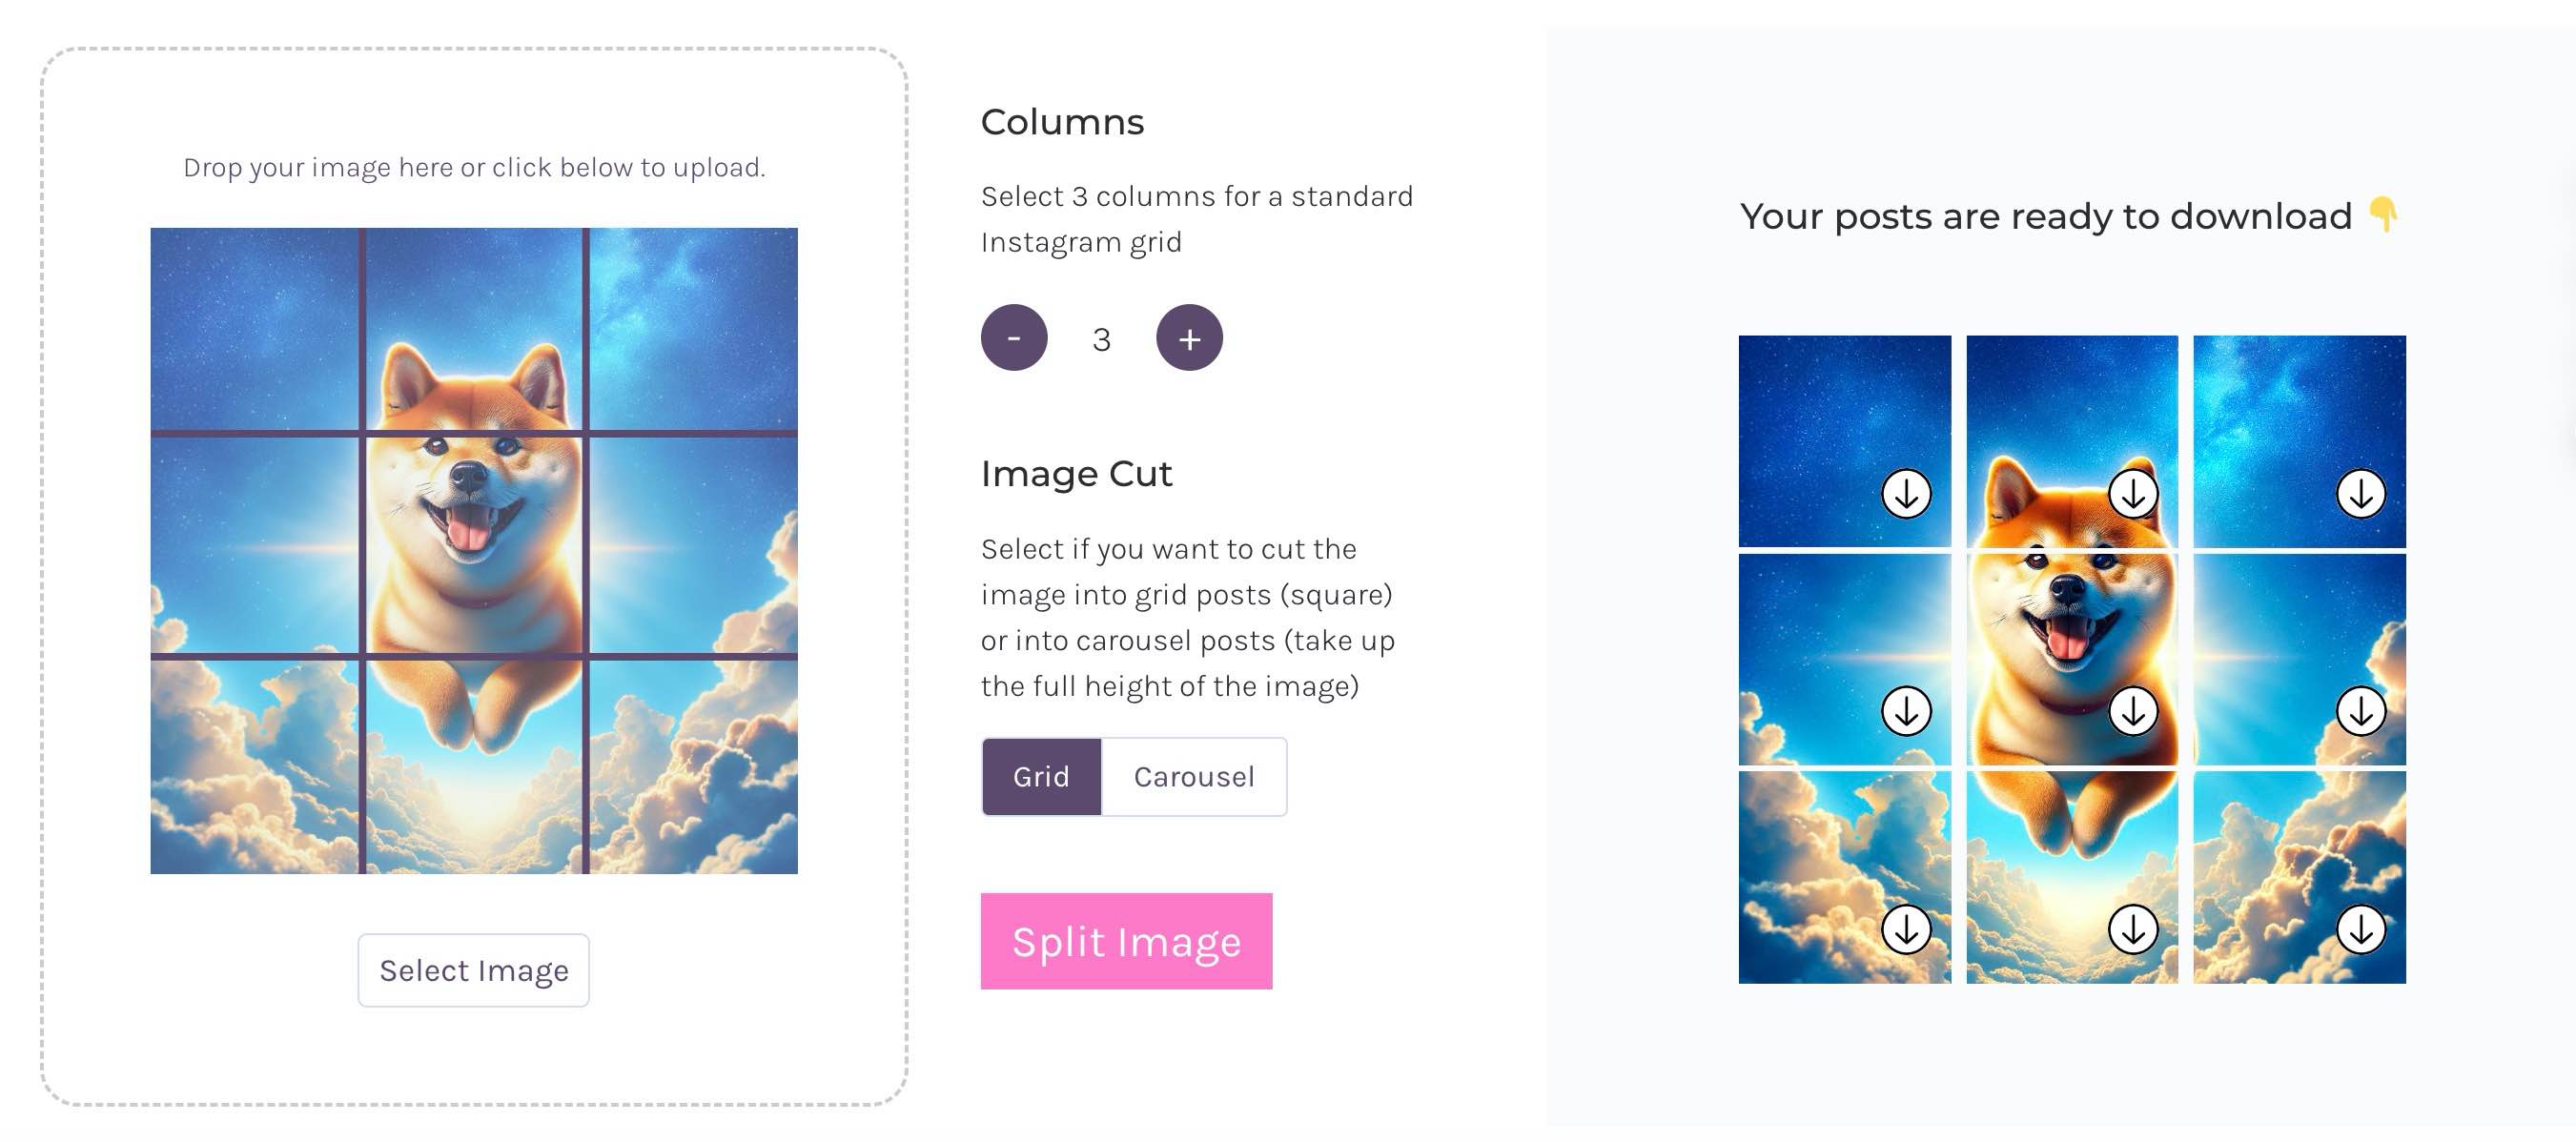
Instagram Photo Splitter:
- Automatically splits upon upload
- Updates preview in real-time as you adjust settings
- Offers hover-to-download for individual images
- Provides a "Download All as ZIP" option for convenience
Supported Layout Options
When it comes to Instagram post layout options:
Instagram Grid Maker:
- Limited to square grid formats (1x1, 2x2, 3x3, 4x4, 5x5)
- Ideal for classic Instagram grid aesthetics
Instagram Photo Splitter:
- Supports 1x2, 2x1 by default
- Offers custom mode for any row/column combination
- Versatile enough for Instagram, WeChat, and more
Download Options
The download process can significantly impact your Instagram feed planning workflow:
Instagram Grid Maker:
- Only supports individual image downloads
- Requires manual clicking for each split image
Instagram Photo Splitter:
- Offers both individual and batch downloads
- One-click ZIP download for all split images
- More efficient for creating complex Instagram aesthetics
Mobile Device Compatibility
In our increasingly mobile world, this factor is crucial for on-the-go Instagram feed planning:
Instagram Grid Maker:
- PC-only, no mobile optimization
Instagram Photo Splitter:
- Fully supports both PC and mobile devices
- Ideal for creating Instagram post layouts anywhere
For more on mobile use, check out our guide on How to Post Nine-Grid Images on WeChat Moments.
Additional Features
While both tools focus on Instagram grid creation, they offer different extras:
Instagram Grid Maker:
- Provides Canva templates
- Useful for users needing design assistance
Instagram Photo Splitter:
- Focuses solely on image splitting
- Keeps things simple and straightforward
User Experience Summary
Let's recap the user experience of these Instagram feed planners:
Instagram Grid Maker:
- Simple three-step process: upload, split, download
- No registration required
- Decent experience for basic Instagram grid creation
Instagram Photo Splitter:
- Two-step process: upload and download
- No registration needed
- User-friendly interface
- Likely to appeal to a wide range of users
Image Quality
Image quality is crucial for maintaining your Instagram aesthetic:
Instagram Grid Maker:
- Compresses images
- Doesn't preserve original format
Instagram Photo Splitter:
- Maintains original image quality
- Preserves original format
Pricing
Cost is always a factor in choosing your Instagram feed planner:
Instagram Grid Maker:
- Basic features are free
- Some paid Canva templates available
- No registration or extra fees for core functionality
Instagram Photo Splitter:
- Completely free
- All features accessible without login
Use Cases
Let's explore who might benefit most from each of these Instagram grid maker tools:
My Social Boutique's Instagram Grid Maker
Ideal for:
- Social media marketing professionals
- Brand managers
- Content creators with design skills
- Small businesses investing in social media
Best for:
- Creating complex, polished Instagram layouts
- Maintaining consistent brand aesthetics
- Accessing additional design resources
- Comprehensive social media marketing solutions
imagesplitter.vip's Instagram Photo Splitter
Perfect for:
- Individual Instagram users
- Beginners and hobbyists
- Budget-conscious small businesses or freelancers
- Occasional grid layout creators
Excellent for:
- Quick and easy basic Instagram grid layouts
- Focusing on image splitting without extra frills
- Improving Instagram aesthetics with free tools
- Creating special puzzle effects occasionally
- On-the-go Instagram feed planning on mobile devices
Conclusion
Choosing the right Instagram grid maker depends on your specific needs, budget, and skill level.
My Social Boutique's Instagram Grid Maker is best suited for professionals and businesses seeking comprehensive solutions for their Instagram aesthetics and overall social media strategy.
On the other hand, imagesplitter.vip's Instagram Photo Splitter is ideal for individuals and small businesses looking for a simple, free tool to enhance their Instagram feed layout.
If your primary need is image splitting and basic Instagram grid creation, imagesplitter.vip's Instagram Photo Splitter should be more than sufficient.
Ultimately, both tools can help you craft an engaging Instagram feed layout. Choose the one that aligns best with your Instagram aesthetic goals and workflow preferences.
引言
在当今视觉为王的社交媒体时代,Instagram已成为展示个人品牌和创意的重要平台。而精心设计的Instagram网格布局,无疑是吸引关注、提升账号专业度的关键因素。一个协调一致、富有美感的网格不仅能让您的个人主页看起来更加赏心悦目,还能有效传达您的品牌信息,增强用户粘性。
Instagram网格布局的重要性体现在以下几个方面:
- 第一印象: 用户访问您的主页时,网格布局是他们看到的第一个画面,直接影响他们对您账号的初步判断。
- 品牌一致性: 精心设计的网格有助于维持视觉风格的一致性,强化品牌形象。
- 叙事能力: 通过巧妙的图片排列,您可以讲述一个连贯的品牌故事,增加粉丝互动。
- 专业形象: 整洁有序的网格布局能够彰显您的专业度和对细节的重视。
- 增加浏览时间: 吸引人的网格布局能够鼓励用户在您的主页停留更长时间,提高互动率。
然而,创建完美的Instagram网格并非易事。这就是图片分割工具发挥作用的地方。这些工具能够帮助您:
- 将大图分割成多个小图,创造出令人惊叹的拼图效果
- 保持图片质量,确保分割后的每一部分都清晰可见
- 节省时间和精力,无需复杂的图像编辑软件
- 轻松尝试不同的布局方案,找到最适合您品牌的展示方式
- 创造独特的视觉效果,让您的账号在众多主页中脱颖而出
在本文中,我们将深入比较两款流行的Instagram网格制作工具: My Social Boutique的Instagram Grid Maker和imagesplitter.vip的Instagram Photo Splitter。通过详细对比它们的功能、易用性、价格等方面,帮助您选择最适合自己需求的工具,打造出令人印象深刻的Instagram网格布局。无论您是个人创作者、品牌管理者还是社交媒体营销专家,这篇对比文章都将为您提供有价值的见解,助您在Instagram上脱颖而出。
My Social Boutique的Instagram Grid Maker的功能介绍
Instagram Grid Maker 是一个免费的Instagram 网格、轮播和拼图制作工具,他的功能包括网格效果,以及轮播效果,还有拼图效果。 工具在线地址: instagram-grid-maker
imagesplitter.vip的Instagram Photo Splitter的功能介绍
Instagram Photo Splitter 是一个纯粹的图片分割工具,不仅仅支持宫格模式的图片拆分,还支持其他格式的拆分,比如按行按列拆分,不同的行列拆分等,不局限于宫格模式。 工具在线地址: Instagram Photo Splitter
功能对比
| 特性 | Instagram Grid Maker | Instagram Photo Splitter |
|---|---|---|
| 支持的布局选项 | 仅宫格模式(1x1, 2x2, 3x3, 4x4, 5x5) | 灵活(1x2, 2x1, 自定义模式如2x2, 2x3, 3x4等) |
| 上传过程 | 拖拽或点击上传 | 拖拽或点击上传 |
| 分割过程 | 需手动点击"Split Image"按钮 | 自动分割,实时预览 |
| 下载选项 | 仅支持单张下载 | 支持单张下载和批量下载(ZIP) |
| 移动设备兼容性 | 仅支持PC端 | 支持PC端和移动端 |
| 图片质量 | 压缩,不保留原格式 | 保留原图质量和格式 |
| 额外功能 | 提供Canva模板 | 无额外设计功能 |
| 价格 | 基础功能免费,部分Canva模板付费 | 完全免费 |
| 适用用户群体 | 社交媒体营销专业人士,品牌管理者 | 个人用户,初学者,小型企业 |
| 使用场景 | 复杂精美的Instagram布局,需要额外设计资源 | 快速简单的网格布局,主要关注图片分割 |
| 注册要求 | 无需注册 | 无需注册 |
| 使用难度 | 中等 | 简单 |
上传和分割过程
我们先看My Social Boutique的Instagram Grid Maker。它呢,支持拖拽或者点击上传图片,我们还是选择上篇文章微信朋友圈九宫格图片怎么发里面用到的柴犬图片以及小黄人的图片。
我们来看截图效果,这是上传上来的效果。

可以很清楚的看到,当上传图片后,Instagram Grid Maker默认选中的Grid就是3, 定位很清晰,就是Instagram网格制作工具呢。下面还支持两种模式,一个是宫格模式,另外一个是轮播,这里我们先不关注轮播的效果。我们还可以看到,上传图片后,宫格模式是3,上传的原图上,被添加了宫格线,这应该就是预览后的效果,也还算清晰,对用户而言,很好理解。
我们再来看看Instagram Photo Splitter的呢,同样用柴犬的图。


可以看到,上传图片后,左侧是原图,右侧是预览图,预览图的效果立马就出来了。Instagram Photo Splitter需要选择拆分模式到自定义模式,手动调整行列都是3,才能实现3 * 3的拆分效果。
整体上,还是觉得Instagram Photo Splitter的使用体验效果更好些,可以对比原图,以及拆分后将要生成的图。
接下来我们在对比一下,这两个小工具的分割过程吧。
对于Instagram Grid Maker。我们还需要手动点击Split Image的按钮,然后需要响应几秒钟,才能出现要被拆分的小图片列表。如图所示,这里其实应该录个视频才更加清晰。
 看这个图,最右边是我们点击分割图片后的效果展示,点击每个item图片的下载按钮就可以把图片下载下来啦。不过感觉体验还不够好,最好是支持一键下载全部才好。这样才更加方便用户呢。
我们来看看Instagram Photo Splitter吧。
还是看上面的图吧。在Instagram Photo Splitter里面,最右侧是预览区域,图片只要上传了就会自动被分割,用户可以重新调整要分割的模式,然后Instagram Photo Splitter就会根据最新的拆分模式给出响应,立马展示出最终的效果。不需要像Instagram Grid Maker点击Split Image的。
如果想要单独一张一张下载的话,只需要拖动鼠标到对应的item图片上即可,上面就会出现一个Download的按钮。如果想要更加省事的话,还可以点击左侧拆分模式下面的Download All as ZIP的按钮功能,他会直接打包全部被拆分的小图片为一个完整的压缩包的。特别方便。
支持的布局选项(3x3, 3x1等)
其实在上面我们大致提到了这个布局选项呢,对于Instagram Grid Maker,他其实只支持宫格模式的,比如说1x1,2x2,3x3,4x4,5x5等格式呢,这个工具被限定死了,没办法选择其他的比例。
但是对于Instagram Photo Splitter而言,是不同的。他呢默认支持1x2,2x1, 此外还支持自定义模式,这个模式更加灵活了,无论是2x2,2x3,3x4等等,都是支持的呢。没有不支持的拆分模式。所以Instagram Photo Splitter不仅仅可以充当Instagram网格制作器,还可以充当微信九宫格生成器,任意图片拆分器等呢。只要是规则的图片拆分,他几乎都可以满足。
下载选项(单张下载vs批量下载)
在上传和分割过程的内容里面,其实也提到过,对于Instagram Grid Maker而言,他是没有批量下载的功能的,它只能一张张的下载,当你点击拆分图片按钮后,Instagram Grid Maker才会开始真正的图片分割,你才可以去点击下载图片,一张张的去下载图片,使用体验上差那么一丢丢,倒也还能接受呢。
而Instagram Photo Splitter,还是比较强大的呢。它呢,不仅仅支持一张张的下载,还支持批量下载,一键下载全部的子图片。效率更高,使用体验更好。
移动设备兼容性
Instagram Grid Maker只能在PC上使用,在移动端上没法使用,没有对移动端设备做相应的适配。 Instagram Photo Splitter功能强大,对移动端设备做了支持,我在上篇文章中也提到过,还做了测试验证呢。感兴趣的,可以看这篇文章微信朋友圈九宫格图片怎么发
额外功能
My Social Boutique提供了丰富的Canva模板,这会方便专注于你的品牌内容等,而不需要你成为一名设计师,把精力花费在Canva上呢。这个功能,Instagram Photo Splitter没有呢,Instagram Photo Splitter仅仅只是一个免费的在线图片分割小工具。
用户体验总结
Instagram Grid Maker的使用步骤也算是比较简单,包括上传图片,点击拆分,一张张的图片下载,就完事啦,不需要注册账号,Instagram Grid Maker也是一个完全免费的Instagram 宫格制作器呢。总体上,Instagram Grid Maker使用体验还OK,能满足大多数用户的使用需求。
Instagram Photo Splitter相对来说更加强大,只需要上传图片,以及一键下载全部图片即可。同样呢,也不需要注册账号,都是完全免费的Instagram 图片分割工具。使用体验更加友好,相信绝大数用户都会喜欢上它的。
图片质量
经过对这两个工具分割的图片进行了比较发现,分割的图片质量还是不同的呢。 Instagram Grid Maker,对图片做了压缩,没有保留原图的质量,也没有保留图片格式。 而Instagram Photo Splitter不改变图片的质量,原图是什么样,分割后的图片就是什么样子,保留一样的图片格式,图片质量。
价格
Instagram Grid Maker提供了一些付费选项,这些付费项,是关于Canva的模版的,针对的是那些没有设计师经验的人群。对于Instagram Grid Maker的工具功能而言,是完全免费的,不需要用户注册,也没有额外的收费选项。
Instagram Photo Splitter是完全免费,整个网站就是一个工具站点,免费,无需登录就可以使用全部的功能。
适用场景
My Social Boutique的Instagram Grid Maker
适用用户群体:
- 社交媒体营销专业人士
- 品牌管理者
- 有一定设计基础的内容创作者
- 愿意投资于社交媒体工具的小型企业主
适用场景:
- 需要创建复杂、精美的Instagram布局
- 希望将Instagram布局与其他营销材料保持一致
- 需要额外的设计资源和模板
- 寻求全面的社交媒体营销解决方案
- 有预算投入到社交媒体工具中
imagesplitter.vip的Instagram Photo Splitter
适用用户群体:
- 个人Instagram用户
- 初学者和业余爱好者
- 预算有限的小型企业或自由职业者
- 偶尔需要制作网格布局的用户
适用场景:
- 需要快速、简单地创建基本的Instagram网格布局
- 主要关注图片分割功能,不需要额外的设计工具
- 希望使用免费工具来改善Instagram页面外观
- 偶尔需要制作特殊的拼图效果
- 需要在移动设备上快速操作
总结
My Social Boutique的Instagram Grid Maker更适合需要全面解决方案的专业用户和企业,而imagesplitter.vip的Instagram Photo Splitter则更适合寻求简单、免费工具的个人用户和小型企业。选择哪个工具最终取决于用户的具体需求、预算和技能水平。
如果只是需要图片分割,Instagram宫格制作,那么只考虑imagesplitter.vip的Instagram Photo Splitter即可呢。
引言
很多小伙伴都碰到这样的问题,如何把一张大图发成微信朋友圈9宫格的图片。这种展示方式在朋友圈列表里非常吸引眼球,看起来很有格调。看到别人发出来的效果那么好看,自然想要自己动手尝试,但却不知道该用什么工具,不知道如何下手。本文将为您详细介绍如何制作和发布微信朋友圈九宫格图片。
使用图片分割生成器发微信朋友圈九宫格图片
工具介绍
这里我们介绍一个非常实用的小工具: 图片分割生成器,链接地址是图片分割生成器。接下来,我们将手把手演示如何利用这个工具来生成9宫格图片,并上传到微信朋友圈。
电脑端操作步骤
- 上传图片
- 设置分割参数
- 下载分割后的图片
- 在微信中发布
 我们看截图,我把详细的步骤用数字1,2,3标记出来了,第一步呢,是上传图片,我们用到的这个小工具是网页版,不是小程序版,估计使用移动设备操作有一点小麻烦,会有一些不便之处,我们这里先在电脑上操作呢,电脑版的微信,现在支持发布朋友圈啦,我们用这个方式,也可以成功发布九宫格图片到微信朋友圈里面。
我们选择一张图片吧,这里我们选择这只可爱的柴犬,会飞的柴犬, 选择完毕后,看下图,可以看到我们的效果了,左侧是上传好的柴犬图片,右侧呢,是被分割成为9宫格效果图片合集了。

之前我们第一张图演示的时候呢,我们已经把要分割的参数调成了3*3,行和列都是3,这样拆分出来的就是9宫格效果啦。这就跟九宫格生成器的功能完全一样了。
然后呢,我们把拆分好的9宫格图片全部下载下来,虽然每个拆分的小图片是支持单独下载的,但是呢,为了方便快捷,我们还是使用Download All As Zip功能,把全部的图片打包下载下来。

我们看下载后的压缩包效果:

用解压缩工具解压这个zip包
 我们可以看到,大图按照顺序被分割为了9个部分,命名上也很清晰,从1到9。
接着呢,我们把拆分后的9宫格图片,发布上传到微信朋友圈里面去。
打开电脑端微信,进入朋友圈页面,点击发布按钮,选择我们刚刚的9宫格图片,可以看我下图。
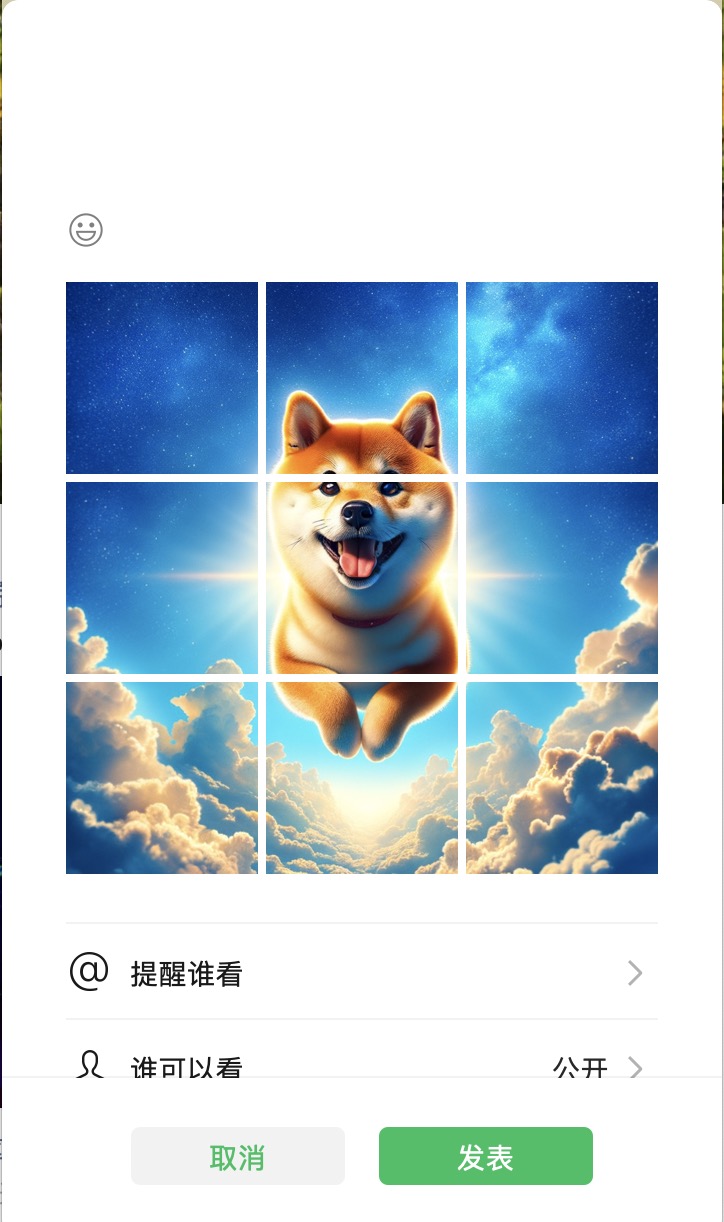 这就是我们添加图片后,展示的效果,这就是我们所期待的微信九宫格图片呢,没想到就这么简单,真是会者不难呀。
效果展示
发布出去炫耀一下,哈哈,好激动呀。看图。
 你们看,成功啦,非常开心,就这么简单就搞定了9宫格效果。请点赞转发支持一下呀。
用手机浏览器拆分图片发布到朋友圈
我们刚刚是在电脑端操作的,可平时,电脑不一定在身边,还是手机用的多,所以我准备用手机浏览器试试这个小工具OK不OK。 咱们开始吧。 这里我用的是Google浏览器,按道理小米浏览器,Oppo,vivo等各家的浏览器都是OK的呢。
移动端操作步骤
- 打开手机浏览器访问工具网站
- 上传图片并设置参数
- 下载并解压图片
- 在微信中发布
手机浏览器打开的效果。

可以看到,图片分割器这个网站还是做了移动端适配的呢,展示效果OK,接着呢,我们上传一张图片。我们这里传的是小黄人的图片😂
 这个是上传的图片,下面的部分是预览的效果。
 可以看到,在移动端设备上,同样OK,已经完美的生成了九宫格效果图。接下来呢,我们需要把九宫格图片保存下来。这里我们演示的是下载全部。手机上存在解压缩的问题,如果你的手机支持解压缩的话,就下载全部,然后把图片解压缩出来。看图,这是我解压缩出来的效果。
 跟在电脑上的表现效果一样,分成了9张图片,按照从1到9的命名顺序展示。
说明了,移动端设备同样可以使用这个图片分割器,那么现在是不是觉得,这个图片分割器也可以称之为微信九宫格生成器了呢。
移动端效果展示
看这两个图,就是效果图啦,很满足我们的九宫格需求。


推荐更多的九宫格生成器
网页版工具
移动应用
- iOS应用:九宫格切图-极简操作
- Android应用:九宫格切图制作
- iOS应用:分图-一键制作九宫格拼图4+
微信小程序
在微信中搜索以下关键词:
- 九宫格图制作
- 切九宫格图
结语
如果您发现这些工具还不能满足需求,欢迎给我发邮件联系:[email protected]。我会继续寻找更多资源来满足大家的需求。